Getting Started with JMap Admin
The following walk-through guide describes the major steps for configuring and publishing a map with JMap.
Make sure JMap Server is running. If it was installed as a service on Windows, you must start it using the Windows Services window. Otherwise, it must be started using the executables in JMAP_HOME/bin or using the shortcuts created during installation on the server.
To start JMap Admin, you can use the shortcut that was created during the installation inside the installation home directory, on the server. You can also open a web browser and type a URL similar to http://192.168.0.1:8080/jmapadmin. The IP address and port number may vary depending on the installation environment and parameters.
Once JMap Admin, is started, you will be prompted for a login username and password. The default login after installation is username "administrator" and the password field is empty.
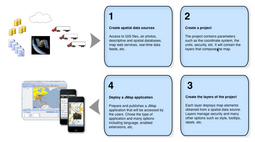
In JMap Admin, you will need to accomplish the following steps in order to publish map data.
Step 1 — Creating spatial data sources
This step requires that you define your spatial data sources. These can be GIS files, spatial data servers, satellite images, etc. When doing so, you indicate to JMap where to read your data from.
See section Creating Spatial Data Sources for more information.
Step 2 — Creating a project
A project in JMap contains map layer definitions data along with parameters regarding access controls (security), queries, units, etc. By creating a project, you define what information your map will contain and what it will look like.
See section Creating Projects for more information.
Step 3 — Creating layers inside the project
This step requires that you create your map layers inside the project. Each map layer is associated with a spatial data source. For each layer, you must define its style (how the layer elements will be drawn), reports, thematics, etc. You can also define access control on a layer by layer basis.
See section Creating Layers for more information.
Step 4 — Deploying an application
This is the last step. Here you publish your project using the application model of your choice. Each application model offers different levels of functionality. There are models for desktop, web and mobile applications. Once your application is deployed, users can start using it to navigate your map data.
See section Deploying JMap Applications for more information.
