Projects
Table of contents
- Creating Projects
- Configuring Projects
- Managing Projects
- Project Permissions
- Multilingual Projects
- Organizing Layers
- Attribute Queries
- Style Templates
- Personal Layers
In JMap, map data is organized in projects. A project is composed of an ordered list of layers. Typically, when a JMap application connects to JMap Server, the application opens a project and displays the project layers. You can create as many projects as you want.
Each layer of a project is associated with a spatial data source. The data source provides the data of the layer. Different projects can contain layers sharing the same data sources, allowing different data bindings, styles, etc. for the same data. Also, more than one layer in a project can share the same data source. This is useful when using layer filters to show different data of the same data source on multiple layers.
A project is a secured resource, which means that permissions are associated with it in order to control access by users. This allows precise control of which users or groups will be allowed to open each project. Similar access control is also available for each layer in the project.
Creating Projects
To create a new project, press Create in the section listing the projects. Projects are created by walking through a wizard.
| Identification | |
|---|---|
| Name | Enter a name for the new project. The name must be unique. |
| Description | Optionally enter a description for the new project. Used for administrative purposes. |
| Default language | Among the languages available, select the one that will be used by default when the requested language is unavailable or when translations are missing. For more information, refer to the Multilingual Projects section. |
| Available languages | Select one or more languages that will be supported by the project. All text elements in the project’s configuration (name of project, names of layers, mouseover bubbles, etc.) will have to be translated into each supported language. At least one language must be selected. For more information, refer to the Multilingual Projects section. |
| Usage statistics | Select this option if you wish to obtain usage statistics regarding this project, the layers it contains, and the public contexts that are created in the JMap Pro applications deployed from this project. |
| Automatically invalidate Mapbox tile cache | Select this option if you want to automatically invalidate the Mapbox tile cache. Mapbox is used to produce a vector cache and thus enhance JMap’s performance, especially for JMap Survey. The Mapbox cache is automatically deleted when: a layer is published, a published layer is deleted, attributes that are bound to a layer are added or deleted, a layer’s base filter changes, the spatial data source of a layer changes, or the project is deleted. The Mapbox cache is not automatically deleted when: an unpublished layer is added to the project, an unpublished layer is deleted from a project, minor changes are made to a layer (style, thematics, mouseover), or the order of attributes bound to a layer changes. |
| Parameters | |
|---|---|
| Map projection | Determines how the data will be displayed in the client applications. Any data that is in a different projection will be converted on the fly to this projection. Note that changing the map projection of a project invalidates the layer cache. This can temporarily reduce the performance of applications. |
| Map unit | The map unit is automatically selected according to the selected map projection. |
| Display unit | The unit used to display map coordinates. |
| Measurement | Geodetic: Distance and area measurements will be made using spherical calculations based on the projection’s ellipsoid. Cartesian using: Distance and area measurements will be made from calculations on the two-dimensional plane using the specified projection. |
| Distance unit | The unit used to display distances (measurements, zoom levels, etc.). |
| Minimum scale | The minimum scale of the map. Users cannot zoom out further when this limit is reached. |
| Maximum scale | The maximum scale of the map. Users cannot zoom in further when this limit is reached. |
| Background color | Default color to use for the background of the map. |
| Default selection color | Color of selected objects on the map. It can also be defined for each layer. |
Project source
When creating a project, you can either create a new empty project or import an existing project configuration from another source. When you use an existing configuration, you can automate the creation of the project’s layers and avoid reconfiguring everything in JMap Admin. Currently, only one option is available for importing a project configuration: importing projects from an ESRI ArcGIS REST Service.
Importing ArcGIS REST projects
You can choose to import the layer configuration from an ESRI ArcGIS REST service. JMap will import the project’s parameters, the layers and their symbology, the scale parameters, the extents, etc.
Select the ArcGIS REST option and click on Next.
| ArcGIS REST | |
|---|---|
| URL | Enter the URL of the ArcGIS Server REST service (e.g. http://sampleserver1.arcgisonline.com/ArcGIS/rest/services). Afterwards, click on Load to show the list of available layers. |
| Username | Enter the username to authenticate and log in to the ArcGIS REST service. |
| Password | Enter the password to authenticate and log in to the ArcGIS REST service. |
| Layers | Select the layers whose configurations you wish to import. JMap creates a layer in the project for each imported layer. The configuration of the JMap layer is similar to that of the original layer, but there may be some differences. |
JMap supports the import of OGC WMTS raster layers.
In the REST service layer import interface, icons indicate layers whose format is not compatible with JMap.
Configuring Projects
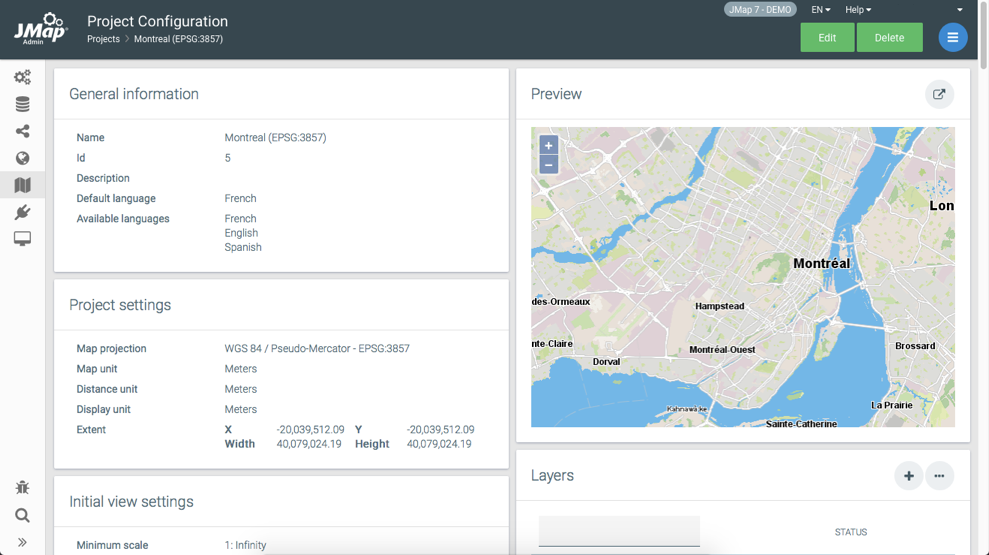
The configuration interface of a project allows you to access information on the project. This interface also contains functions to configure various parameters, such as the initial view of the project in the applications.
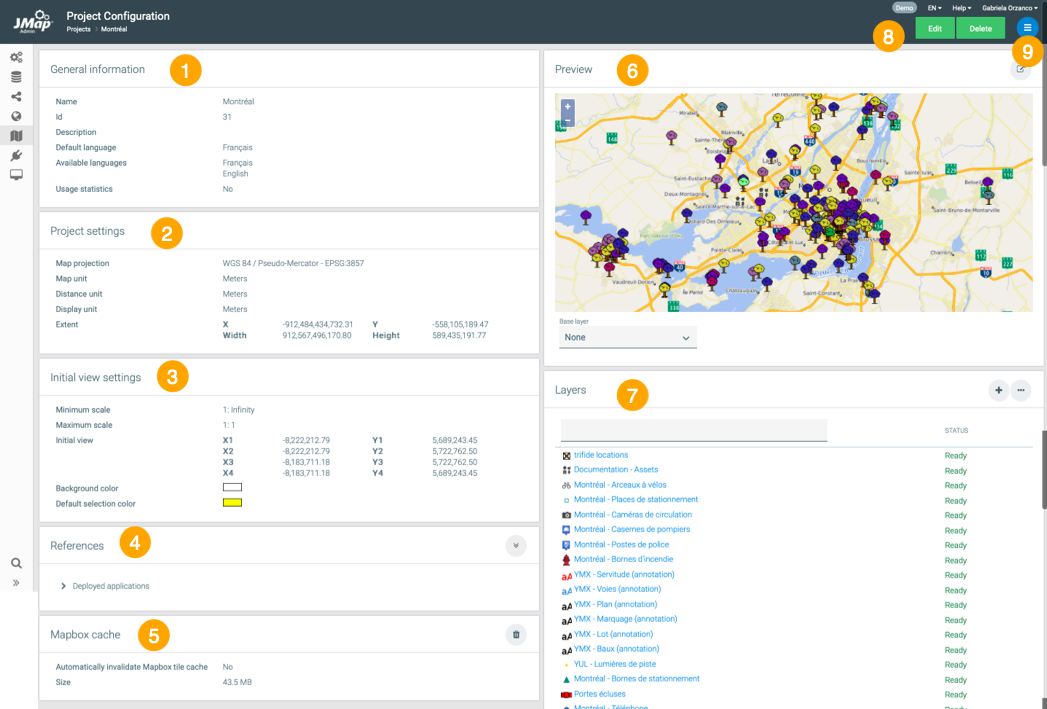
| 1 | General information. Information configured when creating the project. |
| 2 | Project settings. The project’s parameters. They are configured when the project is created. The project’s extent corresponds to the extent of the layers that make up the project. When the project does not have any layers, the values are equal to 0. |
| 3 | Initial view settings. These parameters are specified when the project is created. The initial view is defined by clicking on  in the Preview section. By default, the initial view corresponds to the extent of the project. When the project does not have any layers, the values are equal to 0. in the Preview section. By default, the initial view corresponds to the extent of the project. When the project does not have any layers, the values are equal to 0. |
| 4 | References. This section indicates the deployed applications that use this project. |
| 5 | Mapbox cache. This section provides information on the cache of the project’s vector components, which is produced using Mapbox. |
| 6 | Preview. This section displays when the project contains at least one layer. It shows a map preview, and you can zoom in or out on it. Click on to open a JMap Web Preview in a separate window or a JMap Pro Preview in which you can define the initial view and test the project configurations. You can select a base map for the JMap Web preview: None, OpenStreetMaps, Mapbox maps, and Bing maps, if they are available for your organization. |
| 7 | Layers. This section shows a list of the project layers and their statuses. Shortcuts allow you to access the interfaces to add and organize layers. |
| 8 | These buttons allow you to edit or delete the project configuration. |
| 9 | The menu allows you to access the Layers, Queries, Permissions and Image producer sections. |
JMap Web Preview
The JMap Web Preview opens a JMap Web application in a new browser window.
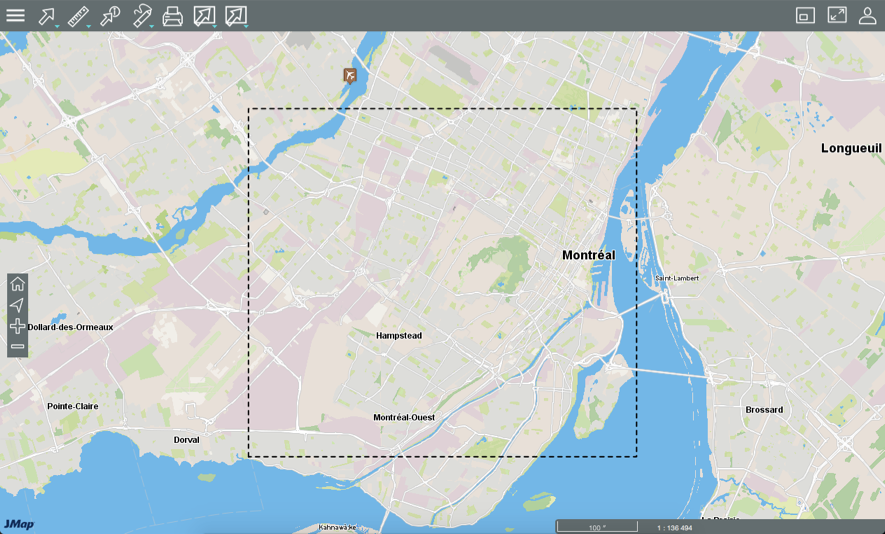
The preview offers all the functionality of JMap Web applications and allows you to validate the project’s configuration. It also allows you to configure the initial view of the project when it is opened in JMap Web applications. To do this, click on  and then on
  Initial extent. A rectangle displays to delimit the initial extent. Click on
  Maximum extent to display the maximum extent. When you close the preview, the geographic coordinates of the initial extent are automatically saved.
JMap Pro Preview
The JMap Pro Preview opens a JMap Pro application offering all the functionality of JMap Pro applications. You can validate the project configuration.
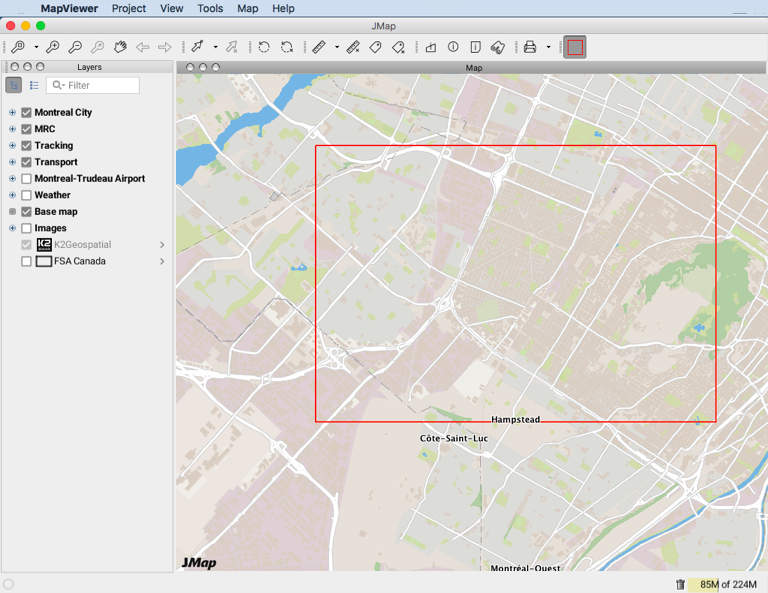
You can also delimit the initial view of the project, when it is opened in JMap Pro applications. Click on  . A rectangle displays to delimit the initial view. When you close the preview, the geographic coordinates of the initial view are automatically saved.
Image producer
The image producer of a JMap project is used to produce images on demand for that project. These images are used for JMap Web and JMap Mobile applications. When a user works in JMap Pro, the image producer is not used because the data is transferred in vector format (except for photos).
Normally, the image producer’s settings do not need to be modified because the default configuration is adequate. The following table describes the settings of the image producer.
| Memory settings | |
|---|---|
| Maximum size | The maximum amount of memory allotted to the project’s image producer. This memory is used to store the project’s vector data in order to accelerate the production of images. For very large projects, this setting can be increased. |
| Memory release | Determines the percentage of memory to be released when the memory of the image producer is saturated. |
| Thread pool settings | |
| Initial size | The number of threads determines the number of images that can be produced simultaneously. |
| Maximum size | If the number of threads increases due to high demand, this value limits the number of threads. |
| View wait timeout | The maximum period before an image request expires. This option is usually disabled. |
Managing Projects
The Projects section in JMap Admin displays a list of existing projects. From this section, projects can be created, cloned or deleted.
Modifying an existing project
A project can be modified by pressing Edit from the project detail section. Modifying a project goes through the same steps as when the project was created. If the projection of the project is changed, the vector data cache of the layers is cleared.
Cloning projects
You can clone an existing project by selecting it from the table and pressing Clone. All layers inside the project are copied to the new project. Note that the underlying spatial data sources and databases are not copied. Instead, they are shared between the layers of the new project and the layers of the old project.
Deleting projects
You can delete an existing project by selecting it in the table and clicking on Delete. You can also delete a project from its configuration section. Deleting a project permanently deletes all layer configurations included in it. The spatial data sources are not affected.
Project Permissions
From the project detail section, press Permissions to access the project permissions section. A list of currently allowed users and groups is displayed. Press  to add new users or groups and automatically grant them the Open this project permission. The available users and groups are configured in the JMap Server section in JMap Admin. See Managing User Accounts and Groups for more information about managing users in JMap.
Project permissions are divided into two categories: administrator permissions and user permissions.
Administrator permissions
Administrator project permissions define the project administration rights for the users authorized to use JMap Admin. For more information on concepts related to permissions and administration roles in JMap Admin, refer to the Managing Permissions section.
| Permissions | |
|---|---|
| Administrate project | Allows an administrator to modify the project and its content. |
| Access project | Allows an administrator to access a project to view its content and to use it when deploying JMap applications. |
User permissions
User project permissions determine which users and groups can open a project. Access will be denied to users who do not have the appropriate permissions. Security can also be configured at the layer level. For more information on this topic, refer to the Layer Permissions section.
| Permissions | |
|---|---|
| Open this project | Allows a user to open a project from a JMap application. |
Anonymous user
Adding the anonymous user to the list of users authorized to open the project gives users the possibility to open a project without any authentication. This is equivalent to removing all security for opening the project. This is useful for public applications, when no project access control is needed.
Everyone user
Adding the everyone user to the list of users authorized to open the project allows any authenticated user to open a project. This is useful for private applications where all users are allowed to open a project but must authenticate themselves.
Multilingual Projects
JMap projects can be configured to support several languages. This way, each user can view the project in his or her own language, as long as the language is available and the translations have been provided. When a JMap application is launched, it can automatically identify the language of the user’s operating system and use this language for the project and graphical interfaces. This behavior depends on the options selected when deploying the application.
For a project supporting multiple languages, each text element that is visible to the users can be translated into each language. For example, you can provide translations for the project name, the names of the layers, labels, mouseover bubbles, forms, etc.
To enable multilingual support, you must choose at least 2 languages when creating or editing a project. You must also select the default language.
| Languages | |
|---|---|
| Available languages | Select the languages that will be available for the project. At least one language must be selected. |
| Default language | Choose the default language among those that are available. When you enter text in the various configuration sections of the project and layers, you must enter it in the default language.If the user’s language is not supported for the project or if translations are missing, JMap will automatically use the default language. |
Afterwards, you can enter the translations in the sections identified with the  symbol when configuring the project and layers. The figure presents the translation interface for a project supporting 3 languages.
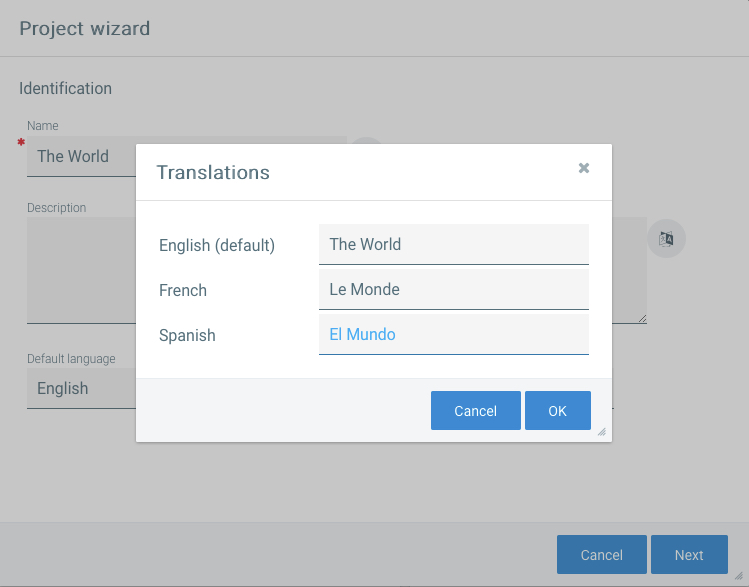
If translations are not provided in all available languages for certain text elements, the text will automatically be displayed in the default language.
Organizing Layers
There are two aspects to organizing layers in a project. One is to define the order of appearance of the layers on the map. Layers at lower positions are drawn first and layers at higher positions are drawn at the end. Top layers can hide elements of bottom layers. The other aspect is to create a logical hierarchy based on the nature of the layers. In other words, this allows the creation of groups (and subgroups) of layers that have a logical relationship. For example, there could be a group of layers related to roads, another to hydrography, and another to census. Organizing them in groups makes it easier for the users to work with layers.
To start organizing the layers, open the Layers section of the project.
Ordering layers
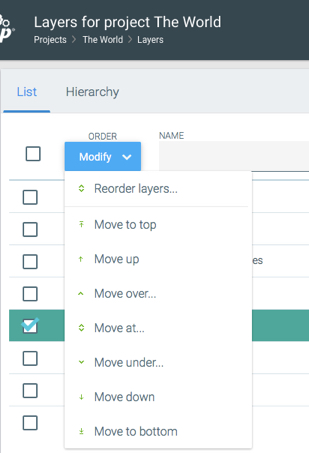
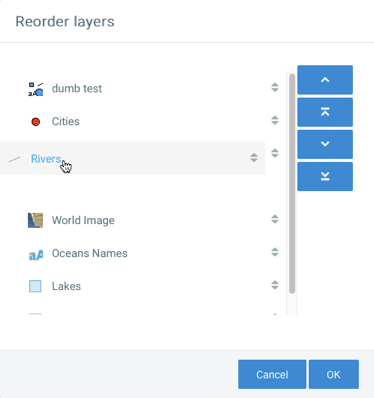
To order layers of a project, open the tab titled List. This section presents the layers in their order of appearance on the map. The lowest position is the first layer to be drawn on the map. To change the order, you must use the Modify menu located at the top of the column displaying the position of each layer. You can also select one or more layers and move them using the available options (Move up, Move down, Move at…, etc.). In addition, you can open a window displaying all the layers and reorder them using drag-and-drop actions.
Grouping layers
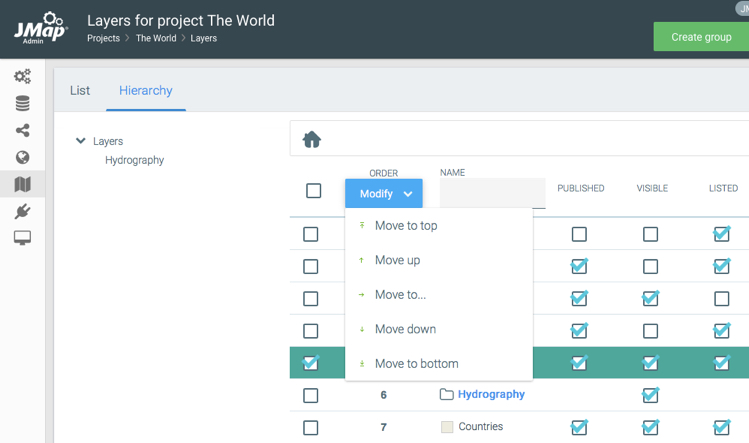
To organize layers in groups, open the tab named Hierarchy. This section presents the current hierarchy of layers. By default, all layers of the project are in one unique group called Layers. To create a new group, press Create group. Fill the layer group parameters as described below:
| Layer group | |
|---|---|
| Name | Enter a name for the new group. The name must be unique. |
| Description | Optionally enter a description for the new group. This description will be visible to users. |
| Visible | Makes the group initially visible when the project is opened. All visible layers inside the group will be displayed. |
| Always listed | Ensures the group is always listed (displayed in the layer management window ) even if it contains no layer. By default, empty groups are not listed. A group can be empty if it contains no layer, if all the layers it contains are not listed or if the user doesn’t have the permission to see the layers of the group. |
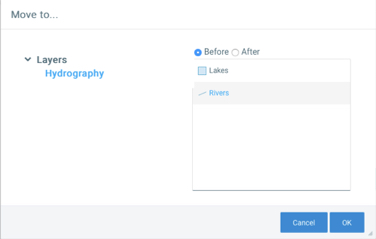
Once groups have been created, you can move layers towards these groups using the Modify menu located at the top of the column displaying the position of each layer.
Attribute Queries
Attribute queries are used to find and select elements of a map layer using their attribute values or a database associated with the layer. In JMap Admin, JMap administrators create the queries and their associated forms. Then, users of JMap applications use those forms to enter attribute values to search for. All elements whose attribute values match the values entered are then selected or listed in an elements explorer.
You can access the query configuration section by clicking on Queries in the Projects section.
Creating a new attribute query
To create a new query, press the Create query button in the Attribute queries section. This will open the query configuration interface. Parameters will vary depending on the type of query selected.
| Query | |
|---|---|
| Title | Enter a title for the query. Users will see this title in a list of queries. |
| Layer | Select the layer on which the query will be executed. A search field is provided to simplify layer selection. |
| Maximum scale | Specify the maximum scale used to present the results on the map. This is used to avoid zooming in too closely on the results. |
| Max. returned values | Specify the maximum number of elements this query can return. The query will refuse to execute if the return size is higher than this limit. This is used to avoid very long queries that could slow down the system. |
| Query templates | Basic: With this type of query, the search is only performed on the layer attributes. This is the simplest type of query. External database: With this type of query, the search is performed in an external database that has a field linking to an attribute of the layer. Setting up this type of query is more complex but offers more searching flexibility. |
Layer queries
| Layer queries | | | —————– | ———————————————————— | | WHERE | WHERE clause of the SQL query used to run the search. Here is where all the search criteria will be defined. Typically, this clause contains numbered parameters ($param1, $param2, etc.) that will be replaced by the values the user enters in the form.
Examples:
COUNTRY='$param1'
Selects the layer elements for which the attribute value COUNTRY is equal to the value entered by the user. The attribute value must perfectly match the value entered ($param1). lower(COUNTRY) like lower('$param1%')
Selects the layer elements for which the attribute value COUNTRY is similar to the value entered by the user. The attribute value must begin with the value entered ($param1). Since the lower operator is used, the search is not case sensitive.
POP2000>=$param1 and POP2000<$param2
Selects layer elements that have the POP2000 attribute value within the range defined by the two values that were entered ($param1 and $param2). | | Form layout | Press this button to configure the query form. See Forms for more information. |
External queries
This type of query is used when the search must be conducted within the data of an external database. The external database must contain a field that links to a layer attribute. A select SQL query is executed in the external database and the values returned are then associated with the layer elements using the link field.
| External queries | |
|---|---|
| Database | Select the database in which you would like to perform your query. |
| SQL query | Enter the SQL query that will be executed in the database to search for elements. Example: select * from cities where CITY_LANGUAGE='$param1'Searches the database selected above, in the cities table. Retrieves all fields of records for which the value of the CITY_LANGUAGE field is equal to the value entered by the user ( $param1). |
| Layer attribute | Among the layer attributes, indicate which one is used to link with the database. |
| Field | Among the fields returned by the SQL query, indicate which one is used to link with the layer. |
| Form layout | Click on this button to configure the query form. Refer to the Forms section for more information on this topic. |
Required and optional parameters
Although search forms are designed to mark fields as required or optional, the where clause of the query must be adjusted to support this option. To accomplish this, any part of the query that is associated with optional parameters must be included between braces ( { } ).
Example of WHERE clause:
CITY = '$param1' and { COUNTRY = '$param2' }
This example searches for cities for which the attribute value CITY is equal to the value of parameter 1 ($param1) entered by the user and who optionally have their value for the COUNTRY attribute equal to the value of parameter 2 ($param2) entered by the user. If parameter 2 is left blank , the entire block { COUNTRY = '$param2' } is removed from the query, along with the and operator, which is now an orphan. Note that the administrator must absolutely define $param2 as optional when designing the form. Refer to the Forms section for more information on designing forms.
Multiple values for the same parameter
Multiple values can be entered with a List (multiple choices) type field in the forms. The values are separated by the delimiter character ; (semicolon). This option can be activated in the WHERE clause of the query. The syntax is as follows:
$multiple{true|false} {$delimiter{;}}
Example:
CITY = '$param1{$multiple{true} $delimiter{;}}'
Searches for cities whose CITY attribute value is equal to one of the values entered in parameter 1. The values are separated by semicolons.
Managing attribute queries
Attribute queries can be modified by administrators. In JMap Dakar and later versions, when a project’s queries are modified, the applications that disseminate the project do not need to be redeployed because the changes are reflected directly.
Organizing attribute queries
Attribute queries can be organized into groups.This is particularly useful for projects that have a large number of queries.
To create a new group, click on the Create group button. To modify the order of groups, click on the Modify button and select Reorder groups. The window that is displayed allows you to drag and drop the groups in order to change their order. To rename a group, click on  . To delete a group, select it in the list and click on Delete.
Deleting attribute queries
Deleting an attribute query permanently deletes the query and its associated form. To delete a query, select it in the list and click on Delete.
Publishing queries
Once a query has been created, it is automatically published. However, you can disable this publication, which will make your query unavailable in applications, but its configuration will still be saved. If you do not want your query to be published, clear the Published checkbox of your query in the query management interface.
Queries on referenced layers
When a project contains referenced layers, the queries configured on these layers are automatically available in the project. The project “inherits” these queries.
You cannot modify these queries from the project; they can only be modified in the project that contains the original layer. If you wish to make changes to a query on a referenced layer, create a copy of the query by clicking on Clone. The configuration interface shows the search parameters that you can modify. Once the new query has been configured, you can clear the Published check box of the query that was “inherited” from the referenced layer if you no longer want it to be available in JMap applications.
If the Published check box is cleared for an attribute query on a layer, that query will no longer be available in the projects that use the referenced layer.
Style Templates
Style templates are predefined styles that can be reused across many projects and layers. They help save time because a style can be configured once but used at many places. Style templates also help create standardized maps.
Once a style template is configured, it can be used in every place a style is needed (layer styles, selection styles, thematics, etc.). A style template can be used as a reference or as a copy. When used as a reference, if the style template is modified, all layers that refer to it will also use the modified style. When used as a copy, the style is detached from the style template and can be modified independently thereafter.
Style templates are associated with only one type of map element (point, line, polygon, etc.) and cannot be used for other types of elements.
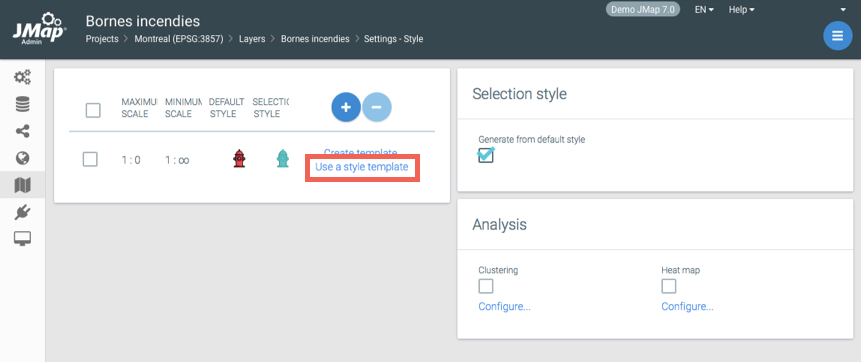
To use a style template, click on Use a style template from any style configuration interface. See Style for more information.
You can access the style template configuration section by clicking on Style templates in the Projects section.
Creating style templates
To create a new style template, press Create.
| Style templates | |
|---|---|
| Name | Enter a unique name for the style template. |
| Type | Select the element type associated with the new style template. Depending on the selected type, the style configuration interface will be different. |
| Description | Optionally enter a description for the style template. |
The rest of the configuration depends on the selected element type and is identical to normal style configuration. See Style for more information. Press Finish to complete the creation of the style template.
Deleting style templates
To delete a style template, select it in the list and press Delete.
Personal Layers
Personal layers are layers of data created and populated by users. When creating a new personal layer, the user specifies a name, a geometry type and a set of attributes. The layer configuration and the data (geometries and attributes) are stored in the JMap Server System database. Once they have been created, personal layers can be shared between users with a permission system. They can also be converted to normal layers inserted in a project by the administrator. Users need a special permission granted by the administrator to create personal layers.
You can access the personal layers section by clicking on Personal layers from the Projects section.
In JMap Admin, the administrator can see a list of existing personal layers. It can be displayed by personal layer or by user. When selecting a personal layer, you can see which users have access to it. When selecting a user, you can see which personal layers the user has access to. You can also click on a personal layer in the list to open its details section.
Deleting a personal layer
To delete a personal layer, select it in the list and press Delete. Be aware that deleting a personal layer also deletes its configuration and all its data. This action cannot be undone.
Publishing a personal layer
Publishing a personal layer transforms it into a regular project layer. Once it is published, a personal layer can no longer be managed by users. However, it can still be edited if the administrator grants the appropriate permissions to users. To publish a personal layer, select it in the list, press Publish and select the project in which the layer will be inserted.