Creating Objects
JMap Survey allows you to create objects, whether you are working online or offline.
To create an object:
-
Touch
 to view the types of objects that are available. Icons
  with legends are displayed. The types of objects that are available depend on the editable layers in the project and on your editing permissions. JMap Survey displays the available object types for which you have editing permissions.
-
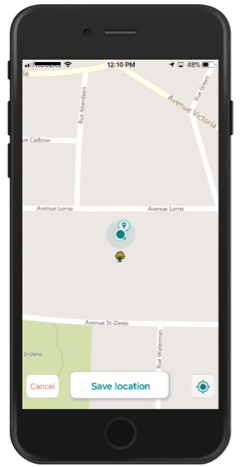
Select the type of object by touching its corresponding icon. The map displays to define the object’s location.
-
If you are creating a point object, it will automatically be located at your current position. You can change the location of the object by touching the map; it will be placed on the point you touch. Touch
 to bring the point object back to your current position.
 -
If you are creating a polygon or line element, touch the map to position each point of the polygon or line on the map. A number will be assigned to each point.
-
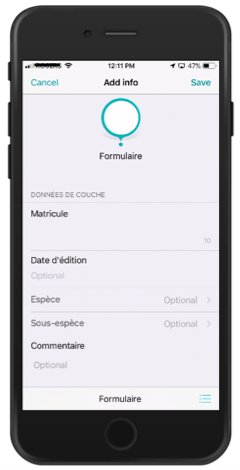
Touch Save location to confirm the entry of your object, or touch Cancel to erase it. If you confirm the entry of the object, a form appears, inviting you to enter the object’s attributes.
-
Enter the appropriate information in the form’s fields. Some fields are required (you cannot save the form unless the field has a value) and others are optional; the latter are identified with the text Optional.
Fields where you must select one or more values from a list will contain an arrow
 . Touch the arrow to display the available values and make your selection.
Text fields indicate the maximum number of characters allowed for your text. The number changes as you enter your text, indicating the remaining characters available. You can use the voice function of your phone to orally indicate the value of the field. The text is transcribed automatically.
Numeric fields indicate the minimum and maximum values authorized. If you try and enter text, it will not be inserted.
Date fields display a calendar when you touch them.
-
Touch
 to add a photo to the form. Three options are available: Take picture, use a photo from the Photo library or Cancel.
 -
Select Take picture. JMap Survey will ask permission to use your device’s camera. This authorization will only be asked once, and your answer will be remembered.
-
Take a picture and validate it, or take another picture. As soon as you take a picture, a screen opens, allowing you to enter a comment for the picture.
-
Enter your comment and touch Save to save your picture or X to cancel photo creation. You can use the voice function of your phone to orally indicate the comment. The text is transcribed automatically.
-
Select Photo library to access your photo library and select one or more photos. As soon as you select the photo, the screen to enter comments is displayed.
-
Enter your comment and touch Save to save the picture or X to cancel photo creation. You can use the voice function of your phone to orally indicate the comment. The text is transcribed automatically.
-
Your form can contain subforms for entering data at different points in time or in different contexts. If relevant, touch the subforms field to access the subforms screen.
-
Touch
to add a subform. The subform will contain fields that are similar to those in the form. -
Enter the relevant information and photos.
-
Touch OK to save the subform. The subform will close. The Subforms field indicates the number of subforms associated with the form. The number represents the subforms created by all of the project’s users.
-
Touch Save to save the form’s data or Cancel to delete the data.
-
Touch
 to display the available forms for your type of object. Several forms can be available for each type of object.