Configuring the JMap Documents Extension
Table of contents
- Selecting the data sources to which documents can be associated
- Configuring document depots
- Managing depots
The JMap administrator installs the extension by selecting the installation file for the platform used. Once it is installed, the extension is automatically displayed in the Extensions section of JMap Admin. The Documents extension contains components for JMap Server, JMap Pro (client), and JMap Web. The extension is therefore displayed in the respective tabs of the Extensions section.
To configure Documents in JMap Admin, follow these three steps:
-
Indicate the spatial data sources to which documents can be associated.
-
Configure the document depots.
-
Integrate the extension when deploying JMap Pro and/or JMap Web applications.
Selecting the data sources to which documents can be associated
Follow these steps to select the spatial data sources to which documents can be associated:
-
In the Extensions/Documents section, click on
 and then on Data sources to open the configuration wizard.
 -
Click on
 to add a data source.
 -
In the menu, select the Data source name and the Attribute name to use in order to establish the association between each element of the data source and the documents.
-
Click on Add to add the data source.
-
Click on
to add other data sources. -
Click on Save to save the data.
Configuring document depots
The second step to configuring Documents consists of creating and configuring the document depots. To do so:
-
In the Extensions/Documents section, in the Server tab, click on Documents to open the configuration interface.
-
Click on Create to open the depot configuration wizard.
-
Enter a Name and a Description for the depot.
-
Select the Type of depot. Three options are available:
File system: A directory located in the server’s file system, which contains documents in the form of files.
Hyperlink: A table in JMap’s System database, which contains hyperlinks to URLs.
SharePoint: A connection to the Microsoft SharePoint electronic document management system.
The steps to create a depot vary depending on the type of depot, but the subsequent steps are similar for all three types of depots.
Creating a depot
File System
-
Enter the information requested by the Document depot wizard.
Primary depot location Indicates the location of the depot in the server’s file system. Click on Browse… in order to browse the file system. Browsable Select this option to allow JMap Pro users to browse the depot. Allow sub dirs creation Select this option to enable JMap Pro users to create subdirectories in the document depot. Additional depot locations Indicate alternative paths to access the depot. Click on to add alternative paths. -
Click on Finish to create the depot and return to the depot configuration interface. The name of the depot is displayed in the table.
-
Click on the name of the depot to access its configuration interface.
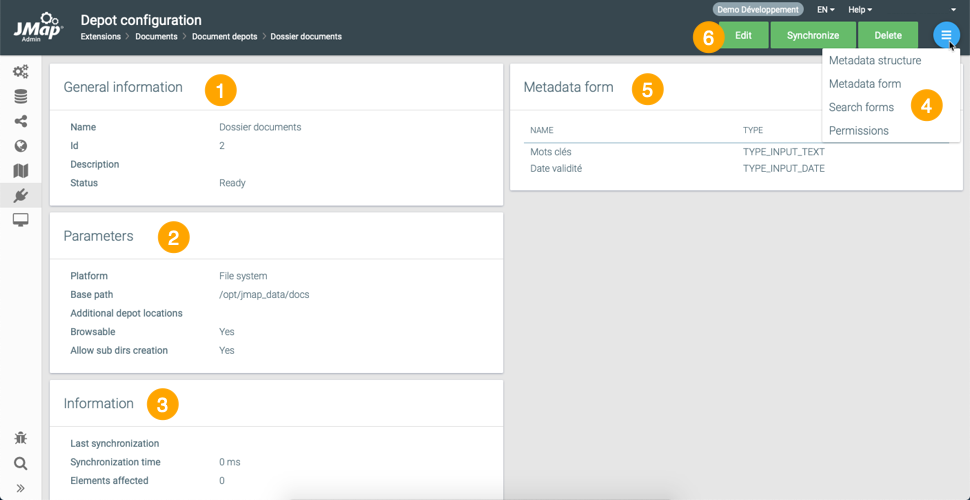
1 General information: This section displays information on the depot, including its name, its Id, its description, and its status. 2 Parameters: This section displays detailed information on the depot’s characteristics. 3 Information: This section presents data related to the depot’s synchronization. 4 Click on to access the configuration interfaces for the Metadata structure, Metadata form, Search forms, and Permissions.5 When the metadata forms are configured, they are displayed in this section. 6 These buttons allow you to Edit, Synchronize or Delete the depot.
Hyperlink
-
In the Document depot wizard, select Hyperlink as the Type, and click on Finish to create the depot and return to the depot configuration interface. The name of the depot will be displayed in the table.
-
Click on the name of the depot to access its configuration interface.
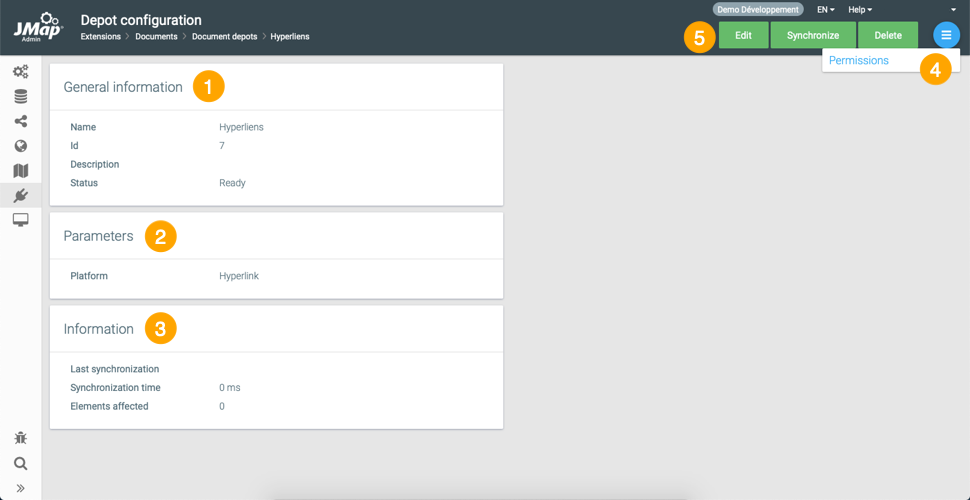
| 1 | General information: This section displays information on the depot, including its name, its Id, its description, and its status. |
| 2 | Parameters: This section displays detailed information on the depot’s characteristics. |
| 3 | Information: This section displays data related to the depot’s synchronization. |
| 4 | Click on to access the configuration interface for Permissions. |
| 5 | These buttons allow you to Edit, Synchronize or Delete the depot. |
SharePoint
-
Enter the information requested by the Document depot wizard.
URL Enter the URL of the library containing the documents in SharePoint. User Indicate which user has permission to access the documents in SharePoint. Password Enter the password. Browsable Select this option to allow JMap Pro users to browse the depot. Allow sub dirs creation Select this option to enable JMap Pro users to create subdirectories in the document depot. Metadata The metadata that is available is extracted from SharePoint and displayed on the left. Select the metadata that will be used to create and/or search for documents. -
Click on Finish to create the depot and return to the depot configuration interface. The name of the depot is displayed in the table.
-
Click on the name of the depot to access its configuration interface.
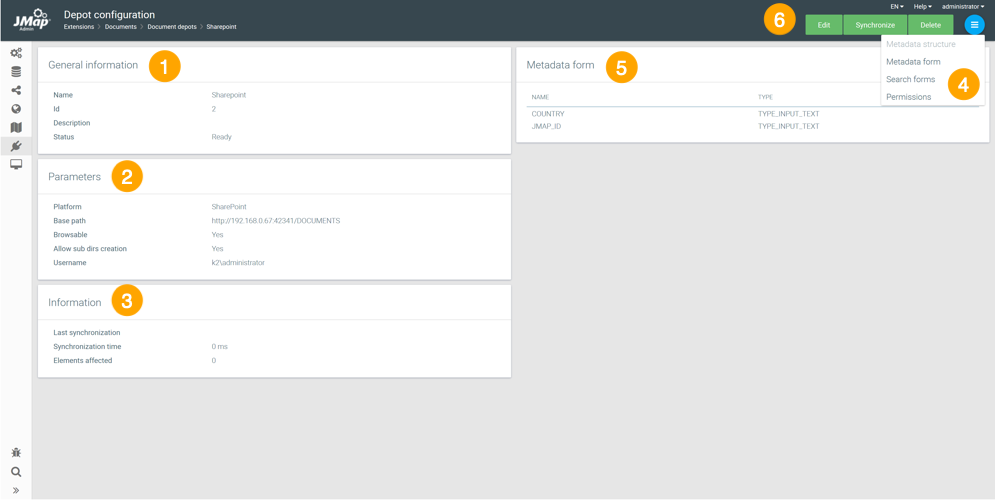
1 General information: This section displays information on the depot, including its name, its Id, its description, and its status. 2 Parameters: This section displays detailed information on the depot’s characteristics. 3 Information: This section presents data related to the depot’s synchronization. 4 Click on to access the configuration interfaces for the Metadata form, Search forms, and Permissions.5 When the metadata forms are configured, they are displayed in this section. 6 These buttons allow you to Edit, Synchronize or Delete the depot.
The metadata structure is provided by the SharePoint server, and you must not configure it. From the SharePoint metadata structure, you can directly configure the metadata form and the search forms.
Configuring a depot
These steps are similar for all types of depots.
Configuring permissions
You must configure the permissions for accessing the depot. To do so, in the depot configuration interface, click on and then on Permissions:
-
In the Permissions tab, click on
to open the Available users window and add the user(s). -
In the users table of the Permissions tab, select the users.
-
Tick the boxes of the permissions you wish to grant to the selected users. The following permissions are available:
-
Read: Allows a JMap Pro, JMap Web or JMap Survey user to open the list of documents or hyperlinks of the depot associated with an element, to open a document, and to download it.
-
Register documents: Allows a JMap Pro user to add a document or a hyperlink to the depot from the local server.
-
Delete: Allows the user of a JMap Pro application to delete a document or a hyperlink from the depot.
-
Associate: Allows a JMap Pro user to associate one or more layer elements with one or more elements or hyperlinks from the depot.
-
-
Click on Save.
Configuring the metadata structure
This step only applies to File System depots. You must configure the depot’s metadata structure, i.e. the attributes containing the metadata of each document. This information is stored in a table created by the depot’s database system. From this structure, you can configure the search and metadata forms.
-
In the depot configuration interface, click on
and then click on Metadata structure. -
In the Metadata structure window, click on
to add an attribute. -
Enter the name of the attribute, select its SQL type, and select the check box if the attribute must be indexed.
-
Click on
to add another attribute or click on  to eliminate an attribute.
 -
Click on Save to save the information and close the window.
Configuring the metadata form
This form allows a JMap Pro user to add or edit the attribute values that constitute the metadata of a document when that user adds a new document to the depot.
-
In the configuration interface of the depot, click on
and then click on Metadata form to open the Form layout interface. The JMap form components are available. The Forms section of the JMap administrator manual provides details on this topic. -
Select the form components.
-
Configure each component by selecting the relevant attribute and its characteristics.
-
Click on Save to record the information and close the window. The form attributes are displayed in the Metadata form section (section 5 in the figure above) in the depot configuration interface.
Configuring the search forms
This form allows a JMap Pro or JMap Web user to search for documents associated with map elements using their metadata. The attributes available in the form are the attributes that were defined in the metadata structure. To configure a search form, follow these steps:
-
In the depot configuration interface, click on
and then on Search forms. -
Click on Create to create a new form.
-
Enter a name for the form and click on Form layout to open its configuration window. The Forms section of the JMap administrator manual provides details on this topic.
-
Select the form components.
-
Configure each component by selecting the relevant attribute and its characteristics. The Name and Description attributes are available by default to create a basic search form.
-
Click on Save to record the information and close the window. The forms you created are displayed in the Search forms interface.
Managing depots
The depot configuration interface contains a table that displays the depots configured in the Documents extension. From this interface, you can also Create, Synchronize and Delete depots, and select the data sources to which documents can be associated by clicking on . You can select several depots to synchronize them or delete them in batches.
The table displays the name, status, platform, last update time, and internal ID of each depot.
| Status | |
|---|---|
| Error | Indicates that the depot is not available for use because its configuration contains errors. |
| Job queued | Indicates that the depot is waiting to be synchronized. |
| Ready | Indicates that the depot is ready and available for use. |
| Platform | |
|---|---|
| File system | Indicates that the depot’s type is File system. |
| Hyperlink | Indicates that the depot’s type is Hyperlink. |
| SharePoint | Indicates that the depot’s type is SharePoint. |
Synchronizing depots
This function can also be accessed from the configuration interface of each depot.
When JMap Pro users delete documents or hyperlinks from a depot, these elements are not deleted from the table in JMap’s System database; they remain listed in the table but the “obsolete” status is assigned to them. In order to delete documents, hyperlinks, and their spatial data source associations from the System database table, you must execute the Synchronize function. This is a way to optimize the performance of depots and of the Documents extension.