Tracking stores the location and telemetry data of mobile units in a database. Thus, you can access the history of their activity for analysis and mapping purposes.
To view the history of mobile units, you must start by defining the period for which you wish to display the mobile units' activity.
Defining a period of time for data selection
The period is the time frame for which Tracking considers the activity data of mobile units to display their history and routes and to analyze them.
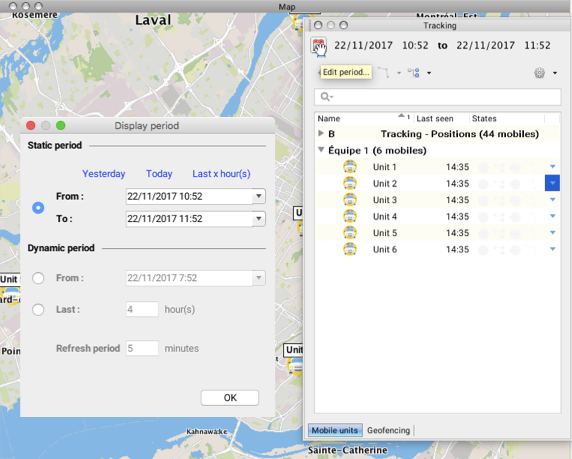
To define a time frame, click on the Edit period...  icon located in the Mobile units tab of the Tracking window. The Display period configuration interface appears.

Two different types of periods can be configured: a static period and a dynamic period. The static period is set between two moments (start and finish) and has a fixed duration. As for the dynamic period, either its duration or start date is variable.
Static period
This time frame is set between a start and end date and has a fixed duration. By default, the static period is set to 1 hour before you logged in.
Several options are available to configure a static time period.
Yesterday: The period is set on the day before the time frame was configured, between 0:00 and 23:59.
Today: The period is set on the day the time frame is configured, between 0:00 and 23:59.
Last x hour(s): The period is set a certain number of hours before the time frame was configured.
From and To: Allow you to manually define the date and time that the period of time starts and ends.
Dynamic period
This type of period has a variable duration or a variable start date. Two options are available to configure it:
From: Allows you to set the start time and date of the period, which extends to the present. In this case, the duration of the period is variable.
Last: Allows you to define a fixed number of hours for the duration of the period, starting from the present moment. In this case, the start date of the period of changes over time.
The dynamic period changes in real time as the GPS sends data to JMap. You can define the data refresh frequency in the application, by specifying the period in minutes in the Refresh period field.
Once you have defined the period for which the location and activity data is displayed, you can select one or more mobile units to view the history.
Viewing the activity history of a mobile unit
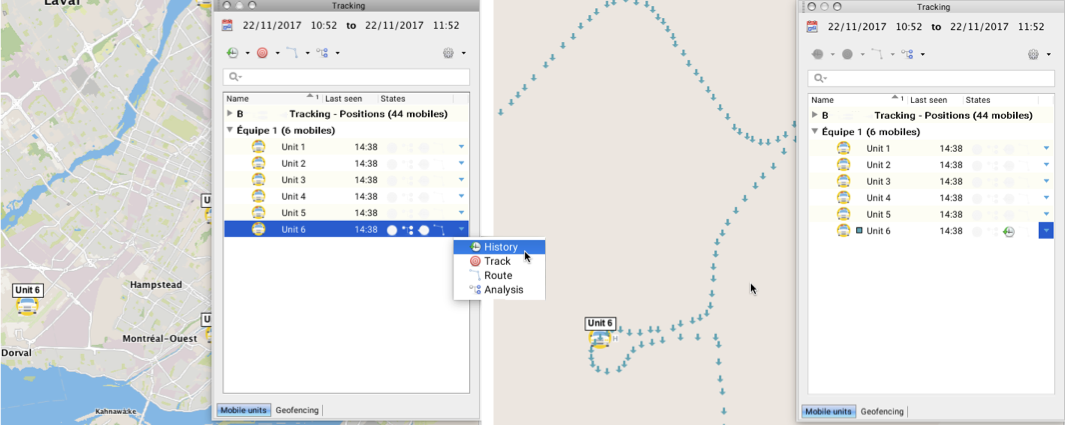
1.Click on  to open the functions menu for the mobile unit whose history you wish to view.
2.Click on History  to enable the function. The symbol
  appears in the States column.
The map interface displays the route traveled by the mobile unit in the time period previously defined. The route is made up of points corresponding to each positioning data item received by Tracking.
A square of the same color as the route appears in the Name column of the mobile unit in the Tracking window. This means that the history is enabled.
In the map interface, the mobile unit's symbol is surrounded by a box and marked with an H, which indicates that the history is displayed.

3.Click on  again to disable the function. The points representing the route are no longer shown on the map interface; the box and the H are no longer shown on the mobile unit's symbol either.
You can use this process to enable the History function of several mobile units on the same layer or on different layers, using the functions menu of each layer.
Viewing the history of several mobile units
1.Click on the mobile unit to select it. By pressing and holding the CTRL key you can select several mobile units. The function buttons of the Tracking window are enabled.
2.Click on History menu  to display the options available.
3.Click on Show history for selected mobiles. The symbol  displays in the States column of each mobile unit selected.
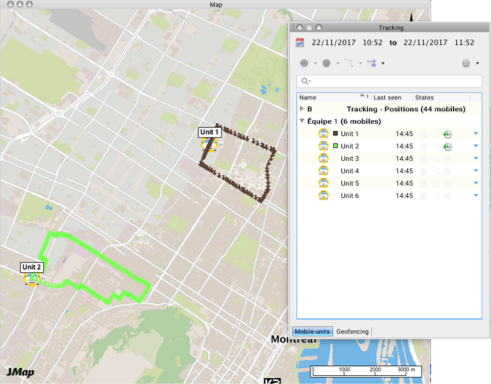
The map interface displays the routes of the mobile units in the time period previously defined. The routes are made up of points corresponding to each data item received by Tracking.
A square of the same color as the route appears in the Name column of each mobile unit in the Tracking window. This means that the history is enabled.
In the map interface, the symbol of each mobile unit is surrounded by a red box and marked with an H, which also indicates that the history is displayed.

4.Select the mobile units for which you no longer want to display the history.
5.Click on History  to display the available options.
6.Click on Hide history for selected mobiles. The symbol  in the States column is disabled for the selected units.
The box surrounding the units and the H are no longer displayed in the map interface. The Tracking window's function buttons are also disabled.