Geofencing consists of defining geofences (or sets of rules) to manage the activity of mobile units and receive alarms when the rules are infringed.
Rules may be based on spatial constraints related to the mobile unit's position, or they may be based on a mobile unit's attribute values. Demarcating an area the mobile unit cannot leave is an example of a rule with a spatial constraint; imposing a speeding limit is an example of a rule related to an attribute of the mobile unit.
Rules can also have a time component, as their application can be restricted to a specific period of time.
You can create, edit, enable, disable, and delete geofences using the functions in the Geofencing tab of the Tracking window.
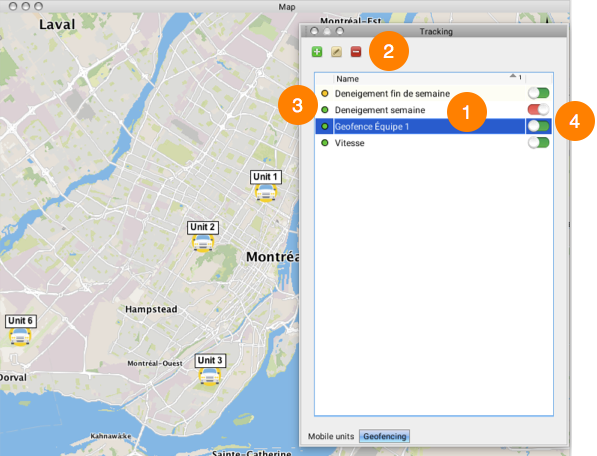
1 |
The list of geofences. You can sort them by name. Double-click on the name of a geofence to open its configuration interface. |
2 |
Functions to:  Create a geofence. Create a geofence. Edit a geofence. Edit a geofence. Delete a geofence. Delete a geofence. |
3 |
Indicates if the geofence is enabled |
4 |
Indicates if the geofence is enabled ( |
Creating a geofence
To create a geofence:
1.Click on the Add  button. The geofence's creation interface displays.
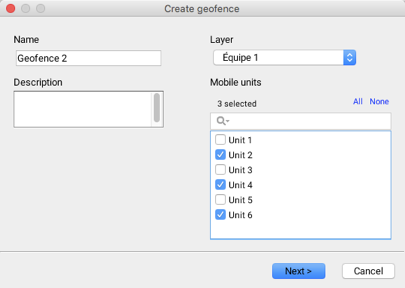
2.Enter a name for the geofence.
3.Describe the geofence (optional).
4.Select the layer managed by Tracking to which the geofence applies.
5.Select the mobile units of the layer to which the geofence applies.
6.Click on Next. The rules configuration interface displays.
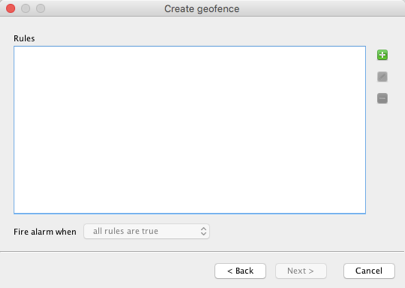
7.Click on the Add  button to create a rule. The Create rule interface displays.
8.Select the Type of rule you wish to create. Two options are available: Attribute value and Geolocation.
9.If you selected Attribute value as the type, configure the rule's settings:
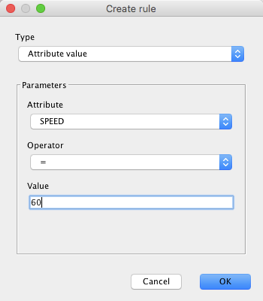
Attribute: the drop-down menu lists the attributes that are available in the layer to create the rule.
Operator: the drop-down menu lists the available operators, based on the type of data of the attribute. The operators are: equal to (=), greater than or equal to (>=), greater than (>), lower than (<), lower than or equal to (<=), and different from (!=).
Value: The reference value (a speed value, for instance).
10.If you selected Geolocation as the type, configure the rule's settings:
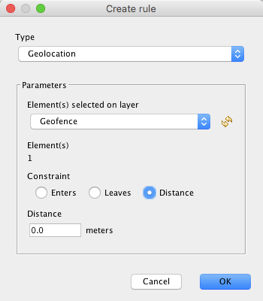
Element(s) selected on layer: The drop-down menu shows the layers in which you have selected elements. These elements can be polygons, lines or points. They represent the regions used to define the spatial constraints.
Element(s) indicates the number of elements selected in the layer.
Constraint: Indicates the relationship between the mobile units and the element selected in the layer, which triggers an alarm or an action. There are three constraints:
Enters, when the mobile unit enters the selected element;
Leaves, when the mobile unit leaves the selected element;
Distance, when the mobile unit moves away from the value indicated.
Distance: The value used to define the Distance constraint.
Note: When you create a zone to apply a Geolocation type rule, the polygon, line or point created is copied in a new map layer. This layer is associated to the rule. If the layer is modified, the rule will not reflect the changes, therefore, the rule must be edited.
11.Click on OK to create the rule. You are returned to the rules configuration interface.
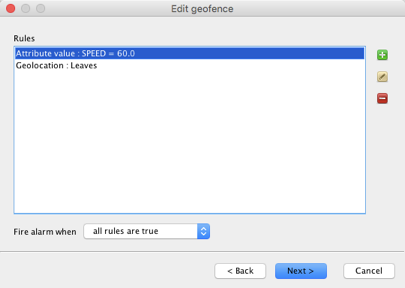
The rules are listed, along with their type and the constraint associated with them.
You can add new rules with Add  , edit rules with Edit
  or delete rules with Delete
  .
.
Rules can be independent from one another. All rules apply to the selected mobile units.
You can choose to fire an alarm when all rules are true or when at least one rule is true. If you select the latter, you cannot select the rule that will fire the alarm.
Tracking verifies the data involved in the geofences at a frequency configured by the JMap administrator (the default is every 10 seconds). However, to fire an alarm, all data received in the specified time interval is analyzed. An alarm is fired if data received in the time interval violates a rule.
12.Click on Next to move on to the next step. The wizard displays the interface to configure the geofence's time component.
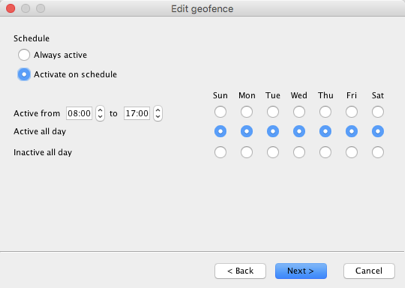
The Schedule section allows you to determine if the geofence will be Always active or if it will Activate on schedule. The second option allows you to set the time period of the geofence's activity.
For each day of the week, you can indicate that the geofence will be active for a specific period of time or for the entire day, or you can indicate that it will be inactive all day.
13.Click on Next. The notifications management interface displays.
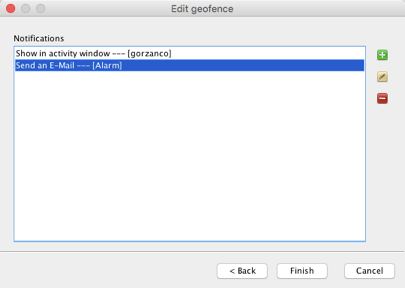
Notifications are listed along with their type and their recipients, if applicable.
You can add new notifications using Add  , edit notifications using Edit
  , and delete notifications using Delete
  .
.
14.Click on the Add  button to create a notification. The Create notification interface displays.
15.Select the Type of notification you wish to create. Two options are available: Show in activity window or Send an E-Mail. The latter can send either an email or a text message.
16.If you select Show in activity window as the type, configure the notification's settings: click on  to add recipients. You can select these among the users who have access to the application.
Once you have selected the notification's recipients, click on OK to complete the configuration. You are returned to the notifications creation interface. You can add or delete recipients for the notification.
17.If you select Send an E-Mail as the type, configure the notification's settings: Recipient, Subject, and Message. In the Recipient field, you can put an email address if you want to send an email. If you want to send a text message, enter the phone number in the following format: 10-digit phone number@pcs.phone company.com (1234567890@pcs.xxxxxxx.com, for example).
Once you have completed the configuration, click on OK. You are returned to the notifications management interface.
18.Click on Finish to complete the geofence's configuration.
The notifications displayed in the activity window will enable the  button in the application toolbar. The number indicates how many notifications were received; to view these:
1.Click on  to display the geofencing alarms interface.
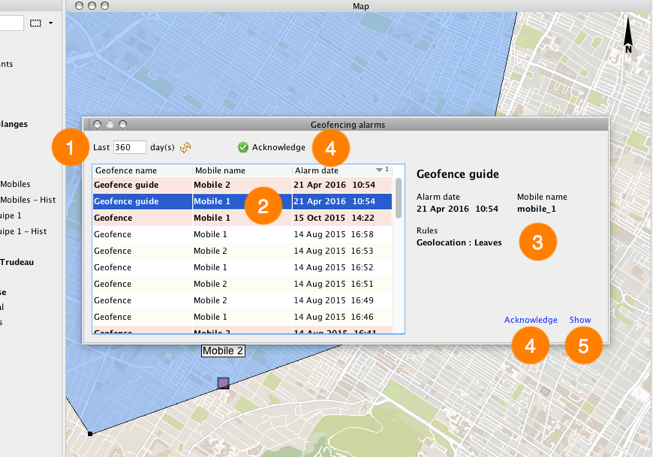
1 |
You can indicate a period to display the notifications received within that time frame. All alarm notifications are stored in the database, but you can choose to display only the most recent ones. |
2 |
The list of notifications received, along with the name of the geofence, the name of the mobile unit associated with it, and the date the alarm was produced. Click once to display the notification details. Click twice to display, in the map interface, the position of the vehicle at the moment when the notification was produced. |
3 |
Notification details. |
4 |
The Acknowledge function indicates that you have seen the notification. When you click on one of the buttons, the notification row turns white. Notifications whose details you haven't viewed are shown in pink. |
5 |
The Show function allows you to view, in the map interface, the vehicle's position at the moment when the notification was produced. |
You will receive an email or a text message for each notification sent.

 or disabled
  .
. ) or disabled (
 ) when viewing the map, based on the activity time period defined for that geofence.