Forms
Table of contents
- Form Designer
- Layer Attributes Forms
- Database Forms
- Permissions of database forms
- Form validation rules
- Attribute Query Forms
In JMap, forms are used for attribute queries to enter the search parameters, to enter attribute values of editable layers and to manage data stored in databases. This is always done in relation with the elements of a layer. A type of form called a subform can also be accessed from another form.
The JMap administrator designs the forms using the form designer. Afterwards, users can use them in JMap Pro, JMap Web, and JMap Survey. Depending on access permissions, users can use data entry forms to view, add, modify or delete data.
To enter the attributes of a layer’s elements, JMap generates a default form if none has been created. This simple form shows all available attributes. In general, it is much more convenient to create a form adapted to your needs.
The following sections explain the form creation process in detail and the functionality of each type of form.
Form Designer
The interface of the form designer allows you to define the content and layout of the forms used to enter attributes and perform queries.
Forms are organized in a grid, and you can configure the number of rows and columns. Columns and rows can be added to the grid at any moment. All empty rows at the bottom of the form and empty columns at the right of the form will be automatically eliminated when the form is saved.
Each cell of the grid can contain a component of the form (label, text entry field, value list, etc.) but each component can also span several cells horizontally.
Each form can have one or more sections. The user can move from one section to another within a form. This can be especially useful if the form is long or complex.
The following image shows the main parts of the form designer.
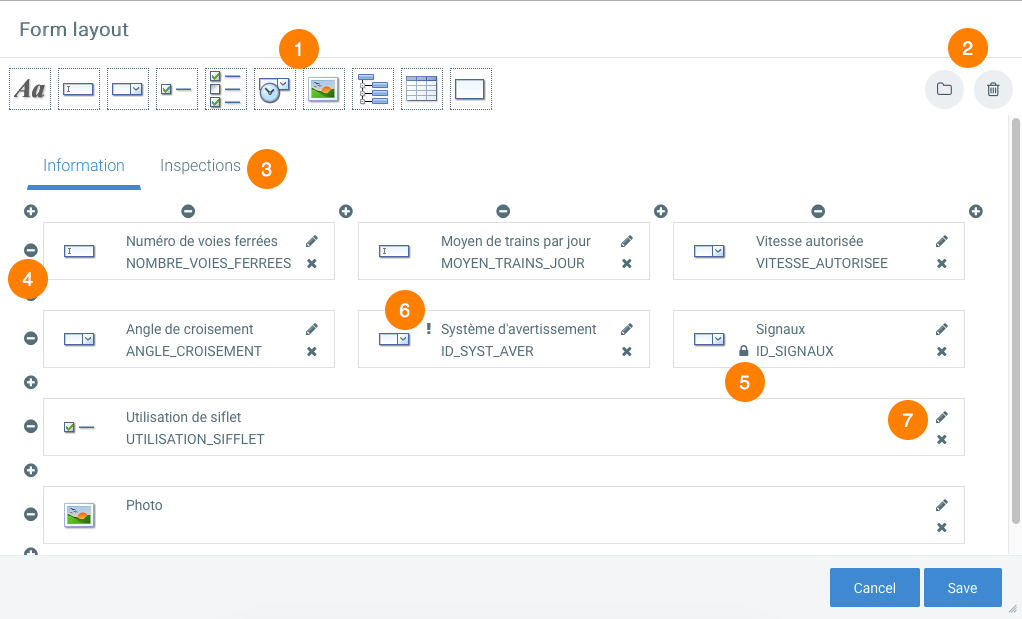
| 1 | Drag a component to a cell in the form. All available cells are highlighted. |
| 2 | Click on  to create a new section, to delete an existing section or to rename a section.Click on to create a new section, to delete an existing section or to rename a section.Click on  to reset the entire form. to reset the entire form. |
| 3 | These tabs allow you to access the different sections. |
| 4 | Click on the  and and  buttons to insert empty rows or columns where required. buttons to insert empty rows or columns where required. |
| 5 | The  symbol indicates that the component is in read-only mode. symbol indicates that the component is in read-only mode. |
| 6 | The  symbol indicates a required field. symbol indicates a required field. |
| 7 | The  button allows you to modify the component’s parameters. The button allows you to modify the component’s parameters. The  button allows you to remove the component from the form. button allows you to remove the component from the form. |
Most form components must be associated with either a layer attribute, a database field or a search criterion, depending on the type of form created. The Label, Photo, and Group components are exceptions to this rule.
Component settings
Each type of component has its own configuration window. The settings allow you to control the behavior and appearance of the component. The following table describes some of the settings that are common to several components. A comprehensive description of available components is provided further below.
| Form component settings | |
|---|---|
| Attribute | Select the layer attribute or the query variable to which this component is associated. This is the attribute or variable that the form component will provide. |
| Required | Determines if this is a required field. The user cannot submit the form until all required fields have been populated. To make a field optional, you must unselect this option. Required fields are identified with a  in the form designer. in the form designer. |
| Read only | Select this option to make this a read-only component. The user will not be able to modify the content. This option should be used to modify a component with a default value. |
| Column span | By default, each component occupies only one cell. For a component that spans several cells horizontally, enter the number of cells the component will span. Cells occupied by a spanned component are labeled Spanned. |
| Tooltip | This text is displayed in a tooltip when the user places the mouse pointer on this component. |
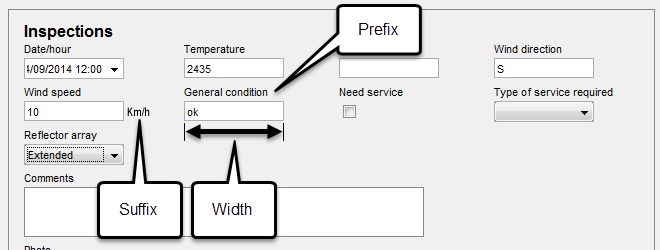
| Label (prefix) | Enter static text that will appear above the component. |
| Label (suffix) | Enter static text that will appear on the right of the component. |
| Width (pixels) | Specify the width in pixels of the component entry field, excluding the suffix label. The default value is 100. The width of each column of the form will automatically be the same as the widest component in the form. |
| Default value | Optionally enter a default value to initialize the data entry field. You can use certain functions to initialize the default value of a component. |
The following table describes the various components available to create forms and their specific settings. Note that some components are not available to create attribute queries.
| Form components | |
|---|---|
 Label Label | Static text to be displayed in the form. The text’s alignment (left, right, center) can be specified, along with the font style used to display the text. Certain functions can be used in the label text. |
 Text Text | A field used to enter an alphanumeric value. The associated field must be alphanumeric or numeric. Input mask: An input mask can be used to control the format of the value entered. Multiline: (alphanumeric fields only) If this option is enabled, the entry field will cover several lines of text, making it easier to enter longer text. Max. number of characters: (alphanumeric fields only) Determines the maximum length of the text a user can enter. This must comply with the restrictions of the database field containing the data. Range validation: (numeric fields only): Allows you to define a range of accepted values (e.g. from 0 to 100). |
 List (single choice) List (single choice) | A list of values from which only one value can be selected. The associated field must be numeric or alphanumeric. The values in the list can be provided in several different languages if your project supports multiple languages. The list can be dynamic, which means its content can be modified dynamically based on the selection of a value from another list. For instance, when selecting a country in a list, another list will be refreshed dynamically to display only the cities of the selected country. Parent attribute If the list must be dynamic, select the parent attribute. In order to link list B (child) to a list A (parent), you must begin by selecting the parent attribute for list B (the attribute associated to list A). If there is a change in the value selected in list A, the content of list B will be updated. The values of list B are determined by the relationship between its values and the values of the parent attribute. If list B has only one value, it is selected automatically. The values in the list can be entered manually or they can be taken from a database or another source: Values Enter the values in the space provided, indicating, for each one, the parent value (only if the list is dynamic), the value to use in the database and the label to display in the list. This value will be used as the data. The label is only used for the information the user will see. If the value and the label are the same, enter the same value twice. If the list is not dynamic, leave the parent value blank. Get values from a database You must select the database from which you wish to obtain the values. Afterwards, enter an SQL query that will be executed to obtain the parent values (only if the list is dynamic), the values, and the labels to be displayed. Normally, labels must be unique and sorted. The following examples use the MY_TABLE table. 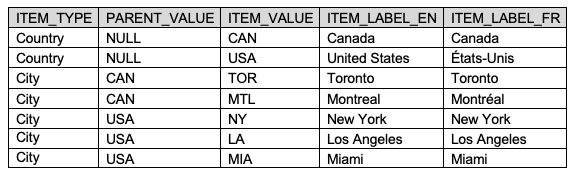 Example: List of countries, available in English and in French. This list is not dynamic. It is associated with a COUNTRY attribute. select * from MY_TABLE where ITEM_TYPE = 'Country' order by ITEM_VALUE;In this example, the ITEM_VALUE field contains the value, the ITEM_LABEL_EN field contains the name of the country in English, and the ITEM_LABEL_FR field contains the name of the country in French. There is no parent value because the list is not dynamic (it does not have a parent list). Example: List of cities, available in English and in French. This list is dynamic. Its parent attribute is COUNTRY, which is associated with the previous list. It lists the cities for the country selected in the parent list. select * from MY_TABLE where ITEM_TYPE = 'City' order by ITEM_VALUE;In this example, the ITEM_VALUE field contains the value, the ITEM_LABEL_EN field contains the name of the city in English, and the ITEM_LABEL_FR field contains the name of the city in French. The PARENT_VALUE field contains the parent value. Important: The SQL query of a child list must include the field that allows you to establish the relation with the parent values. The previous example used select to include all the fields in the queries. Note: At times, values to be displayed in a list come from a table associated to a spatial data source stored in JMap Server’s System database. In such a case, the name of the physical table cannot be known. To solve this, you can use this simple approach: instead of entering the name of the table, enter the ID of the layer preceded by the acronym “DS” between dollar signs $.Example: select distinct ID_CITY, CITY from $DS27$ order by CITYProvider Other sources may be available to provide the values and labels. If this is the case, you can select this option and choose the source in the list of available sources. |
 List (multiple choices) List (multiple choices) | A value list from which one or more values can be selected. The associated field must be alphanumeric. The value saved in the field is the list of selected options, separated by commas (,). The values in the list can be entered manually or they can come from a database or another source. Refer to List (single choice) for more information. |
 Check box (true or false) Check box (true or false) | Populates the associated field for which there are only 2 possible values. The 2 possible values must be specified and be character strings (e.g. true or false) or numerical values (e.g. 0 or 1). If the associated field is boolean, you must use true and false. Checked value: Value to be recorded if the check box is selected. Unchecked value: Value to be recorded if the check box is not selected. |
 Calendar (single date) Calendar (single date) | Allows you to select a date. The layer attribute or the field used for the query must be of one of the following types: date, datetime or timestamp. Date format: This is the format that the calendar component will use to display the selected date. If the user enters the date manually, he or she must also use this format (e.g. dd/MM/yyyy, yy/MM/dd H:ss, etc.). |
 Photo (unavailable for attribute query forms) Photo (unavailable for attribute query forms) | This component allows the user to insert images in a form. In JMap Survey, it allows the user to take photos with the device’s integrated camera. In JMap Pro, JMap Web or JMap NG, the user can select existing images to insert in the form or in the subform. This component cannot be present more than once in the same form or subform. For a layer attributes form, the photos can be stored in the JMap Server System database (in this case, no configuration is required) or in an external database. When this component is added to a database form, the photos must be stored in an external database. You must then define all required parameters for storing the photos. Storage: Choose the JMap option to store the photos in JMap’s System database (only available for layer attribute forms). Photos selected by the users are copied in the JMAP_HOME\db\documents directory, and the relation between the layer element and the photo is added to the JMAP_DOCUMENTS table in the System database. Choose the External option to store the photos in the database or in the directory of your choice. The relation between the layer element and the photo is stored in the table and database of your choice. If you select External, you must define the entire configuration that follows. Delete photos with elements: Select this option if you want the photos associated with an element to be deleted automatically if the element is deleted. This option is not enabled by default. Database: Select the database where the photos must be stored. This database must be configured beforehand in JMap Admin. Table: Select the table that will contain the information on the photos. This table must have the following structure. The name of the table and fields may vary. 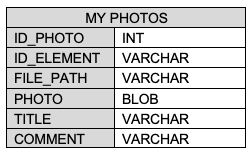 The BLOB field is not required if the photos are stored on the drive and not in the database. Refer to the Photos persistence option for more details. Photo ID field: Select the field in the table that will contain the photo’s unique numerical identifier. Element ID field: Select the field in the table that will contain the attribute identifying the layer element. This attribute is called the key attribute and it is selected when the spatial data source associated with the layer is created. File name field: Select the field in the table that will contain the name of the file for the photos. Photo title field : Select the field in the table that will contain the photo’s title. Photo comment field : Select the field in the table that will contain the photo’s comment. This field contains 255 characters. Photos persistence: Choose the Database option to save the photos directly in the database, in a BLOB field existing in the table. You must then select the BLOB field. Choose the Disk option to save the photos in a folder of the server’s file system. You must then enter the photos folder that will contain the photo files. Note: Photo title field and Photo comment field are new features of JMap 7 Istanbul. If you update your JMap 7 Hanoï server to JMap 7 Jakarta, to allow JMap users to add a title and comments to photos, you must edit the forms to select the fields in the table that will respectively contain the title and comments of the photos. |
 Tree (tree of values) Tree (tree of values) | This component displays a value tree structure with N levels. The user can select a value in the tree, leaf or branch. This value will be stored in the associated attribute. The associated attribute must be alphanumeric. The values of the tree can be provided in several languages if your project supports multiple languages. The tree shows a parent-child data structure, like the dynamic lists that are linked to one another. However, unlike dynamic lists, the tree is associated to just one attribute. The tree’s values can be entered manually or they may come from a database or another source: Values Enter the values in the space provided as you build the tree structure. For each value entered, you can define the parent (or the root of the tree). Get values from a database You must select the database from which you wish to obtain the values. Afterwards, enter an SQL query that will be executed to get the values from a table with a parent-child relationship. The following example uses the MY_TABLE table. Example: Tree containing countries (level 1) and cities (level 2), available in English and French. select * from MY_TABLE;In this example, the ITEM_VALUE field contains the value, the ITEM_LABEL_EN field contains the name of the country or city in English, and the ITEM_LABEL_FR field contains the name of the country or city in French. The PARENT_VALUE field contains the parent. With this configuration, JMap will build the following tree: 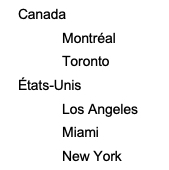 |
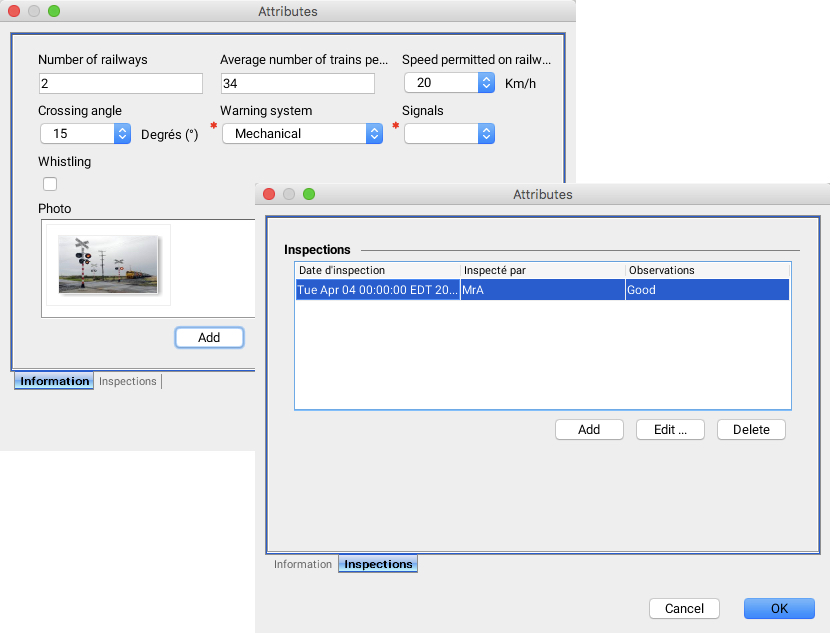
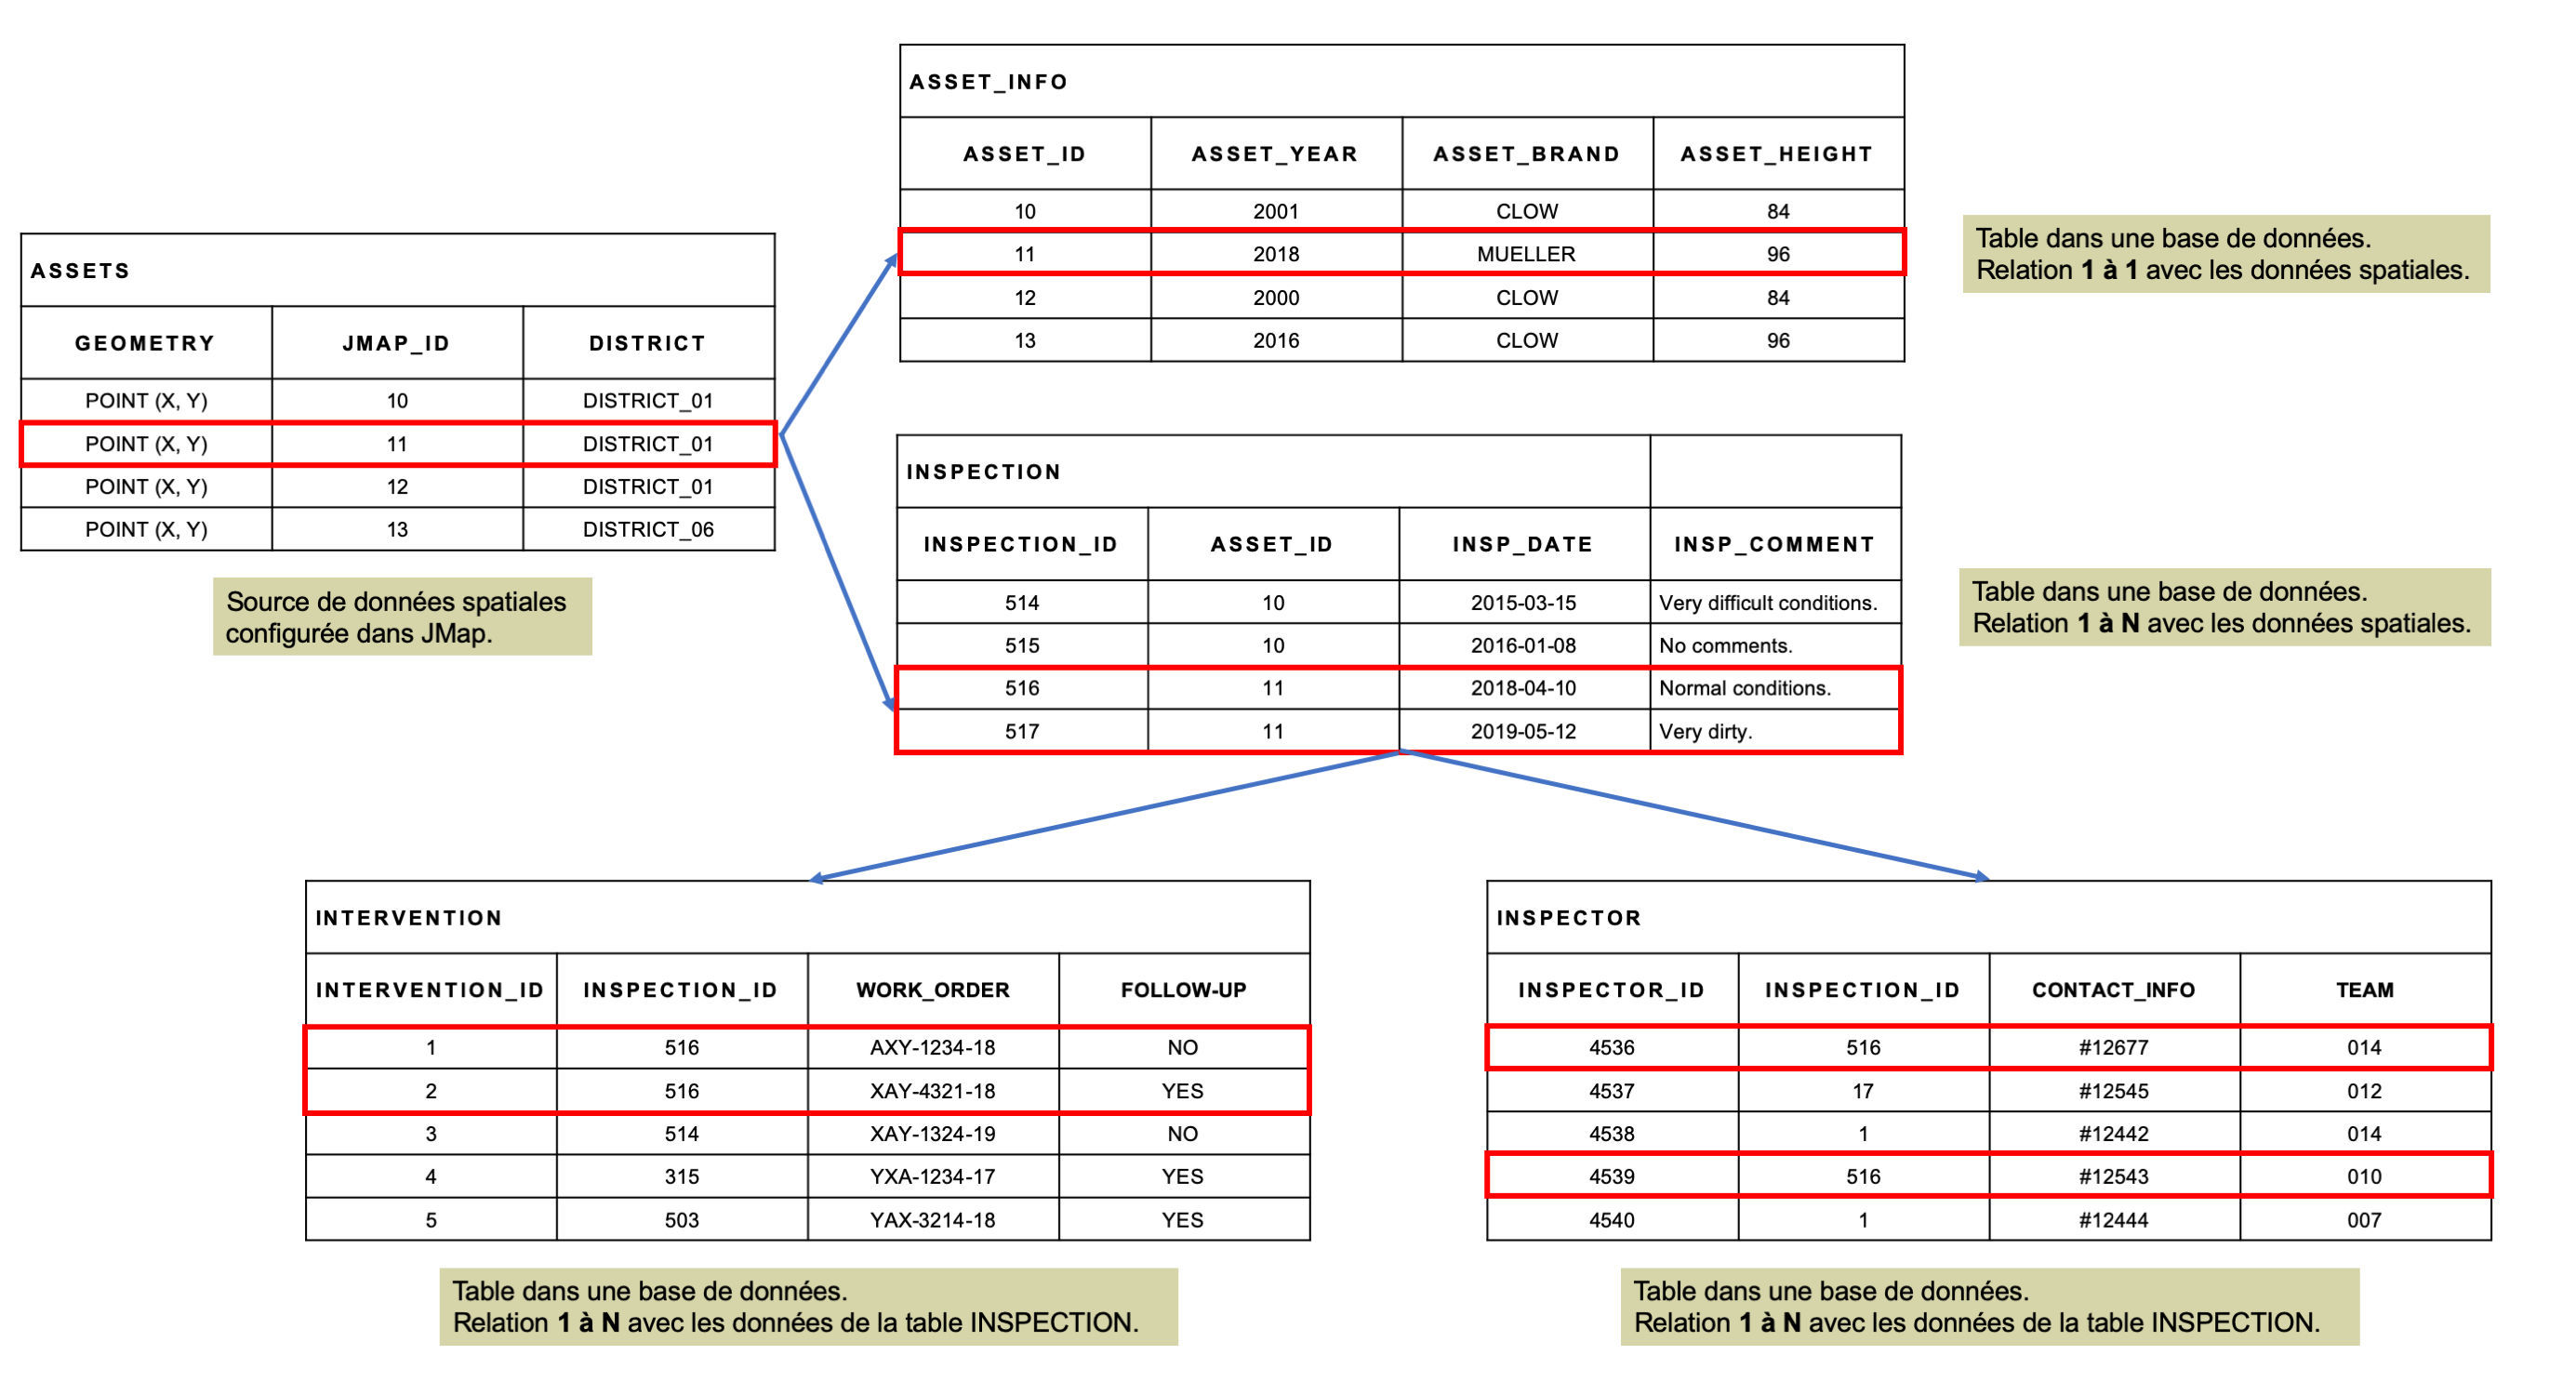
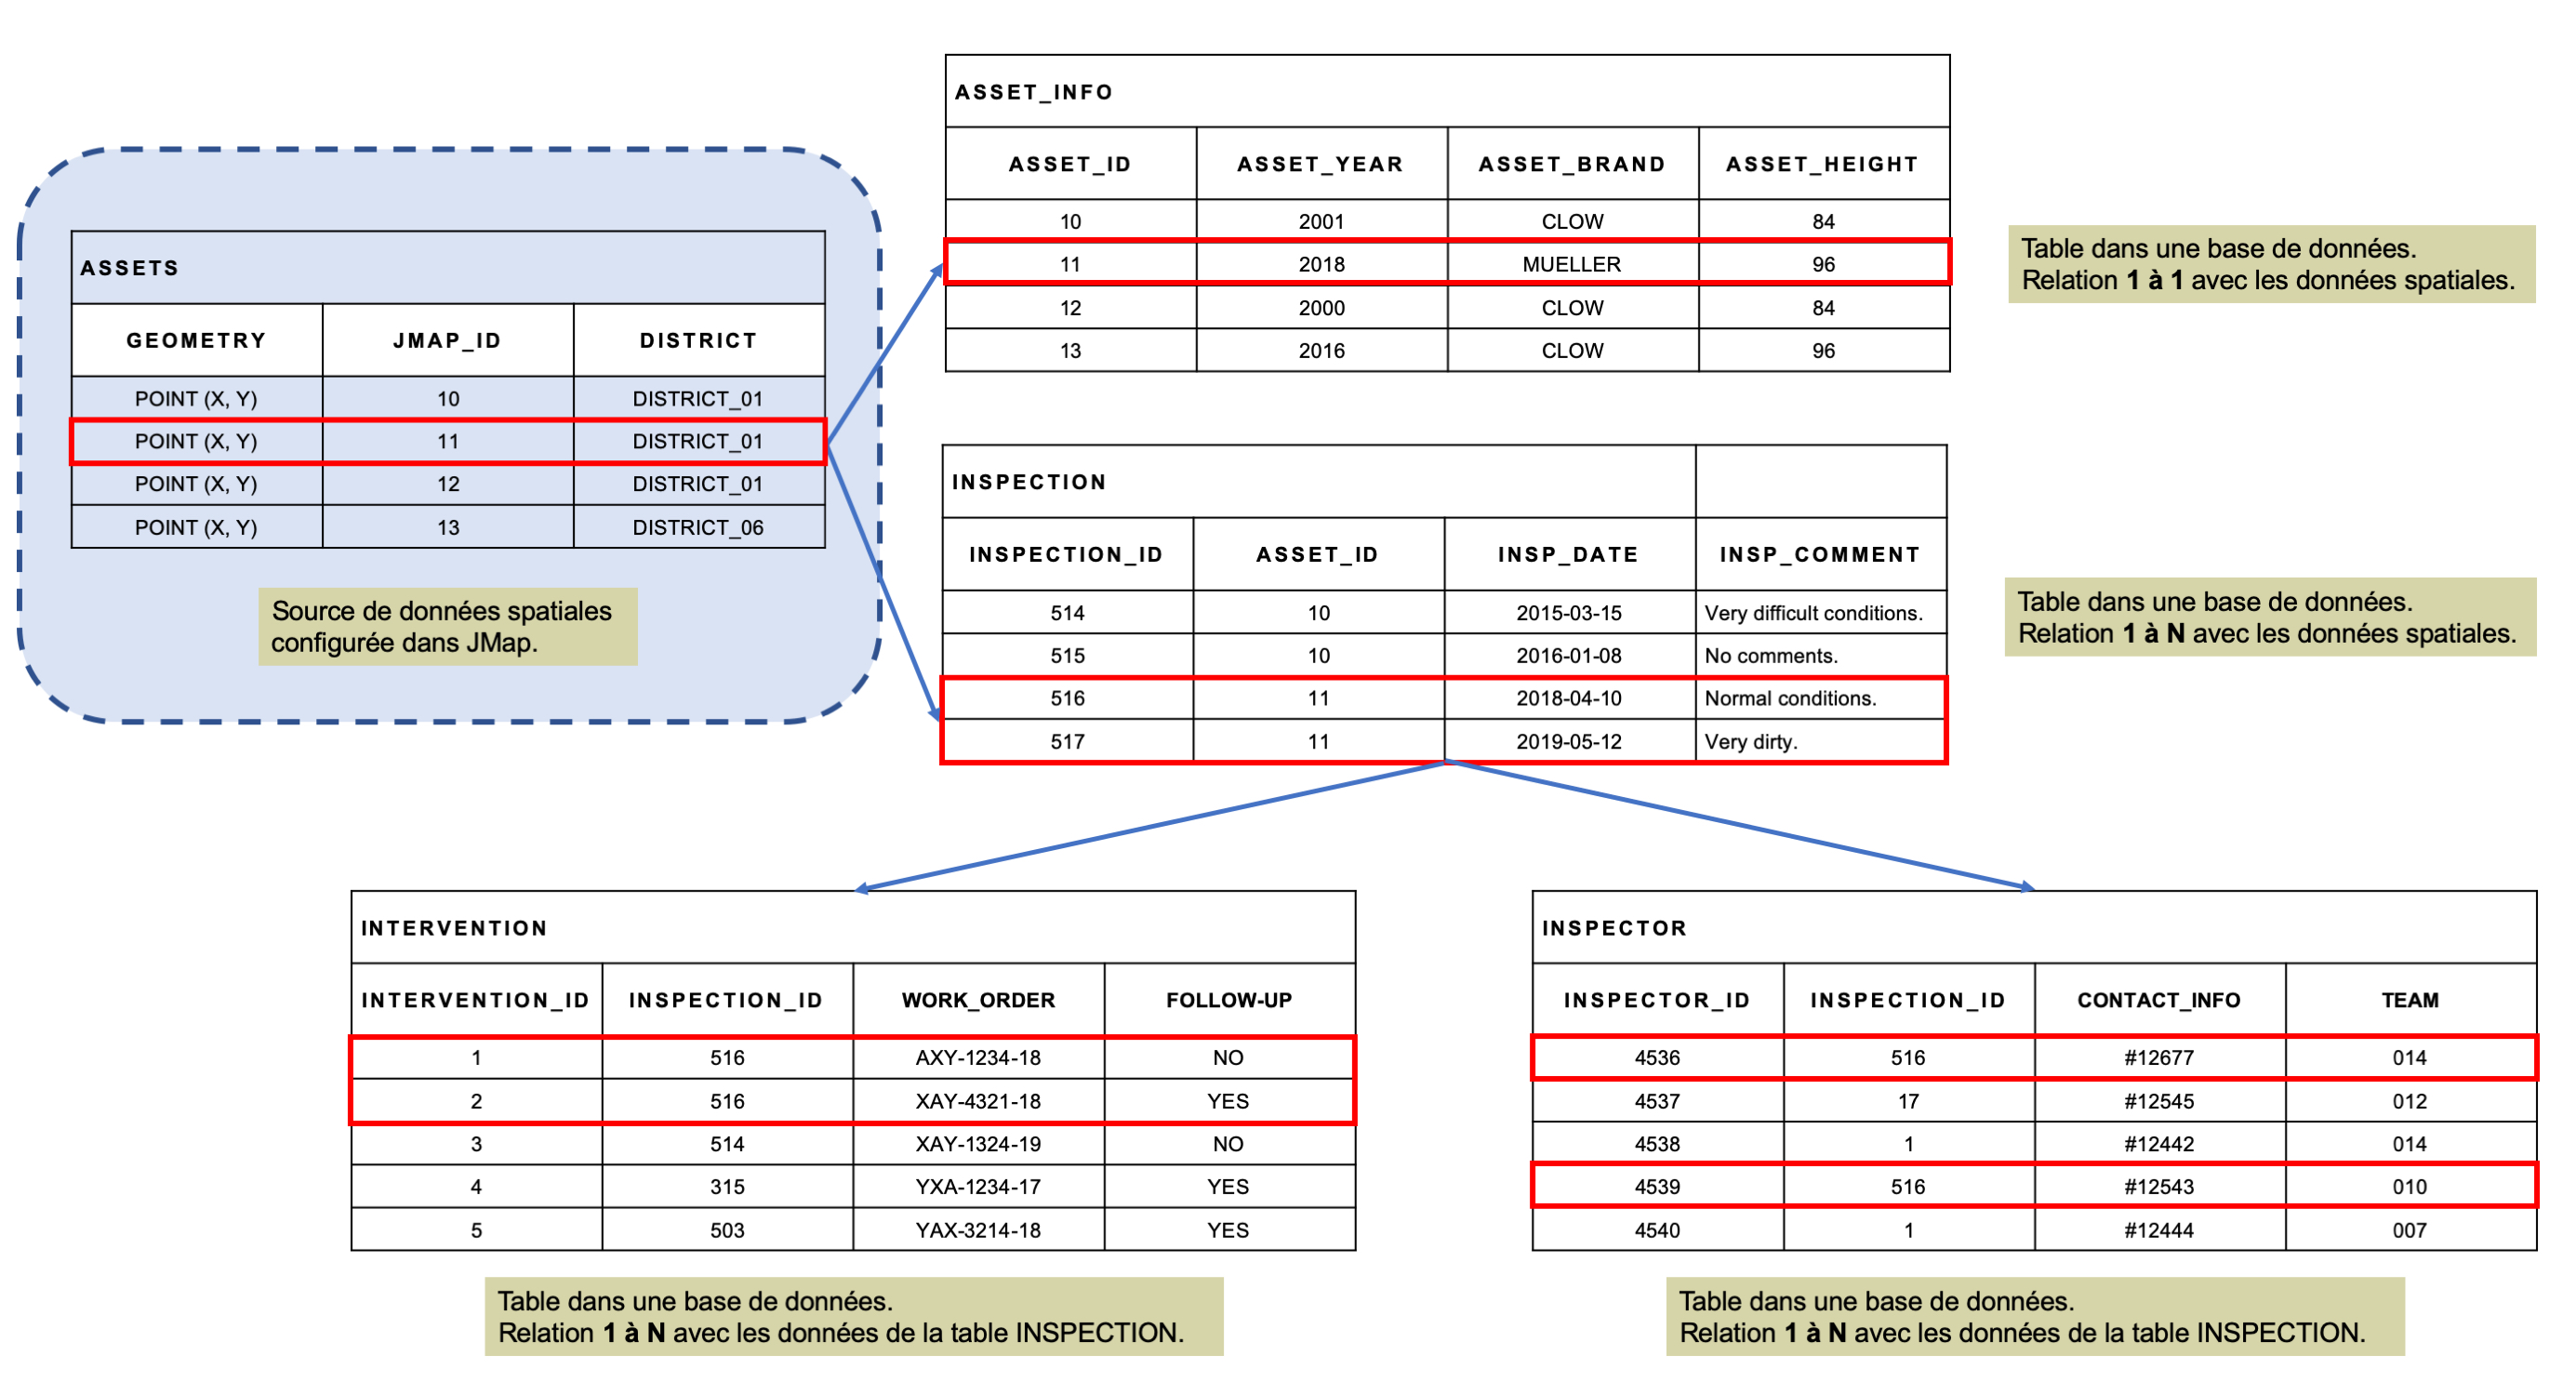
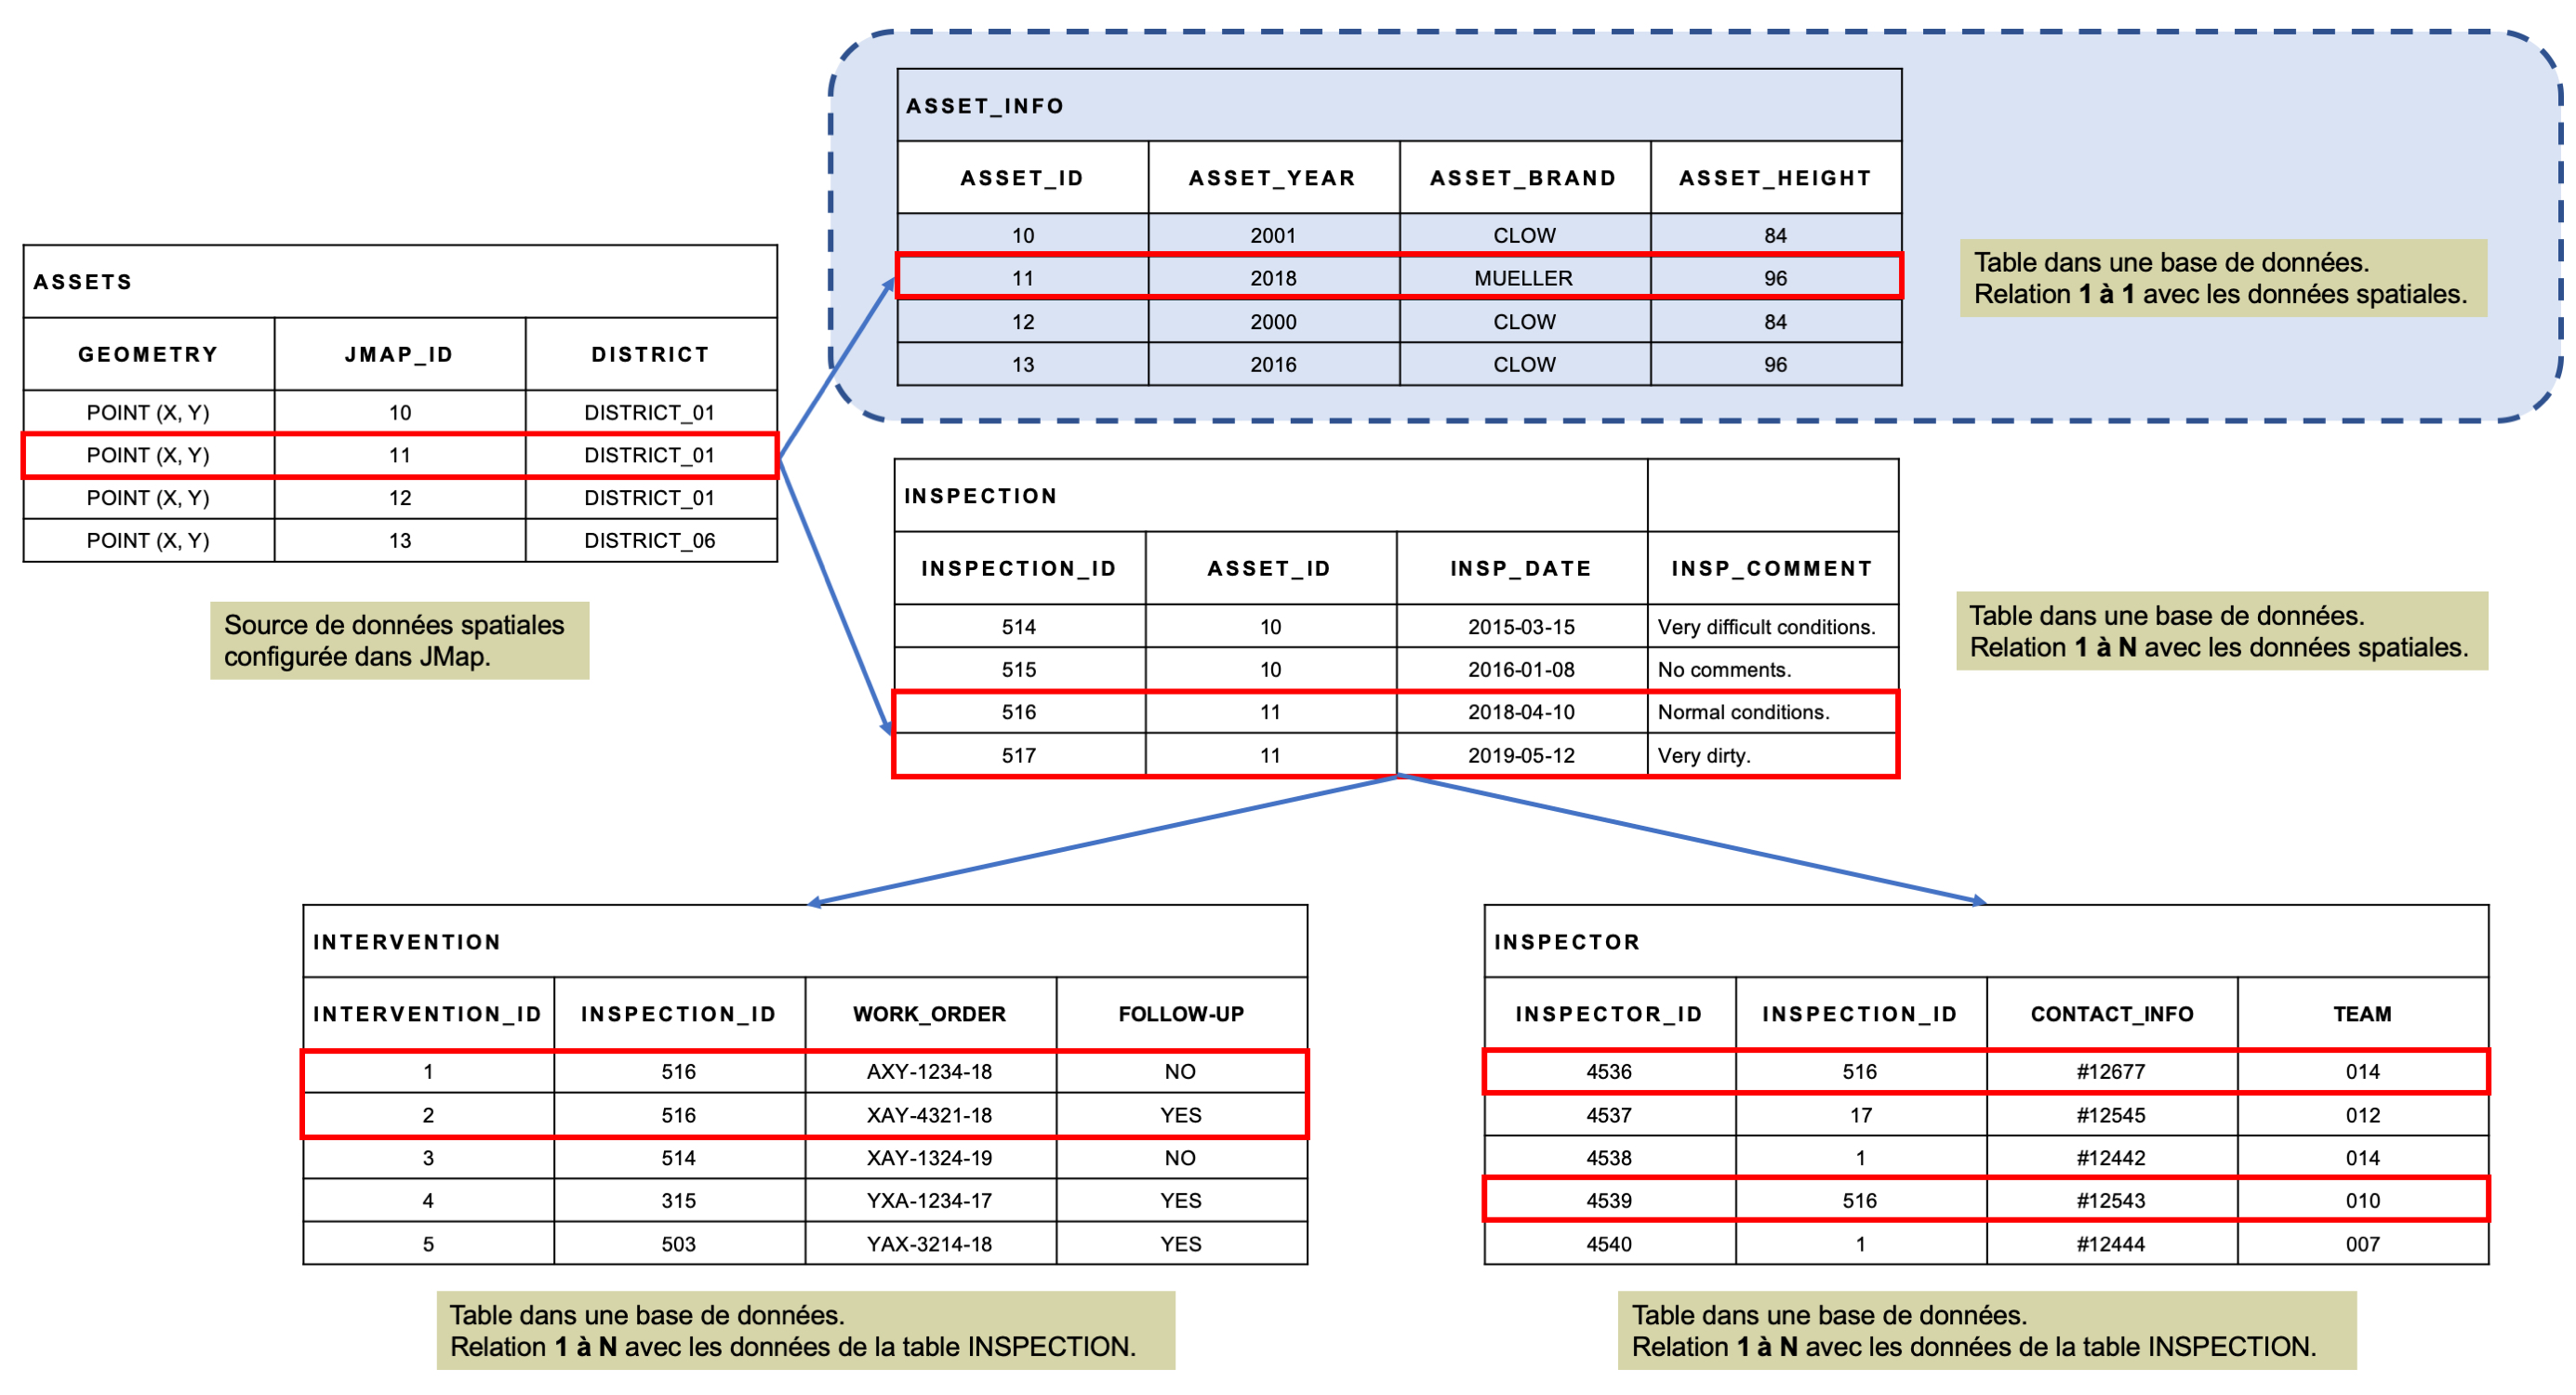
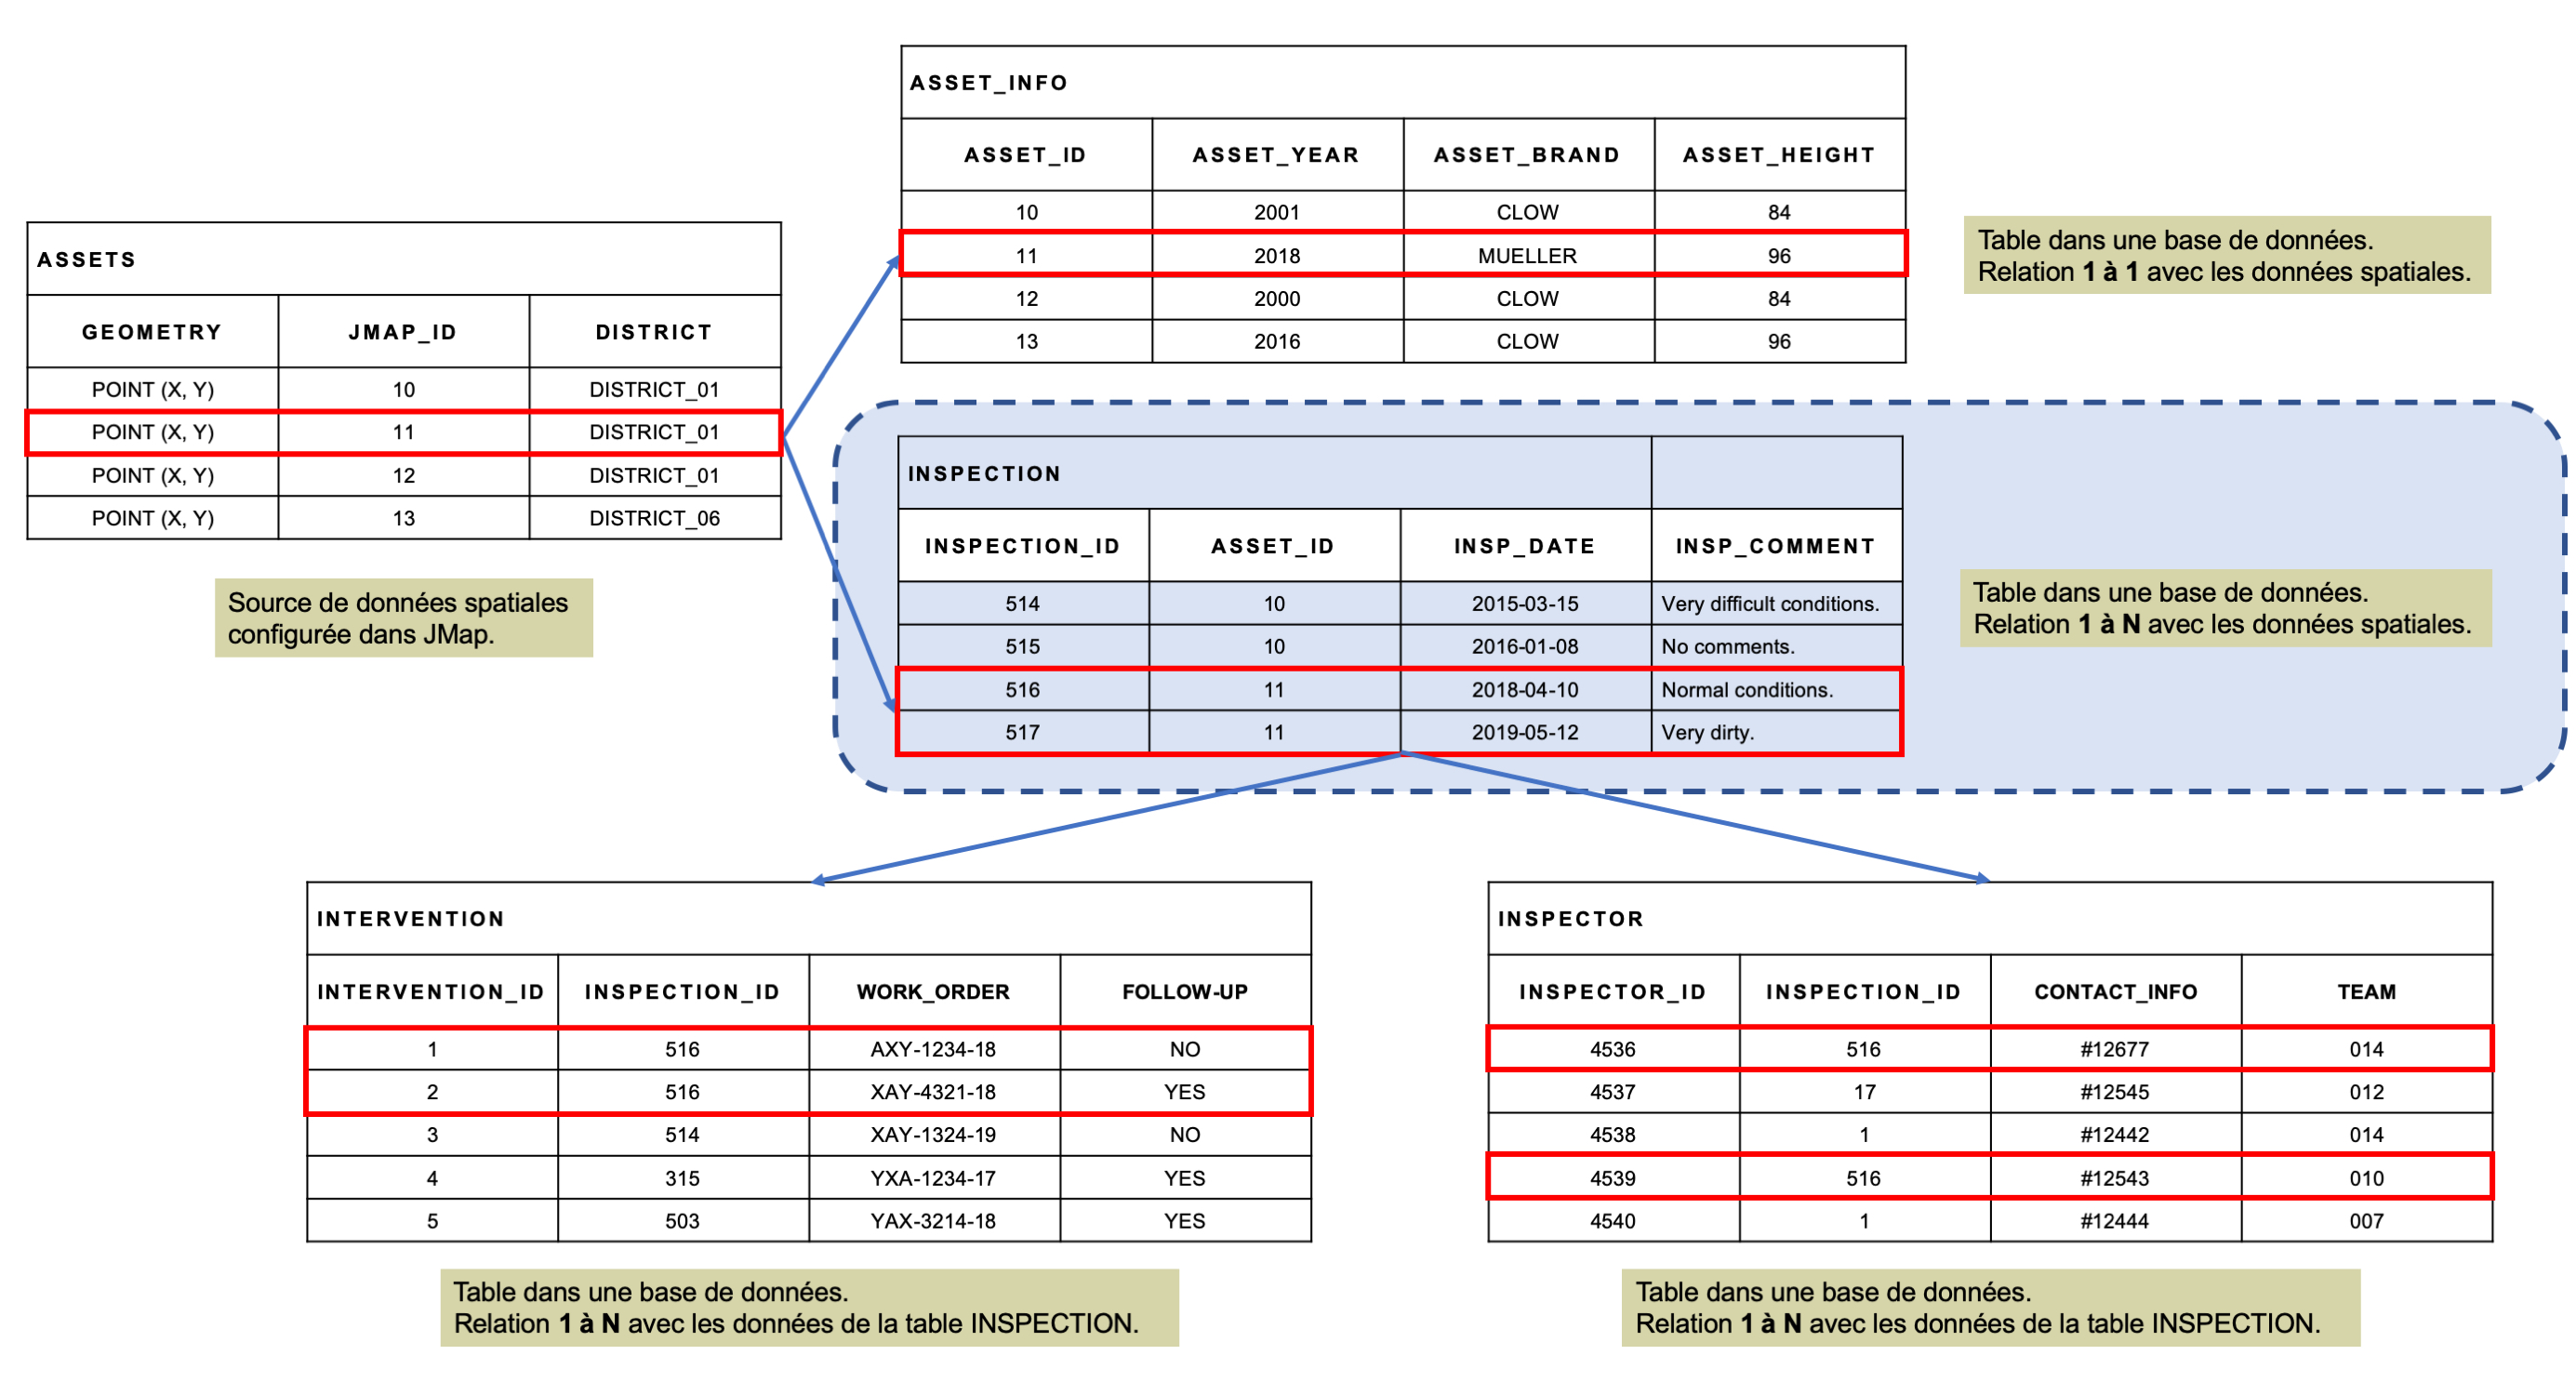
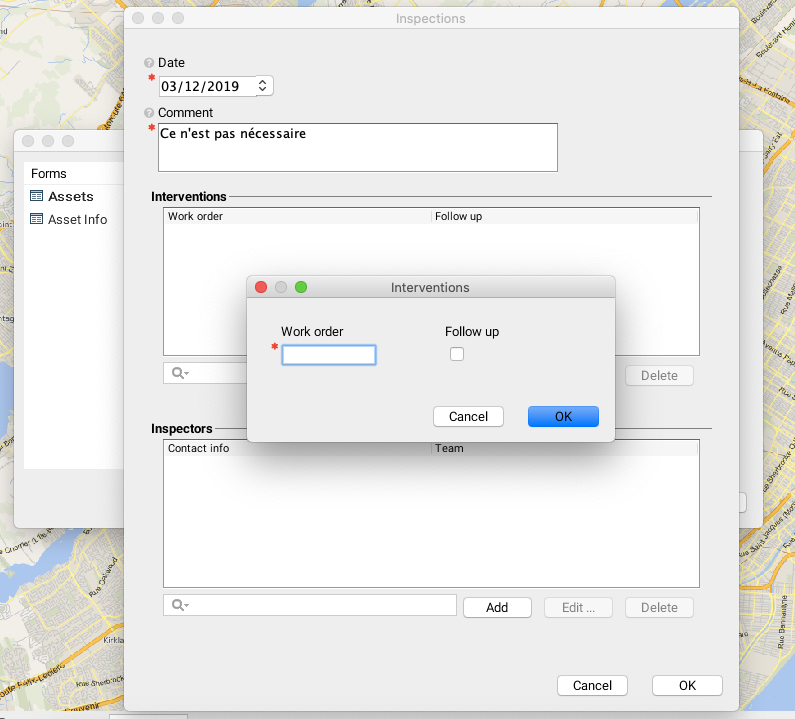
 Table (unavailable for attribute query forms) Table (unavailable for attribute query forms) | Allows you to manage data originating from databases external to JMap and for which a 1 to N relationship exists with the layer elements. Example: Suppose a points layer represents fire hydrants in JMap (Assets), and a database external to JMap contains data on the inspections performed on these fire hydrants. For each fire hydrant, 0, 1 or several inspections can be performed. In the attributes form (Assets form) of the fire hydrants layer, the table allows you to display inspection data regarding a fire hydrant, where each line in the table represents an inspection. Depending on the permissions configured, the table can also be used to add, modify or delete the inspection data. Subforms can be nested in a form or a subform. In the following example, each inspection can have 0, 1 or several interventions associated with it. In this case, the table displays the data of the interventions performed during each inspection. The table is always associated with a subform. This subform defines how external data is accessed and allows this data to be entered. The subform must be created before the table can be configured. Subform: Select an existing subform that will be used to populate the values associated with the table. Fields: Allows you to manage the fields displayed in the table. These are the fields of the subform associated with the table. You can modify the field names, their display order, and their visibility in the table. It is also possible to modify the format of numeric and date fields. The table parameters allow you to define the external data fields that will be displayed in the table and their order of appearance. The following figure shows the Assets form designer, with the Table component. This component is used to display the data from inspections, which is entered using the Inspections subform. 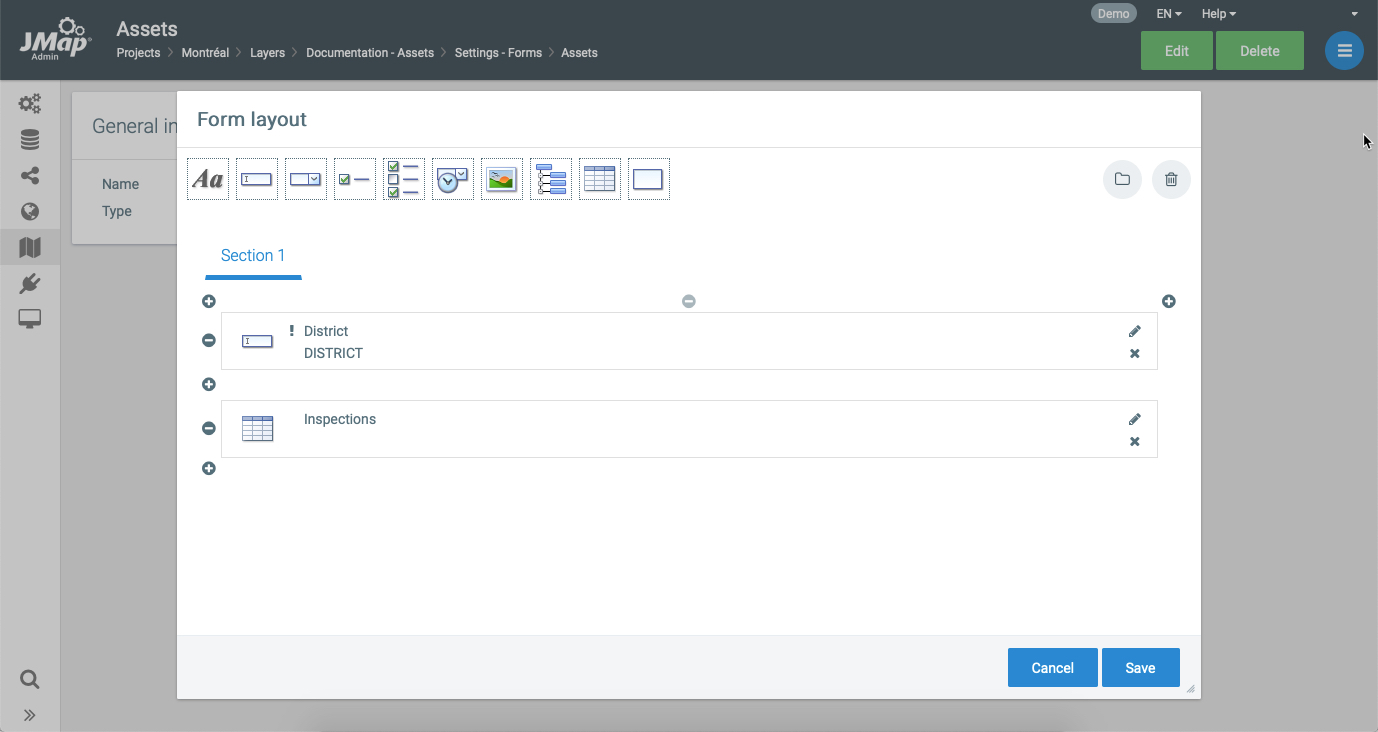 The following figure shows the design of the Inspections subform with the Table components. These components are used to display data on the interventions and inspectors, which is entered using the nested Interventions and Inspectors subforms. 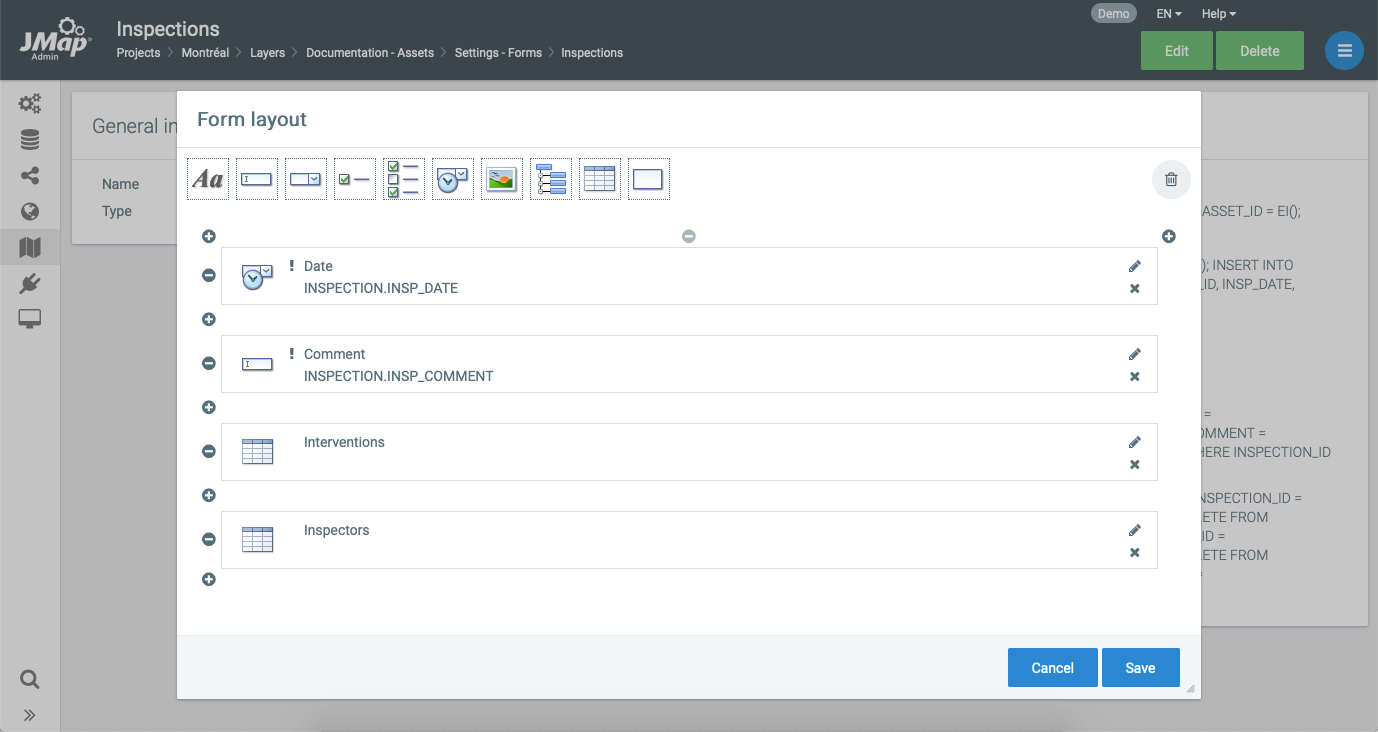 For more information on using external data with JMap forms, refer to the Database Forms section. |
 Group (groups components together) Group (groups components together) | This component is used to group form components together. A frame with a title will be drawn around the components belonging to the same group. Insert this component in the cell of an empty row to start a new group. This component automatically spans all cells of the row. It cannot be inserted on a row that already has other components. |
Warning: If you configure a database form you must ensure that the parameters of a component of the form are compatible with the characteristics of the corresponding field in the database. For example, if a text field in the database is 50 characters long, the corresponding Text component of the form must have a maximum number of characters of 50.
Functions
The following functions can be used to initialize form components.
| Functions | |
|---|---|
| username() | Replaced by the user’s code. |
| fullname() | Replaced by the user’s full name. |
| date() | Replaced by the current date. |
| datetime() | Replaced by the current date and time. |
Component validation rules
You can define validation rules for each component, in order to decrease errors when users of JMap applications enter values for the component. Rules can also be created at the form and subform level. The Form validation rules section presents this topic.
The rules that you define at the component level allow in particular to:
-
Make a field “read-only” or “required” according to the values of other fields of the form.
-
Calculate the values of certain fields.
JMap uses JSonLogic, a programming language which allows to develop the syntax of the rules and to validate them because it offers evaluation libraries of logical expressions in all languages. You can build logical, mathematical or string expressions.
The rules at the component level allow three types of expressions:
| Required | You can enter a Boolean expression that indicates when the field is required. That is, if the expression you enter is respected (it is true), the field is mandatory. The expression implies values from other fields on the form. Example: {" == ": [{" var ":" STATUS "}," done "]} This expression for the MATERIAL field, indicates that when the user enters the value “done” in the STATUS field, he must enter a value for the MATERIAL field to be able to save and close the form. Note: This expression is exclusive with the Required parameter of the component. If you check the Required parameter, this field is always mandatory and the Required range to define a logical expression is not available. If you do not check the Required parameter and define a rule, the field becomes mandatory only when the rule is respected. |
| Read only | You can enter a Boolean expression that indicates when the field is in read-only mode. That is, if the expression you enter is respected, the field is read-only. The expression implies values from other fields on the form. Note: This expression is exclusive with the Read only parameter of the component. If you check the Read only parameter, this field is always Read only and the Read only range to define a logical expression is not available. If you do not check the Read only parameter and define a rule, the field becomes Read only at the moment that the rule is respected. |
| Calculated | You can enter a mathematical or character strings expression to calculate the value of the field. The result of this rule becomes the value of the field. Example: {" * ": [2, 3.1416, {" / ": [{" var " : "DIAMETER"}, 2]}]} This expression calculates the value of the CIRCUMFERENCE field from the value of the DIAMETER field. |
The following sections describe the steps to create forms and subforms. The examples mentioned refer to the tables in the following figure:
Layer Attributes Forms
These forms are used to enter the attribute values of an editable layer. Only one attribute entry form can exist per layer. The user must have the required permissions to modify the values of a layer’s attributes. Refer to the Layer Permissions section for more information.
Creating a layer attributes form
To create a form that will be used to enter a layer’s attributes, select Forms in the layer’s settings menu, then click on Create.
Enter a name for the new form. You must then select the type of form to create, Layer attributes. Click on Save.
Afterwards, select Form layout in the settings menu to go to the form designer and add components. Each component of the form must be associated with an attribute of the layer. The component provides the attribute value, and the value is updated when the user closes the form and saves the changes. Refer to the Form Designer section for more information.
The layer attributes form is used to manage only the attributes that are available in the spatial data source and bound to the layer.
Database Forms
Database forms are used to manage data stored in databases that are external to JMap. They allow you to add new data as well as modify or delete existing data. You can create several database forms for one layer. Each database form has its own permissions to control which users can make changes to the data.
These forms can be used to manage data using a 1 to 1 relationship with a layer’s data. In this case, a record is added when an element is created, and this record is usually deleted when the element is deleted.
They can also be used to manage data using a 1 to N relationship with the layer data. In this case, a special type of form called a subform is used and is always associated with a table form component. Refer to the subforms section for more information on this topic.
Configuring this type of form is an advanced JMap function that requires writing SQL queries to extract, add, modify and delete data.
Database forms use a common field to manage data external to JMap that is related to the layer.
Creating a database form
To create a database form, select Forms in the layer parameters menu. Make sure you open the Forms tab, then click on Create.
You must enter a name for the new form. Afterwards, you must select the type of form to create, Database, then select the database containing the data to be used in the forms.
At the following step, a window allows you to enter the form’s SQL queries. These queries are used to extract, add, modify, and delete data. The SELECT query is required, but the others are optional. Only operations for which SQL queries have been provided can be performed.
A special syntax is used for SQL query configuration. In general, each line of this syntax must end with a semicolon (;). The syntax is not case sensitive.
The following table provides a detailed explanation of how this syntax works.
| Syntax for database forms | |
|---|---|
| ev(attrib) or elementValue(attrib) | This function returns the value of the attribute specified as a parameter for an element. Example: ev(city);Returns the value of the element’s CITY attribute. |
| fv(field) or formValue(field) | This function returns the value in the form for the field specified as a parameter. The name of the table must be the prefix of the field name. Example: fv(table.name);Returns the value entered in the form component associated with the TABLE.NAME field of the database. |
| ei() or elementId() | This function returns the id of the element. It can be the jmap_id field, or another field, as configured in the spatial data source. |
| $variable | Allows you to create and initialize variables that can be used in the various expressions. For the INSERT query of a form, a variable containing the unique identifier of the inserted record must be used. Example: $city = EV(city);Creates a $city variable initialized with the value of the element’s CITY attribute. |
| nti(table, field) or nextTableId(table, field) | This function returns the next value to use as a numeric identifier for the table and field specified as parameters. The specified field must exist in the specified table and must be an integer field. The function determines the maximum value existing in the table and returns this value incremented by 1 (max + 1). This function is useful when adding a new record in the database when the table has a unique identifier. Example: $id = nextTableId(inspections, inspection_id)Creates and initializes a $id variable with the value of the next INSPECTION_ID identifier in the INSPECTIONS table. If the maximum value present is 100, the value returned is 101. |
The following table provides a detailed explanation of each parameter in the database form creation window.
| Form properties | |
|---|---|
| Database | Select the database containing the data that must be managed by the form. |
| SELECT query | The SQL query that provides the data used to populate the form fields. All the fields that are returned by this query can be used to configure the form’s components and also within other queries defined in the form using the fv()function.The query must contain a condition to link a layer attribute with a database field. Example of a query for a database form (1 to 1): SELECT * FROM ASSET_INFO WHERE ASSET_ID = EI();In this example, all the fields of the ASSET_INFO table are obtained and available to configure the form components. The ASSET_ID field is used to link towards the element of the ASSETS layer using the ei() function.If the ei() function returns a value in text format, you must place the statement between apostrophes to view the value:SELECT * FROM ASSET_INFO WHERE ASSET_ID = 'EI()';Example of a query for a database form (1 to N): Example with the Inspections subform: SELECT * FROM INSPECTION WHERE ASSET_ID = EI();In this example, all the fields of the INSPECTION table are obtained and available to configure the subform’s components. The ASSET_ID field is used to link towards the element of the ASSETS layer using the ei() function. If the ei() function returns a value in text format, you must place the statement between apostrophes to view the value:SELECT * FROM INSPECTION WHERE ASSET_ID = 'EI()';Example with the Inspectors nested subform: SELECT * FROM INSPECTOR WHERE INSPECTION_ID = FV(INSPECTION_ID);In this example, all the fields of the INSPECTOR table are obtained and available to configure the subform’s components. The INSPECTION_ID field is used to link towards the element of the INSPECTION table using the fv(field) function.Example with Interventions nested subform: SELECT * FROM INTERVENTION WHERE INSPECTION_ID = FV(INSPECTION_ID);In this example, all the fields of the INTERVENTION table are obtained and available to configure the subform’s components. The INSPECTION_ID field is used to link towards the element of the INSPECTION table using the fv(field) function. |
| Field of the unique identifier | The SELECT query must include a unique identifier field (numeric or alphanumeric). Select the field that must be used as a unique identifier. Example of a query for a database form (1 to 1): ASSET_INFO.ASSET_ID Example of a query for a database form (1 to N), Inspections subform: INSPECTION.INSPECTION_ID Example of a query for a database form (1 to N), Inspectors nested subform: INSPECTOR.INSPECTOR_ID Example of a query for a database form (1 to N), Interventions nested subform: INTERVENTION.INTERVENTION_ID |
| INSERT query | SQL query that inserts new data in the database. Configure this query only if the form must allow records to be added to the database. You must define a variable that contains the value of the unique identifier for the new record. Example of a query for a database form (1 to 1): $id = ei(); INSERT INTO ASSET_INFO (ASSET_ID, ASSET_YEAR, BRAND, ASSET_HEIGHT) VALUES (EI(), FV(ASSET_INFO.ASSET_YEAR), FV(ASSET_INFO.BRAND), FV(ASSET_INFO.ASSET_HEIGHT));In this example, the data of the form is inserted in the ASSET_INFO table when the INSERT SQL query is executed. The values of the ASSET_INFO.ASSET_YEAR, ASSET_INFO.BRAND and ASSET_INFO.ASSET_HEIGHT fields are provided by the values entered in the form using the fv(field) function. The value of the ASSET_INFO.ASSET_ID variable is provided by the ei() function. Example of a query for a database form (1 to N): Example with Inspections subform: $id = nti(INSPECTION, INSPECTION_ID); <br />INSERT INTO INSPECTION (INSPECTION_ID, ASSET_ID, INSP_DATE, INSP_COMMENT) VALUES ($id, EI(), FV(INSPECTION.INSP_DATE), FV(INSPECTION.INSP_COMMENT));In this example, a $id variable is created and initialized with the next value (max + 1) of the ID field from the INSPECTION table. The form data is inserted in the INSPECTION table when the SQL INSERT query is executed. The values of the INSP_DATE and INSP_COMMENT fields are provided by the values the user entered in the subform using the fv(field) function. The value of the INSPECTION_ID field is provided by the $id variable. The value of the ASSET_ID field is provided by the ei() function. Example with Inspectors nested subform: $id = nti(INSPECTOR, INSPECTOR_ID); <br />INSERT INTO INSPECTOR (INSPECTOR_ID, INSPECTION_ID, CONTACT_INFO, TEAM) VALUES ($id, FV(INSPECTOR.INSPECTION_ID), FV(INSPECTOR.CONTACT_INFO), FV(INSPECTOR.TEAM));In this example, a $id variable is created and initialized with the next value (max + 1) of the ID field from the INSPECTOR table. The form data is inserted in the INSPECTOR table when the SQL INSERT query is executed. The values of the INSPECTION_ID, CONTACT_INFO and TEAM fields are provided by the values the user entered in the subform using the fv(field) function. The value of the INSPECTOR_ID field is provided by the \$id variable.Example with Interventions nested subform: $id = nti(INTERVENTION, INTERVENTION_ID); <br />INSERT INTO INTERVENTION (INTERVENTION_ID, INSPECTION_ID, WORK_ORDER, FOLLOW_UP) VALUES ($id, FV(INSPECTION_ID), FV(INTERVENTION.WORK_ORDER), FV(INTERVENTION.FOLLOW_UP));In this example, a $id variable is created and initialized with the next value (max + 1) of the ID field from the INTERVENTION table. The form data is inserted in the INTERVENTION table when the SQL INSERT query is executed. The values of the INSPECTION_ID, WORK_ORDER and FOLLOW_UP fields are provided by the values the user entered in the subform using the fv(field) function. The value of the INTERVENTION_ID field is provided by the $id variable. |
| Variable with the ID of the new element () | Select the variable containing the value of the unique identifier of the new record inserted in the table. It must be defined with the INSERT query. In order for your data to be recorded in the database (the photos, for example), you must define and select this variable. Example of a query for a database form (1 to 1): $id Example of a query for a database form (1 to N), Inspections subform: $id Example of a query for a database form (1 to N), Inspectors nested subform: $id Example of a query for a database form (1 to N), Interventions nested subform: $id |
| UPDATE query | SQL query that updates the data in the database. Configure this query only if the form must allow data to be updated. Example of a query for a database form (1 to 1): UPDATE ASSET_INFO SET ASSET_YEAR = FV(ASSET_INFO.ASSET_YEAR), BRAND = FV(ASSET_INFO.BRAND), ASSET_HEIGHT = FV(ASSET_INFO.ASSET_HEIGHT) WHERE ASSET_ID = FV(ASSET_INFO.ASSET_ID);In this example, the form data is used to update the ASSET_INFO table when the UPDATE SQL query is executed. The values of the ASSET_YEAR, BRAND, and ASSET_HEIGHT fields are provided by the values the user entered in the form using the fv(field) function. The WHERE clause allows you to update the record containing the element’s unique identifier, ASSET_ID, also using the fv(field) function.Example of a query for a database form (1 to N): Example with Inspections subform: UPDATE INSPECTION SET INSP_DATE = FV(INSPECTION.INSP_DATE), INSP_COMMENT = FV(INSPECTION.INSP_COMMENT) WHERE INSPECTION_ID = FV(INSPECTION.INSPECTION_ID);In this example, the subform data is used to update the INSPECTION table when the UPDATE SQL query is executed. The values of the INSP_DATE and INSP_COMMENT fields are updated, and they are provided by the values the user entered in the form using the fv(field) function. The WHERE clause uses the fv(field) function to retrieve the value of the record’s unique identifier. Example with Inspectors nested subform: UPDATE INSPECTOR SET CONTACT_INFO = FV(INSPECTOR.CONTACT_INFO), TEAM = FV(INSPECTOR.TEAM) WHERE INSPECTOR_ID = FV(INSPECTOR.INSPECTOR_ID);In this example, the subform data is used to update the INSPECTOR table when the UPDATE SQL query is executed. The values of the CONTACT_INFO field are updated, and they are provided by the value the user entered in the form using the fv(field) function. The WHERE clause uses the fv(field) function to obtain the value of the record’s unique identifier.Example with Interventions nested subform: UPDATE INTERVENTION SET WORK_ORDER = FV(INTERVENTION.WORK_ORDER), FOLLOW_UP = FV(INTERVENTION.FOLLOW_UP) WHERE INTERVENTION_ID = FV(INTERVENTION.INTERVENTION_ID);In this example, the subform data is used to update the INTERVENTION table when the UPDATE SQL query is executed. The values of the WORK_ORDER and FOLLOW_UP fields are updated, and they are provided by the value the user entered in the form using the fv(field) function. The WHERE clause uses the fv(field) function to obtain the value of the record’s unique identifier. |
| DELETE query | This SQL query deletes the data from the database. Only configure this query if the form must allow data to be deleted. Example of a query for a database form (1 to 1): DELETE FROM ASSET_INFO WHERE ASSET_ID = FV(ASSET_INFO.ASSET_ID);In this example, the record corresponding to the element’s ASSET_ID attribute value is deleted from the ASSET_INFO table using the fv(field) function to obtain the value of the element’s identifier.Example of a query for a database form (1 to N): Example with Inspections subform: DELETE FROM INSPECTION WHERE INSPECTION_ID = FV(INSPECTION.INSPECTION_ID); DELETE FROM INTERVENTION WHERE INSPECTION_ID = FV(INSPECTION.INSPECTION_ID); DELETE FROM INSPECTOR WHERE INSPECTION_ID = FV(INSPECTION.INSPECTION_ID);In this example, the record corresponding to the inspection’s unique identifier is deleted from the table using the fv(field) function to obtain the value of the identifier. The records of the INTERVENTION and INSPECTOR nested subforms that correspond to the inspection’s unique identifier are also deleted from the table when the inspection is deleted.Example with Inspectors nested subform: DELETE FROM INSPECTOR WHERE INSPECTOR_ID = FV(INSPECTOR.INSPECTOR_ID);In this example, the record corresponding to the inspector’s unique identifier is deleted from the table using the fv(field) function to obtain the value of the identifier.Example with Interventions nested subform: DELETE FROM INTERVENTION WHERE INTERVENTION_ID = FV(INTERVENTION.INTERVENTION_ID);In this example, the record corresponding to the intervention’s unique identifier is deleted from the table using the fv(field) function to obtain the value of the identifier. |
Subforms
Subforms are database forms that are opened from a Table component that exists in another form. They are normally used to manage data that has a 1 to N relationship with the layer’s elements. They could be used to manage data for inspections on assets (N inspections can be associated to the same object), for example. They are configured similarly to the other database forms.
Creating a subform
To create a subform, select Forms in the layer parameters menu. Make sure you open the Subform tab, then click on Create. You must enter a name for the new form and select the database containing the data to be used in the forms.
At the following step, you must configure the SQL queries of the subform, as explained above for the creation of a database form.
Subforms are database forms that use a common field to manage data with a 1 to N relationship with the layer data.
Nested subforms
Several levels of subforms can be nested in a subform. They are used to manage data having a 1 to N relationship with the subform’s records. For example, they can be used to manage the data of interventions arising from an inspection performed on an asset (N interventions can be associated with 1 inspection). A nested subform is opened from a Table component found in the subform it is associated with. Creating a nested subform is done by following the same steps to create a subform. Examples of queries are displayed in the table of the Creating a database form section. 
Nested subforms are database forms that are used to manage data having a 1 to N relationship with the subform’s data using a common field.
The following figure shows a preview of the nested subforms from our example, in JMap Pro.
Permissions of database forms
Database forms have their own permissions. Available permissions are described in the table below.
| Form permissions | |
|---|---|
| Add data | Allows a user or group to use the form to add new data in the database. |
| Modify data | Allows a user or group to use the form to modify existing data in the database. |
| Delete data | Allows a user or group to use the form to delete data existing in the database. |
Form validation rules
Layer attribute forms and database forms and subforms allow you to define global form validation rules based on multiple fields. You can also define validation rules at the component level.
The rules validate the values of the fields on the client side, that is, the values that the users of JMap applications enter in the forms. The validation takes place when the form is saved, which is not done if the rules are not respected.
To configure the rules of a form or a subform, open the configuration interface of the form or subform that interests you:
-
Press
 to open the menu and select the Rules option. The interface that lists the rules is displayed.
 -
Press Create. The window for creating a rule is displayed.
| Rule | |
|---|---|
| Name | Enter a name for the rule. |
| Expression | Enter the logical expression that defines the rule. The syntax is that of JSonLogic. You can enter logical and / or mathematical expressions. The expression must be respected for the form to be validated and closed. The user of a JMap application (Pro, Survey, NG) must enter the correct data for the fields concerned by the expression in order the expression to be respected (is true) and the form can be saved and closed. Exemple : {“!”:[{“and”:[{“==”:[{“var”:“STATUT”},“done”]},{“or”:[{“==”:[{“var”:“MATERIAL”},“”]},{“==”:[{“var”:“INSP_DATE”}, null]},{“==”:[{“var”: “DIAMETER”}, null]},{“<=”:[{“var”:“DIAMETER”}, 0]}]}]}]}This expression indicates that when the value of the STATUS field is “done”, the MATERIAL, INSP_DATE and DIAMETER fields must be initialized (their value cannot be null or 0). Note: Currently JMap cannot validate expressions that contain date type fields. |
| Message | Enter the error message that appears when the logical expression is False. You can enter the message in multiple languages. Exemple : Fields MATERIAL, INSP_DATE and DIAMETER cannot be null or empty if STATUS is 'Done' |
- Press Save.
You can create multiple rules for the same form.
Attribute Query Forms
Like data editing forms, attribute query forms are created using the form designer. They allow the users to enter query parameters. Each form component is therefore associated with a parameter of the query ($param1, $param2, etc.).
Unlike the other types of forms, they cannot be divided into sections. In addition, the Photo components are not available for this type of form.
These forms are created when configuring attribute queries, by clicking on Form layout.
When creating an attribute query form, it is important to consider which parameters are required and which are optional in the query definition. For instance, if Required is not selected for a form component, the query must consider this parameter as optional. Refer to the Creating attribute queries section for more information on optional parameters in queries.