Spatial Data Sources
Table of contents
- Basic concepts
- Creating Spatial Data Sources
- Configuring Spatial Data Sources
- Spatial Data Source Permissions
- Sharing Spatial Data Sources
- External Attributes
- Metadata
A spatial data source in JMap, as its name implies, is any source that can provide spatial data. Spatial data sources are separated into 2 families: vector data sources and raster data sources. Vector data sources provide vector spatial data along with its attributes, and raster data sources provide raster data (images). Configuring data sources is usually the first step to publishing spatial data with JMap.
Some spatial data sources work with a file reader to load spatial data from files in various formats (e.g. MID files, SHAPE files, image files, JPEG photo files, etc.). Other data sources access the data stored on remote spatial data servers (e.g. PostGIS, Oracle Spatial/Locator, ArcSDE, WMS/WFS servers, etc.).
Once a spatial data source is created, it must be updated before it can be used. Updating a spatial data source means preparing it for use by JMap Server. In concrete terms, this operation involves different tasks, depending on the type of data source. Generally speaking, for data sources that access data stored in files, the contents are read by JMap Server and inserted in the tables of JMap’s System database. A spatial index is then built for fast access, and attribute statistics are calculated. For data sources that access data stored on spatial data servers like Oracle Spatial/Locator or WFS systems, the update process is simpler and only involves calculating attribute statistics. Updating file data sources takes more time than updating server data sources.
Spatial data sources are listed in the Spatial data section in JMap Admin. The table displayed presents basic information about each data source. When you click on the name of a data source, a details section is displayed. This section presents some useful information about the spatial data source and provides some management functions associated with it.
Basic concepts
Editable data sources
Some spatial data sources support data editing (writing) by JMap. This is the case of most DBMS type data sources (PostGIS, Oracle Spatial, etc.). In this manual, each section pertaining to a specific type of data source indicates whether it supports reading only or reading and writing.
File type data sources (SHP, GML, etc.) do not support data editing. However, there is an option allowing you to transform this type of data source into a JMap Spatial data source, which will then allow you to edit spatial and descriptive data in JMap. Once this transformation has been done, the data source will no longer be linked to the original files. All data modifications will have to be performed directly using JMap’s editing tools.
Including multiple files
In most data sources that read files, multiple files can be integrated together to form continuous maps. It is frequent for CAD users to split a territory in rectangular tiles. By reading all tile files together, JMap administrators can recreate continuous maps, provided that the files contain the same data structure (geometry, layers and attribute types).
File browsing
JMap Admin provides a file browser that allows you to navigate through the file system of the server where JMap Server is running in order to select the files to include in the data sources. Local and network storage units can be used, as long as the JMap Server process has access to them.
You can also create user paths. These paths are shortcuts that allow you to save time when browsing the system. They can also be used to write paths that are specific to an operating system, such as Windows UNC (e.g. \myserver\data). To create a user path, you must go to the root of the file system and click on Add user path…
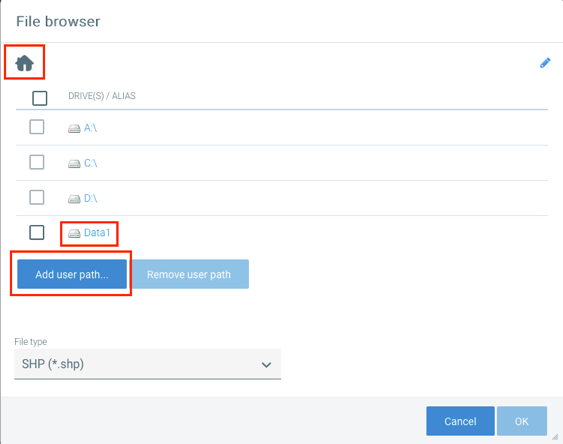
To restrict browsing in the file system, you can define one or more root folders. The JMap administrator will not be able to navigate outside these folders. To do this, you must add a line to the file jmapserver.properties.
admin.filebrowser.roots=c:/data/DataGeo|Data;d:/data2|Data2
In this example, two root folders are created, named Data and Data2.
Uploading files
Accessible through the file browser, the Uploads directory contains files uploaded by all users directly to JMap Server from JMap Admin. If you want to upload a file for use as a spatial data source, click on this folder to access the upload interface.
Enter a name for the file and press Upload. The file will be uploaded to a directory created automatically for your user account. The file is accessible to all user accounts.
Updating spatial data sources
Before a spatial data source can be used to create layers, it must be updated. In JMap, updating a data source generally involves collecting information on the spatial data and its attributes and preparing data for fast and efficient access. This process may be very brief or may take several minutes, depending on the type of data source and amount of data.
In JMap Admin, you can update a data source by clicking on Update in its information section. You can also update several data sources simultaneously by selecting them in the section displaying the list of data sources and clicking on Update.
Scheduling automatic data source updates
You can schedule automatic updates for spatial data sources. This action may be helpful if you use data sources that read data files. If the files are frequently modified, you can schedule automatic updates that will occur on a regular basis (every day at midnight, for instance) for the appropriate data sources. Each data source can have its own schedule.
In order to schedule updates for a given data source, click on Schedule from that data source’s details section or in the list of data sources. Afterwards, simply follow the wizard to define the specific moments when the updates will take place. Scheduling options are very flexible.
Once these tasks have been scheduled, you can view the current schedule for a data source by viewing its information section.
At any time, you can access the list of all planned updates for data sources by clicking on Scheduler in the JMap Server section.
Deleting spatial data sources
You can delete spatial data sources by clicking on Delete from the data source’s information section. You can also delete data sources by selecting them in the section listing the sources and then clicking Delete. When a data source has been deleted, its entire configuration is permanently deleted. The data itself (the file or database) is not affected.
Statuses of spatial data sources
Each spatial data source has a status. The status indicates the condition of the data source, i.e. if it is ready to be used, if an error occurred, etc. The status of a newly created data source is always set to not ready (unless you checked the auto-update flag). This means that the data source cannot be used yet. In order to be used, every data source must be updated at least once.
Data sources can be updated in batches. A maximum of 3 data sources can be updated simultaneously. Other data sources to be updated are queued until they can be updated.
The following table describes the possible statuses of a spatial data source:
| Statuses | |
|---|---|
| Error | An error occurred. The data source cannot handle requests. See error message to determine the source of the error. |
| Job queued | The data source is waiting to be updated. A maximum of 3 data sources can be updated simultaneously. The data source can still handle requests if it was updated at least once before. |
| Update needed | The configuration of the data source has been modified and it must be updated before the changes are effective. The data source can still handle requests. |
| Not ready | The data source is not ready to handle requests. This status is typically attributed to a data source that has just been created but has not yet been updated. |
| Ready | The data source is ready to handle requests. |
| Updating | The data source is being updated. Depending on the type of data source and volume of data, the update process can be very fast or it can take a certain amount of time. The data source can still handle requests if it was updated at least once before. |
System spatial data sources
System spatial data sources are data sources that are automatically created by JMap to support JMap data source and layer sharing. Normally, these resources do not need to be managed and they are not displayed by default in the list of spatial data sources. If you wish to display them, you can select Show system data sources in the display settings of the list of spatial data sources.
Creating Spatial Data Sources
To begin creating a new spatial data source, go to the Spatial data section and click on Create. Certain parameters are common to all data sources, while others are specific to each type of data source.
| Identification | |
|---|---|
| Name | Enter a name for the new spatial data source. The name must be unique. |
| Type | Select the type of data source that matches the type of the data to read. All supported data source types are shown in the list. You can also search the list by typing a few letters in the search field. |
| Description | Optionally enter a description for the new spatial data source. This description can only be viewed by the JMap administrator. |
Note that custom data source types may also exist. These are new types of data sources that are developed for special purposes using the JMap SDK.
The next configuration steps will depend on the data source type you selected. For more information on configuring a specific type of spatial data source, refer to the appropriate section in this manual.
Projections
The projection of the data source must be selected to match the projection of the data. If this parameter is not set correctly, the data displayed may be invalid.
| Projections | |
|---|---|
| Original projection | The projection or spatial coordinate system of the data in the data source. |
Note: At the last stage of creating a spatial data source, the Start update automatically option allows you to initiate the update when you click on Finish. If you do not select this option, you will have to launch the update manually from the spatial data section in order for your changes to be taken into account.
Configuring Spatial Data Sources
The spatial data source (SDS) configuration interface allows you to access information on a source as well as parameter configuration functions such as metadata, permissions, and attributes.
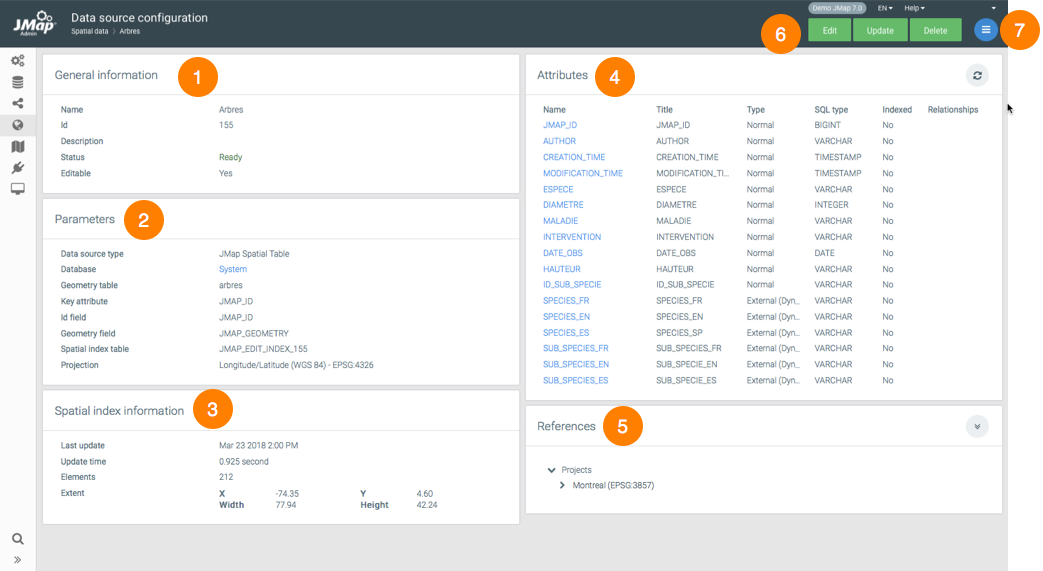
| 1 | General information configured when creating the SDS. |
| 2 | SDS parameters configured when it was created. The hyperlink allows you to access the DB that contains the data. |
| 3 | Spatial information. The extent corresponds to the geographical extent of the elements contained in the SDS. When it has no elements, the values are equal to 0. |
| 4 | Attributes. This section presents a list of SDS attributes. Clicking on the name of an attribute will open a window, allowing you to configure its properties. |
| 5 | References. This section lists the projects and layers that use this SDS. |
| 6 | These buttons allow you to edit, update or delete the SDS configuration. |
| 7 | The menu provides access to the Metadata, Permissions and Schedule sections. |
Attributes
The attribute configuration window contains two tabs: Metadata and Attribute sample. This button  is used to update the statistics of the SDS.
| Metadata | |
|---|---|
| Type | Indicates the attribute’s data type. |
| SQL Type | Indicates the SQL type of the attribute data. |
| Indexed | Check this box to have the attribute indexed. |
| Title | You can change the title of the attribute. This icon  allows you to provide the title in multiple languages. allows you to provide the title in multiple languages. |
| Format pattern | Specify a format pattern for displaying SDS items. The pattern must follow the Java standards. This article offers more details: https://docs.oracle.com/javase/tutorial/i18n/format/decimalFormat.html. |
| Upon saving, recursively apply to associated layers… | By checking the appropriate boxes, you will apply the title and/or format pattern of the attribute to all layers that are associated with the SDS. |
The Attribute sample tab displays the value of the attribute for a sample of SDS elements.
Spatial Data Source Permissions
In the details section of a spatial data source, click on Permissions to access the permissions section. You can also modify permissions in batches. To do this, select several data sources in the list and click on Permissions.
A list of authorized users and groups displays. Click on  to add new users or groups. The available users and groups are configured in the JMap Server section of JMap Admin. Refer to the Managing Users and Groups section for more information on managing users in JMap.
Only administrator permissions are associated with spatial data sources.
| Permissions for spatial data source | |
|---|---|
| Remote access | Allows a user to access this spatial data source through a JMap Server to JMap Server connection. This permission must be granted to the user account through which the secure connection between both JMap Servers was established. For more information on this topic, refer to sections JMap Server to JMap Server Connections and Sharing Spatial Data Sources. |
| Administrate spatial data source | Allows an administrator to modify the configuration of the spatial data source. |
| Access spatial data source | Allows an administrator to create layers that take their data from this data source. |
Sharing Spatial Data Sources
Spatial data sources can be shared in order to be accessed by other JMap Server instances. This way, data can be stored in a single location but is accessible from several JMap Server instances.
In JMap Admin, you can share a spatial data source by granting the Remote access permission to one or more users on this spatial data source. This choice must be consistent with the user who established the connection from the JMap Server that must access the shared spatial data sources.
Refer to sections Spatial Data Source Permissions and JMap Server to JMap Server Connections for more information on this topic.
Once a spatial data source has been shared, a  icon displays in the list of data sources, in the Shared column.
External Attributes
External attributes for a spatial data source are attributes that are obtained from an external database (external means a database that is separate from the data source itself). The external attributes are added to the list of existing attributes and can thereafter be used like any other attribute in reports, queries, mouseover, thematics, etc.
External attributes are available only for vector spatial data sources that read data from files (shp, mif, tab, dwg, dgn, etc.) and JMap Spatial tables. When working with vector data sources that access data inside existing spatial databases (PostGIS, MySQL Spatial, Oracle Spatial/Locator, etc.), this option is not available. In that case however, it is often easy to include all needed attributes using normal SQL joins with other tables or by creating views.
External attributes are created from the spatial data source creation wizard.
To create an external attribute, choose External attributes in the Attribute section of the wizard. Press Add and choose one of the following two methods: Select fields or SQL query.
Select fields
Choose this option in order to select one or more fields from a specific database table from which you want to obtain the values. This option is the simplest method, and it allows you to create several attributes at once.
| Settings | |
|---|---|
| Database | Select the database from which the attribute values will be taken. This database must already be configured in JMap Admin. |
| Schema | Select the schema containing the table. |
| Table | Select the table containing the fields to be used as external attributes. |
| Include | The list of available fields is displayed. Select the ones to be included as external attributes. |
| GET VALUE FROM | Indicate the name of the field. |
| ATTRIBUTE NAME | You can give the external attribute a name that will be different from the field name. |
| DYNAMIC ATTRIBUTE | Select this option if you want the attribute to be dynamic. Dynamic attributes are read directly from the source in a dynamic manner. Attributes that are not dynamic are imported into JMap’s system database and are only reread when the data source is updated.In certain cases, dynamic attributes can reduce the system’s performance. |
| Join on fields | Select the parameters of the join between the external data and the JMap data source. |
| Aggregation type | This option is only available if a single field is selected. Select the aggregation method to use if more than one value is found for the same geometry: Keep first element: Keep only the first value found. Average: Calculate the average value to use as the attribute value. Only available for numeric attributes. Summation: Calculate the summation value to use as the attribute value. Only available for numeric attributes. Using separator: Build a string containing all values separated by the specified character. Only available for text attributes. |
SQL query
Choose this option to provide an SQL query that will extract the attribute values in the database. This method is more flexible, but limits you to creating one attribute at a time.
| Parameters | |
|---|---|
| Attribute name | Enter a name for the external attribute. |
| Dynamic attribute | Select this option to make the attribute dynamic. Dynamic attributes are read directly from the source in a dynamic manner. Non dynamic attributes are imported in JMap’s System database and are only reread when the spatial data source is updated in JMap Admin.Dynamic attributes can impact performances in some situations. |
| Database | Select the database from which the attribute values will be taken. This database must already be configured in JMap Admin. |
| SQL query | Enter the SQL query to be executed in the external database that returns the values to use for the external attribute, along with the field used to join with the data source. Press Execute to test the query and to initialize the other parts of the interface. |
| Get value from | Select the table and the field to get the values from. Only those returned by the SQL query are available. |
| Join on fields | Select the parameters of the join between the external data and the JMap data source. |
| Aggregation type | Select the aggregation method to use if more than one value is found for the same geometry: Keep first element: Keep only the first value found. Average: Calculate the average value to use as the attribute value. Only available for numeric attributes. Summation: Calculate the summation value to use as the attribute value. Only available for numeric attributes. Using separator: Build a string containing all values separated by the specified character. Only available for text attributes. |
Metadata
Metadata can be associated with spatial data sources in JMap. It can include information such as the person who produced the data, the date it was updated, a description, etc. Users can view this information for the corresponding layers in JMap applications. Metadata can be entered directly into JMap Admin using preset templates or it can be taken from an external metadata management system. Refer to the Metadata Templates section for more information on creating templates.
To access the metadata settings of a spatial data source, click on Metadata in the details section of a spatial data source. The following options are available:
| Metadata | |
|---|---|
| Type | 3 options are possible: None: No metadata is associated with this data source. External: The metadata comes from a metadata management system that is outside of JMap and accessed through a URL. The URL must be entered in the URL field below. Template: The metadata is entered directly in this section using the selected template. |
| URL | If the type of metadata is external, this setting defines the URL to be opened in order to view the metadata associated with this spatial data source. |
| Template | If the type of metadata is template, select the template to be used for this data source. The metadata entry form for this template displays. Enter the metadata in the various fields. |
Layers whose data originates from spatial data sources with metadata will automatically inherit this metadata. Metadata can be viewed by users of JMap Web and JMap Pro applications.
Metadata templates
JMap allows you to define metadata templates to document spatial data sources directly in JMap Admin. Once the template has been defined, you can associate it to certain data sources and enter all the information, which users can then easily view in JMap’s applications. If you already use a metadata management system that can be accessed in a browser, you can also create a direct link between certain layers and this system.
You can create as many metadata templates as you want.
The metadata template management section can be accessed by clicking on Metadata templates in the Spatial data section.
Creating a metadata template
Click on Create to create a new template. The interface shows the following options.
| Metadata template | |
|---|---|
| Name | Enter a name for this template. Template names must be unique. |
| Default language | Among the languages available for the metadata template, choose the default language that will be used when the requested language is unavailable or when translations are missing. |
| Available languages | Select one or more languages that will be supported for this metadata template. All text elements in the template’s configuration (section and field names, field values) will have to be translated into each supported language. You must select at least one language. |
| Section name | You can define one or more metadata sections. Enter a name for the current section. Click on  to add a new section. Click on to add a new section. Click on  to delete a section. to delete a section. |
| Label | Enter a label for the field. The label text will be displayed in the metadata entry window and in the consultation interface.Click on to add a new field. Click on to delete a field. |
| Type | Select the type of field. The following types are available: TEXT: Alphanumeric data entry field on a single line. TEXTAREA: Data entry field spanning multiple lines to allow for longer text. |
| Mouseover | By selecting this option, the field value will be displayed in the mouseover bubble when a layer is pointed in the layer bar of JMap applications. This bubble presents a summary of a layer’s metadata. |