Layers
Table of contents
- Creating Layers
- Importing layers
- Publishing layers
- Configuring Layers
- Layer Permissions
- Sharing Layers
- JMap extensions
- Bulk editing a layer set
A project is composed of an ordered list of layers. Layers are used to display data extracted from spatial data sources. Each layer is related to a specific spatial data source. Vector layers are related to vector data sources and display vector data while raster layers are related to raster data sources. The layer configuration determines the appearance of the data (style of the layer), the visibility thresholds, what information is associated with the spatial data (attributes), etc. Each layer has its own configuration parameters for labelling, reports, thematics, etc.
Layers are created in the project they belong to. Specific permissions can be configured for each layer. Thus, some layers can be accessed only by a subset of users authorized to open the project.
The layers of a project can be organized into a logical tree-like structure or hierarchy. This feature is useful to better organize information when working with projects that have a high number of layers. In client applications, users are able to control the visibility of the layers belonging to the same group in one click. Refer to the section titled Organizing Layers for more information on this subject.
Layers can be copied from one project to another or even shared between various projects located on the same JMap Server or on separate JMap Servers. Refer to the section titled Sharing Layers for more information on this topic.
The layers of a project are displayed in the Layers section, which may be accessed from the JMap Admin project configuration interface. In the List tab, the table shows basic information about each layer of the project. When you click on the name of a layer, a details section displays. The Hierarchy tab displays the groups and subgroups with the layers that compose them. The tasks you can perform from this tab are detailed in the Organizing Layers section.
In the List tab of the Layers section of a project, you can perform the tasks described in the table. For some tasks, you must select more than one layer.
| Layers | |
|---|---|
| Add - Create | Initiates the creation of a new layer. Refer to Creating Layers. |
| Add - Clone/Reference | Allows you to duplicate or reference a layer from another project located on the same server or on a different JMap Server. Refer to Sharing Layers. |
| Add - Import… | Allows you to import layers one by one from a project exported from another JMap server. Refer to Importing layers. |
| Permissions | Allows you to configure permissions for the selected layers. Refer to Layer Permissions. |
| Update data sources | Updates the spatial data sources associated with the selected layers. Refer to Spatial Data Sources. |
| Update caches | Launches the preparation of the vector data cache for the selected layers. Refer to Creating Layers. |
| Update - Bulk edit… | Allows you to edit certain layer parameters in batches. The Bulk editing a layer set section provides details about this topic. |
| Delete | Deletes the selected layers. |
This button  allows you to access the Permissions section, where you can configure the permissions of the selected layers. See Layer Permissions for more details.
Creating Layers
Each layer of a project in JMap takes its data from a spatial data source. Thus, before layers can be created, the related data sources must already exist (see Creating Spatial Data Sources for more information).
Creating a new layer
To create a new layer, press Create in the Add menu of the Layers section of a project. Note that the new layer will have the same name as the data source by default. The name can be changed later.
| Spatial data source | |
|---|---|
| Spatial data source | Select the spatial data source that will provide the data of the layer. Selecting a vector data source will create a vector layer. Selecting a raster data source will create a raster layer. |
| Name | Enter a name for your new layer. The name must be unique. By default, the layer will take the same name as the selected data source. |
| Description | (Optional) Enter a description for the new layer. This description will be used for administrative purposes. |
The next steps are different for vector layers and raster layers. Note that creating a raster layer is also different for each type of raster data source. Jump to the corresponding section below.
Creating a vector layer
| Geometry type | |
|---|---|
| Geometry type | If the data source provides more than one type, select the unique geometry type for the layer. |
| Element factory | |
|---|---|
| Element factory | Some JMap extensions work with layers composed of complex elements, integrated by several distinct geometries. The spatial data sources associated with the extension allow defining the complex elements. When such a spatial data source is selected for the creation of a layer, this step allows to select the appropriate option to configure the complex elements of the layer. Select the Default factory option for layers composed by a single type of geometry. This step is absent when the spatial data source does not allow to define complex elements. |
| Attributes | |
|---|---|
| Bound attributes | By default, when layer elements (points, lines, polygons, etc.) are served by JMap Server, the element attributes (or descriptive data) are not. This is because the attributes are not “bound” to the elements. Attribute binding binds attribute data to layer elements. Only bound attributes can be used for the following functions: labeling, mouseover, thematic mapping and displaying attributes in the elements or selection explorer. Select and add the attributes to the list on the right to bind them to the layer. The other attributes will still be available for other functions like attribute queries and information reports. Note that the number of bound attributes has an impact on network and memory usage as well as the size of Mapbox vector tiles and thus can reduce the overall performances. Therefore, attributes should only be bound when necessary. |
| Geometry angle (layers of points only) | |
|---|---|
| Angle attribute | This section is only available for layers of points. In this section, select a numeric attribute that contains the rotation angles for the symbols representing the points of the layer. If you select an attribute of the angle, the symbols will be displayed with a rotation following this attribute value. |
| Units of angular measure | Choose the rotation unit to apply: degrees or radians |
| Direction | Choose the rotation direction. Angle values can be interpreted clockwise or counterclockwise. |
| Origin of rotation | Choose the origin of the rotation to apply: geographic (north) or arithmetic (east). |
The request mode determines how the vector data is managed by JMap Server. It can greatly influence the system’s overall performance.
| Request mode | |
|---|---|
| Load by tile | The data is requested by rectangular zones (tiles) defined by a predetermined fixed grid that covers all the layer data. Structuring layer data in tiles makes data management more efficient, for network transfers, memory management and cache storage. If the grid is not properly configured, this can have a negative impact on the system’s performance or lead to operational problems. When you press the Estimate button, JMap performs a calculation to determine the best configuration for the grid. You can accept these values or modify them according to your needs. This mode offers the best performance because once a tile has been extracted from a data source, it can be cached for a certain amount of time and reused effectively. This is the recommended mode for most applications. |
| Load by region | The data is requested by random regions, according to the user’s navigation actions on the map. Each time the layer needs to be displayed in the application, a new request is sent to JMap Server and the data is extracted again from the spatial data source. This mode is very dynamic as no caching is used, and users can see data changes at every map manipulation (zoom, pan, etc.). Note however that it is much more intensive for JMap Server and, if not used properly, it can affect the system’s general performance. This mode must be used for dynamic data. Typically, this data is found in a relational database and can be randomly modified. This is the case for layers that are editable by JMap. |
Advanced parameters
Most of the time, the following advanced parameters don’t need to be modified.
| Advanced (optional) | |
|---|---|
| Transformation | Apply a translation: Translate each geometry of the layer by X units horizontally and Y units vertically. The original data is not affected. Generalize geometries: Generalize (simplify) geometries using the specified tolerance. For a given geometry, all nodes that are closer together than the tolerance are eliminated. In addition, all nodes that are located on the same straight line are eliminated. The original data is not affected. Reduce precision (better performance): Use data compression to improve performance. In some rare situations, this option can noticeably reduce data precision. From JMap Dakar, this option is unchecked by default for new layers to avoid performance issues. Layers configured in earlier versions of JMap are not affected. |
| Caching | This section allows you to define server data caching rules for the vector data and its attributes. The cache is on the server. This improves performances because once data is in the cache, JMap Server does not need to load it again from the data source. Activate server data caching for this layer: Use this option to enable or disable data caching on the server for this layer. Automatically build the cache when the data source is updated: If caching is enabled, this tells JMap Server to flush and rebuild the cache for this layer, when the corresponding spatial data source gets updated. Building the cache in advance helps to prevent delays for the users. Building the cache may take a long time, depending on the volume of the data. Cache timeout: This instructs JMap Server to cache the data no longer than the specified time period. When the timeout is reached, the data is requested again from the data source. This is mostly useful for spatial data sources that get their data from spatial data servers to which JMap Server is connected (Oracle Spatial/Locator, ESRI geodatabases, PostGIS, MySQL Spatial, etc.). Update layer cache after I click “Finish”: Select this option to have the cache built immediately for this layer. Building the cache may take a long time, depending on the volume of data. |
| Base Filter | SQL conditions: SQL conditions are used to filter the elements of the spatial data source. Only the elements that satisfy the SQL conditions will be on the layer. This allows you to create many layers showing different data using the same spatial data source. SQL conditions are interpreted directly by the database system so the syntax resembles that of an SQL WHERE clause. However, you must always indicate the name of the table in the database in the SQL clause. WHERE keyword is not necessary. Exemple: WORLD_CITIES.JMAP_ID < 100 where WORLD_CITIES is the table name. If you specify only JMAP_ID <100, the layer is not displayed. |
Creating a raster layer based on a WMS data source
To create a raster layer based on a WMS spatial data source, you need to tell JMap what data to request from the WMS server. The WMS server publishes a list of all the layers it can serve and their properties. In JMap, the WMS layer creation interface allows you to select the layers to include in the WMS layer you wish to create.
| WMS raster layer | |
|---|---|
| Connection type (Direct/Server) | The connection type determines if JMap Pro applications will request images directly from the WMS server or if they will send the requests to JMap Server, which in turn will query the WMS server. JMap Web applications are not affected by this setting. If Direct is selected and a JMap Pro application fails to connect to the WMS server, the connection mode will revert to Server. Note that if JMap Server is behind a firewall/proxy, it may need proxy authentication settings in order to access the Internet. See JMap Server Settings for more information. |
| Output format | The list of output formats offered by the WMS server. You can select the format to use. |
| Background color | Tells the WMS server what color to use in the background of the map images. Any area where there is no data will be filled with this color. |
| Use background color as transparent color | Tells the WMS server to use the background color as the transparency color. Using transparency allows the map images to be placed on top of other layers without completely hiding them. |
| S.R.S. | The list of Spatial Reference Systems offered by the WMS server for the layer. You can select the one to use. Make sure the selected SRS is consistent with the project projection because JMap cannot reproject images received from WMS servers. |
| Available layers | The list of layers the WMS server is publishing. If you hold your mouse pointer on a layer name, its description will display automatically, along with its attributes. The attributes determine if the layer is Queryable (supports GetFeatureInfo requests), Cascaded (comes from another WMS server) or Opaque (not transparent, i.e. the layers found under it will not be visible). |
| Selected layer(s) | The layers selected among those that are available appear in this list. Click on  to add a new layer to this list. You can select the style to be used. A default style is always provided. Click on to add a new layer to this list. You can select the style to be used. A default style is always provided. Click on  to delete a selected layer. to delete a selected layer. |
Creating a raster layer based on a GDAL or ECW/ECWP data source
| Raster layer | |
|---|---|
| Image format | Select the image format to use for image transfers between JMap Server and JMap Pro applications. For air photos, JPEG usually gives the best results. |
| Image format parameters | Only used with JPEG image format to specify the quality factor (1 means excellent quality and low compression while 0 means low quality and high compression). Test with different values to determine what fits your needs. A value of 0.5 is usually a good compromise. Example: quality=0.6 |
| Background color | Tells JMap Server what color to use in the background of the images. Any area where there is no data will be filled with this color. |
| Use background color as transparent color | Tells JMap Server to use the background color as the transparency color. Using transparency allows the map images to be used on top of other layers without completely hiding them. |
Creating a raster layer from a WMTS data source
| WMTS raster layer | |
|---|---|
| Layer | Select the layer from the WMTS server that you wish to use to create the layer. Only layers who have the same projection as the project are selectable. |
| Style | Select the layer style. |
Importing layers
You can add a layer to a project by importing it from a project that has been exported from another JMap server. The Exporting and Importing section provides details on exporting and importing a JMap server’s resources. To import a layer in a project, you must also create a data source in JMap Server containing the data of the imported layer.
When you select Add / Import… the Importation wizard will guide you through the process to import one or more layers from the project where they are found.
-
To start the process, select the Importation file. Click on Browse to access the File browser.
-
Select the .properties file that contains the project whose layers you wish to import.
-
Click on Next.
-
Select the Project that contains the layer you wish to import.
-
Select the Layers to import.
-
Click on Next.
-
If the project in which you are importing the layer contains a layer with the same name as the one you are importing, select an option to resolve the conflict between these layers: Create a new layer with a different name, Replace the existing layer or Use existing layer.
-
Click on Next.
-
If the JMap Server in which you are importing the layer contains a spatial data source with the same name as the data source of the layer you are importing, select an option to resolve the conflict between these data sources: Create a new data source with a different name, Replace the existing data source or Use existing data source.
-
Click on Next.
-
A summary lists the number of imported resources for the project: layers, databases, remote connections, spatial data sources, style templates, and metadata templates.
-
Press Import. The layer is added to the project and a new spatial data source is created in JMap Server.
Publishing layers
A layer must be published to be accessible to the users. A layer that is not published is not part of the project, and in no way can users see it or access it.
When a new layer is created, it is not published by default. This allows you to do further configuration tasks on the layer before making it available for the users. For example, it is important to configure visibility thresholds appropriately according to the scale before the layer can be seen by users.
After layer creation, you must press the Publish button in the layer’s detail section.
Unpublishing an existing layer can be useful to make it unavailable to the users without actually deleting it.
Configuring Layers
The layer configuration interface allows you to access layer information as well as parameter configuration functions such as style, labels, or reports.
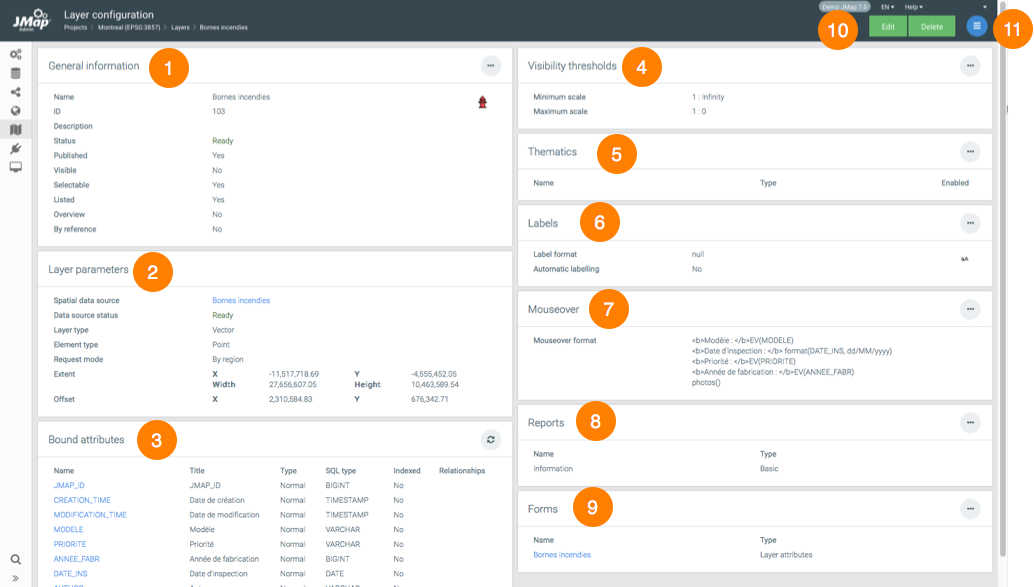
| 1 | General information configured when creating the layer. This button  provides direct access to the section settings configuration interface. provides direct access to the section settings configuration interface. |
| 2 | Layer parameters configured when it was created. The hyperlink allows you to access the spatial data source that contains the layer data. |
| 3 | Bound attributes. This section presents a list of attributes related to the layer. Click on the name of an attribute to open the configuration window of its properties. This button  is used to update the statistics of the attributes. is used to update the statistics of the attributes. |
| 4 | Layer visibility thresholds; shows the limits between the minimum and maximum scales for displaying layer elements. |
| 5 | Thematics. This section presents the layer’s thematics. Click on the name of the thematic to access its configuration interface. |
| 6 | Labels. This section presents information on the labels. |
| 7 | Mouseover. This section describes the mouseover configured for the layer. |
| 8 | Reports. This section presents the reports configured for the layer. |
| 9 | Forms. This section presents information about forms configured for the layer. Click on the form name to access its configuration interface. |
| 10 | These buttons allow you to edit the layer configuration or delete it. |
| 11 | The menu provides access to the sections General, Permissions, Style, Thematics, Labels, Mouseover, Forms and Reports. This menu also provides access to the configuration interfaces of JMap extensions which require the configuration of parameters at the layer level. |
The raster layer configuration interface contains the General information, Layer parameters, and Visibility thresholds sections.
Attributes
The Attribute configuration window contains three tabs: Metadata, Statistics, and Attribute sample.
| Metadata | |
|---|---|
| Type | Indicates the type of data for the attribute. |
| SQL Type | Indicates the SQL type of the data for the attribute. |
| Indexed | Check this box to have the attribute indexed. |
| Title | You can change the title of the attribute. This icon  allows you to provide the title in multiple languages. allows you to provide the title in multiple languages. |
| Format pattern | Specify a format pattern for displaying SDS items. The pattern must follow Java standards. For more details on this topic, read the following article: https://docs.oracle.com/javase/tutorial/i18n/format/decimalFormat.html. |
The Statistics tab provides simple statistics about the attribute. The Attribute sample tab displays the value of the attribute for a sample of layer elements.
Layer Permissions
There are several different types of permissions for a project’s layers. The following tables describe each one of these.
Administrator permissions
| Permissions | |
|---|---|
| Remote access | Allows a user to access this layer through a JMap Server to JMap Server connection. This permission must be granted to the account of the user who established the secure connection between both JMap Servers. For more information on this topic, refer to the JMap Server to JMap Server Connections section. |
User permissions
| Permissions | |
|---|---|
| View this layer | Allows a user to view a layer in JMap’s applications. By default, the everyone user (everyone who has permission to open the project) is authorized to view any new layer. To restrict access to a layer, you must remove this permission from everyone and only add it to the users of your choice. |
| Add elements | Allows a user to add new elements on the layer and enter attribute values using the form associated with the layer. Editing must be enabled on this layer in order for this permission to be available. |
| Modify elements | Allows a user to modify the geometries of the elements (move, add/remove nodes, etc.) found on the layer. Also allows the user to modify attribute values using the form associated with the layer. Editing must be enabled on this layer in order for this permission to be available. |
| Delete elements | Allows a user to delete existing elements on the layer. Editing must be enabled on this layer in order for this permission to be available. |
| Modify attribute values | Allows a user to open the form of a layer’s element attributes and to modify their values. Editing must be enabled on this layer in order for this permission to be available. |
| Copy / export elements | Allows a JMap Pro user to copy the data of the layer to another layer, or to export the data of the layer using the JMap Exportation extension. |
| Options | |
| Edit only own elements | Allows the user of a JMap application to modify the geometries, the values of the attributes or to delete only the elements that he has created in the layer. The user cannot edit the elements of the layer that were created by other users. |
To modify layer permissions, press  in order to select the users and groups to which you wish to grant permissions. Only the users and groups who are already authorized to open the project containing the layer can be granted permissions associated with this layer.
Sharing Layers
JMap allows you to share layers between projects that are on the same server or that originate from remote servers that are connected. Layer sharing allows you to manage data more effectively (avoids duplication, saves time) by reusing existing layers instead of creating new layers in each project. When the original layers are modified, the changes can automatically be viewed in all projects that have referenced layers pointing towards these shared layers. Referenced layers cannot be modified directly, save a few basic settings. Only the original shared layer can be modified.
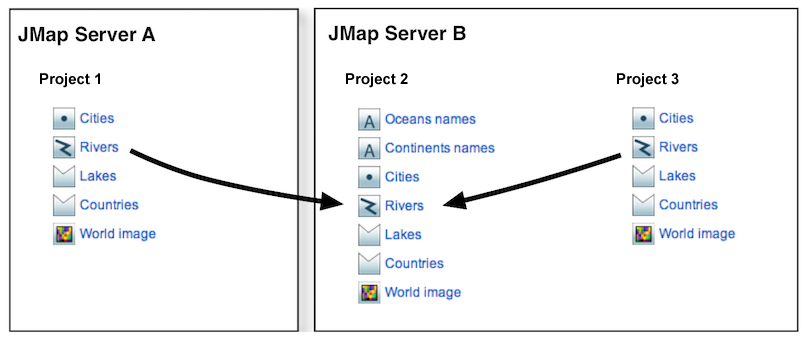
The figure presents the layer sharing between projects on the same server and on different servers. The properties of the Rivers layer cannot be modified in projects 1 and 3. The original layer is in project 2.
Sharing layers between projects on the same JMap Server
To share layers between projects on the same JMap Server, no action is required. Layers can be accessed freely from any project on the same server. Refer to Accessing shared layers for more information.
Sharing layers between different JMap Servers
If you wish to share a project’s layers in order to access them from another JMap Server, you must assign a special remote access permission to a user for these layers. In order to do this, access the project layers section for which you wish to share these layers.
-
Select one or more layers.
-
Click on Permissions.
-
In the permission management interface, select the user account or group to which you wish to assign the remote access permission (you can add user accounts and groups by clicking on
). -
Select the Remote access permission. The account used must match the user account through which the connection to this JMap Server was established. If you are using a group, the aforementioned user account must be included within it.
Once the layers have been shared, they can be selected from the remote JMap Server and inserted in this server’s projects. Refer to Accessing shared layers for more information.
To stop layers from being shared, simply remove the Remote access permission from these layers.
Accessing shared layers
To access existing layers from different projects located on the same JMap Server or shared layers on other JMap Servers, you must click on Add and select Clone / Reference in the layers section of the project to which you would like to add these layers.
In the Clone / Reference layers section:
-
Select a JMap Server from which you wish to clone or reference layers. If you choose Local server, you can select the projects and layers of the local server without these being shared. The other servers in the list are the JMap Servers for which a JMap Server to JMap Server connection exists. Refer to the JMap Server to JMap Server Connections section for more information on creating JMap Server to JMap Server connections.
-
Select the project from which you wish to clone or reference layers. Once the project has been selected, the list of available layers displays.
-
Select the layers you wish to clone or reference and move them to the list on the right.
-
Select the Clone or Reference option.
If you choose the Clone option, the selected layers will be duplicated towards your project. They will be exact copies of the original layers, but there will be no connection between the copies and the original layers. You can modify the copies without affecting the originals. If you delete a cloned layer, this doesn’t affect the original layer. If you delete the original layer, this doesn’t affect its cloned layers. However, duplicated layers always use the same spatial data source as the original layer. If this data source is modified or deleted, this will affect the duplicated layers.
If you select the Reference option, the original layers will be accessed by reference. This means that a direct connection will be maintained between the layers of your project and the original layers. You will not be able to modify these layers in your project. If the original layers are modified, the changes will appear wherever references to these layers exist, after a short delay. If you delete a referenced layer, the original layer will not be affected. If you delete the original layer, the referenced layers will no longer work and will have to be deleted manually.
JMap extensions
Some JMap extensions require the configuration of specific parameters at the layer level. To access the extension configuration interface, press and then the name of the extension. Once the settings are configured, press Save.
Bulk editing a layer set
You can edit different settings for a set of layers. You must select the layers to modify in the List tab of the Layers section of the project. Afterwards, press the Update button, and click on the Bulk edit… option. The Bulk edit interface will open.
| Update - Bulk edit… | |
|---|---|
| Change ‘Antialiasing’ | Check if you want to change this setting. Check New Value to enable the antialiasing feature. Uncheck New Value to disable the antialiasing feature. The Style section provides details on this parameter. |
| Change ‘Minimum scale’ | Check to change the minimum scale for displaying layers. Check Infinity or 1: and in this case, indicate the scale. The General Settings section provides details on this topic. |
| Change ‘Maximum scale’ | Check to change the maximum scale for displaying layers. Check Zero or 1: and in this case, indicate the scale. The General Settings section provides details on this topic. |
| Change ‘Request mode’ | Check to change the data request mode. Check the option of your choice. The Creating Layers section provides details on this topic. |
| Change ‘Description’ | You can write a new description for the layers. |