JMap Applications
Table of contents
JMap applications diffuse data that is organized into projects to end users. Currently, there are two families of applications: traditional applications and new generation applications. Traditional applications require the application to be deployed, while new generation applications connect to the JMap Web API to access the projects directly.
This chapter contains a section that describes the operation of new generation applications, and another section to guide administrators in creating and managing deployed traditional applications.
Traditional JMap applications
Deploying a JMap application consists of preparing the application and putting it online so it can be accessed by users. You must select the desired options (application type, activated extensions, access controls, etc.) to customize the application according to your needs. To allow a user to open a deployed JMap application, simply give the user the application URL.
Deployed JMap applications are placed online in the web server integrated to JMap Server. They can also be copied manually to other web servers.
The deployment section displays a list of applications that have already been deployed.
Creating a new deployment
To create a new application deployment, click on the Create button in the Deployed applications section. Some parameters will be common to all types of applications. The following tables describe these parameters.
| Template | |
|---|---|
| Application type | There are four types of JMap applications. Each type of application has different features that are adapted to different needs. Custom application templates can also be added; these can be variants of the types offered by default. JMap Pro applications: This type of JMap application offers advanced functionality. It requires more IT resources, and a Java Runtime Environment (JRE) must be installed (Java is no longer required if you use the new deployment mode with an installation program). JMap Web applications: This type of JMap application is lighter and you can run it from a web browser or a mobile web browser. It doesn’t offer as many advanced features as JMap Pro applications. WFS Service: This type of application is a vector data web service destined to provide data to third-party applications through the Web Feature Service standard protocol. WMS Service: This type of application is a web service for the production of map images. It is destined to provide maps to third-party applications using the Web Mapping Service standard protocol. |
| Identification | |
|---|---|
| Name | Enter a name for the new deployed application. Names must be unique. The name can contain spaces and any other characters. |
| Type | Select the deployment type, either local or external. Local: The application service will be deployed directly in JMap Server. External: Select this option for applications that must be deployed on a web server that is external to JMap Server. The application service will not be deployed in JMap Server. Instead, a .war file will be created. This file must be copied onto the external web server. A Download button in the deployment section allows you to download the .war file. |
| Protocol | The protocol to be used for communication between the JMap application and JMap Server. Select https for secure communication. If the HTTPS protocol is not configured in JMap Server, this option is not available. For more information on using the HTTPS protocol, refer to the Using HTTPS with JMap section. |
| Application host | The host name or IP address that will be included in the URL of the deployed application. If your server has several IP addresses, specify the one that must be used. If you have selected the External deployment type, make sure you enter the name or address of the external web server where the application will be deployed. |
| Application port | The TCP/IP port used in the URL of the deployed application. |
| Relative path | The path used in the URL of the deployed application, taken from the name given to the application. |
The following steps depend on the type of application you selected. Refer to the following sections: JMap Pro Applications, JMap Web Applications and WFS and WMS Services.
JMap Pro Applications
The following settings apply to JMap Pro applications.
| Application options | |
|---|---|
| Project | Select the project to open when JMap Pro is started. |
| Language | Select the language to use in JMap Pro. The elements of the graphical interface (menus, buttons, text in windows, etc.) will be in the selected language. If you select the Automatic option, the language of the graphical interface will be the same as the language defined in the regional options of the user’s system. If the aforementioned language is not supported by JMap, the language of the interface will be set to English. The project configuration (names of layers, mouseover bubbles, etc.) will be in the selected language, provided translations into this language are available in the project. If you select the Automatic option, the language of the project will be the same as the language defined in the regional options of the user’s system. If the user’s system language is not available in the project, the default language defined in the project will be used. |
| Map rotation | You can define the rotation to be applied to the map when opening the application. |
| Controlled access | This option allows you to determine if access to this application must be controlled. If this option is activated, an authentication window will appear when the application is launched. If this option is not selected, the project must allow anonymous sessions. |
| Enable single sign-on | Select this option to activate single sign-on for this application. Note that single sign-on must be configured on JMap Server for this option to be available. When JMap Pro is started, if single sign-on cannot work, an authentication window will be automatically displayed. Refer to the Single Sign-On section for more information. |
| Embedded in the browser | Select this option to integrate the JMap application in a web browser window as a Java applet. Otherwise, the application will open in its own window. Note: This option is not recommended because Java execution is no longer supported by most web browsers. |
| Show deployment name in the application title bar | Select this option to show the deployment name in the application title bar. This is useful when multiple application are open. |
| Advanced | |
|---|---|
| Connection type | Select the connection method to be used between the client application and JMap Server. Direct connections are usually appropriate for internal use; proxy connections are destined to users outside the local network. Proxy connections use the HTTP protocol and therefore can go through firewalls more easily. |
| Max. memory for data | Select the maximum amount of memory that can be used to store vector data in the client application. When this limit is reached, the application will free up memory by deleting old data in order to store new data. The default value of 128 MB is appropriate for most sets of data but you may have to adjust it when you have a large amount of data to display. |
| Max. Heap size | Select the maximum amount of memory that can be assigned to the application to store all the settings and data needed to run it. This memory includes the memory previously configured for vector data. This amount of memory should always be higher than the maximum memory for data. The default value of 512 MB is suitable for most applications, but you may have to adjust it in some cases. Note that the amount of memory used by the application process (as seen in task managers) can exceed this value. |
| Display this message in login window | You can optionally add a message that will be displayed in the login window to all of the application’s users. |
| Display projects list in login window | Select this option to display a list of available projects in the connection window. Users can then choose the project they wish to open. The project’s security settings will be used to determine whether or not a user is authorized to open a particular project. |
| Do not list users | Select this option to hide the list of users in the deployed application. This application can be useful if you must hide the accounts of internal users when you deploy an application that is accessible to the general public via the Internet. The users list serves various purposes, such as sharing contexts and sending maps by email. |
| Parent path of .jmap folder | This advanced setting allows you to specify a different location than the default for the .jmap folder. This folder contains JMap Pro settings and cached data. Specify the desired location of the .jmap folder. Example: C:/permanent_folderWill give you this final folder: C:/permanent_folder/username/.jmap |
| Map options | |
|---|---|
| Show map overview by default | Select this option to display the overview window when the application opens. |
| Display scalebar | Select this option to display a graphic scalebar in each application map. The user can add or remove the bar during his/her session. |
| North arrow | Select this option to display a graphical arrow pointing north in every map of the application. The user can add or remove the arrow during his/her session. You can decide which model you wish to use, its size, and where it will be positioned on the map. |
Click on  to add a logo that will be displayed on the map.
| Logos | |
|---|---|
| Position | Defines the position of the logo on the map. |
| Offset X | Defines a horizontal offset value in relation to the selected position. |
| Offset Y | Defines a vertical offset value in relation to the selected position. |
| Transparency | Indicate the partial transparency of the logo (0% = opaque, 100% = invisible). |
| Extensions | |
|---|---|
| Name of extension and version | Extensions available for JMap Pro applications are indicated here. Select the ones you wish to deploy with the application. Extensions will usually add new windows, menus or toolbar to the application. |
| Toolbar visible | Select this option to make the toolbar of the selected extension visible when the application starts up. Otherwise, the user can display the toolbar on request. |
| GUI visible | Select this option to display the windows and other components of the selected extension’s graphical interface when the application starts up. Otherwise, the user can display them on request. |
| Extra parameters | Some extensions can take entry parameters when the application starts up. If this is the case, these parameters can be inserted in this field for the selected extension. |
Click on Finish to complete the deployment process.
JMap Web Applications
The following settings apply to JMap Web applications.
| Application options | |
|---|---|
| Project | Select the project to open when JMap Web is started. |
| Language | Select the language to be used in JMap Web.The elements of the graphical interface (menus, buttons, text in windows, etc.) will be in the selected language. If you select the Automatic option, the language of the graphical interface will be the same as the language defined in the regional options of the user’s system. If the aforementioned language is not supported by JMap, the language will be set to English.The project configuration (names of layers, mouseover bubbles, etc.) will be in the selected language, provided translations into this language are available in the project. If you select the Automatic option, the language of the project will be the same as the language defined in the regional options of the user’s system. If the user’s system language is not available in the project, the default language defined in the project will be used. |
| Map rotation | You can define the rotation to be applied to the map when opening the application. |
| Controlled access | This option determines if access to this application must be controlled. If this option is activated, an authentication window will display at application startup. If this option is not selected, the project must allow anonymous sessions. |
| Docked layers panel at startup | Determines if the sidebar (containing the list of layers and searches) will be displayed when the application opens. |
| Continuous zoom | This option allows you to zoom continuously on the map. If this option is not selected, the zooms are made in predetermined increments. This option is automatically disabled if Google Maps is displayed as a base map. This option is selected by default for new web deployments from JMap 7 Cairo. |
| Geolocation tool | Select this option to activate the geolocation tool in the application. The option will only be available if the application is deployed with the HTTPS protocol. If this option is not selected, the geolocation button will be absent from the user interface. |
| Data editing tools | Select this option to activate the data editing tools for element geometries and their attributes. Even if these tools are activated, the user must have the necessary permissions to modify the data of a layer. |
| Selection tools | Select this option to activate the selection tools in the application. If this option is not selected, the selection button will be absent from the user interface. |
| Google tools | Select this option to activate the address search, directions, and Street View from Google. Important: You must make sure you use this option in accordance with Google’s license agreement. |
| Sharing tools | Select this option to enable sharing tools (link to this map, integrated map, create an image). If this option is disabled, the sharing menu will not appear in the user interface. |
| Share on social networks | If the sharing tools option is selected, you can select this option to enable map sharing on social networks (Facebook, Linkedin, Twitter). |
| GeoWebCache | |
|---|---|
| Username | If you are using a GeoWebCache server, enter the user account that GeoWebCache must use to access the deployed application and selected project. It is absolutely necessary that this user account have the appropriate permissions to open the project associated with this deployed application. Refer to the Using a GeoWebCache Server section for more information. |
| Password | Enter the password that GeoWebCache must use to access the deployed application and associated project. |
| Advanced | |
|---|---|
| Cross-Origin Request Sharing | Select this option if JMap Web needs to be embedded in a website whose domaine name (DNS) is different from that of the application. |
| X-Frame Options | This field offers a range of options for the JMap Web application to be called from an iframe. |
| X-Frame Authorized Referers | In this field, add any domain URL authorized to call the JMap Web application in an iframe. URLs must be separated by semicolons. Example: http://172.17.101.14:8082; http://172.17.101.15:8083. |
| Session timeout | Check this option to log the user out after a given period of inactivity. |
| REST API Address | JMap Web requires JMap Server’s REST services. Enter a different address for the REST services if they were deployed on another server. |
Configuring layers
This type of application requires a layer configuration that may differ from the configuration existing in the project to be disseminated. JMap Web displays map images that are generated by JMap Server from the project layers. An image will often contain the data of several layers combined together.
Tiled image layers
The images produced can either be tiled (images with fixed sizes) or not tiled (images with variable sizes). In the case of tiled images, they can be generated in advance or on demand, and they can be cached to improve performance. Images that are not tiled are always generated on demand. In general, tiled image layers offer better performances and a smoother user experience, but they may add border effects and overload the server if there are a lot of them.
Base layers
Base layers are used to display a map in the background. The data of base layers is static and cannot be queried by JMap. Only one base layer can be displayed at a time in the application, but if several are available, the user can select one.
Base layers can be made up of layers from the JMap project or they may come from external sources (OpenStreetMap, Google Maps, Bing Maps, WMTS, Mapbox). When they are produced by JMap Server, tiled, and cached, they can be shared by several JMap Web applications.
To add a layer, click on .
| Types of layers | |
|---|---|
| JMap dynamic layer | Dynamic layers can be tiled or not tiled, but they are always generated on demand and they cannot be cached. They are a good option for data that changes often or that requires more interactivity. The user can control the visibility of each layer composing the dynamic layer. Users can also display thematics and their legends, edit data, make selections, etc.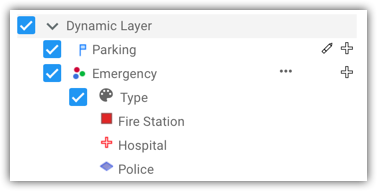 A dynamic layer offers a high level of interactivity with the layers it is comprised of. |
| JMap dynamic layer (entire project) | Dynamic layers for the entire project are a special type of dynamic layer that presents the layers of the project with their organization (hierarchy of groups and layers). They are a quick way to deploy an application that accurately represents a JMap project. However, since they are always dynamic and can be comprised of many layers, their performance isn’t optimal when there are many users.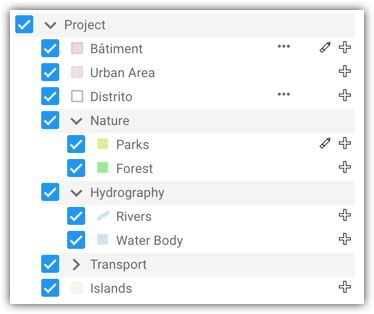 A dynamic layer for the entire project shows the layer structure as it is defined in the project. It offers a high level of interactivity with all of the layers. |
| JMap static layer | Static layers are always tiled and often cached. They are a good option for data that does not change often. They can be base layers or non-base layers. They are less interactive than dynamic layers. Users can see a static layer’s composition (unless it is a base layer) but they will not be able to control the visibility of each one, nor can they request the display of thematics or edit data. However, it is possible to display mouseover bubbles and make selections on the layers that make up a static layer. JMap static layers can be used as base layers.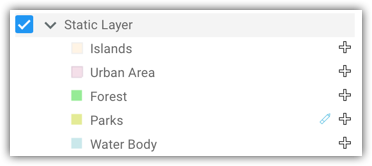 |
| Google Maps | Add a base layer that displays the Google Map. In order for this layer to display correctly with the other layers, the projection of the JMap project must be identical to the projection used by Google Maps, i.e. WGS84 / Pseudo-Mercator (EPSG:3857). You can choose the types of maps (Roadmap, Terrain, Satellite, Hybrid, etc.) that you wish to add. Important: In order for this layer to appear, you must enter a Google Maps API key in your configuration. In the layer configuration interface, the existing key is displayed, but you cannot edit it in the interface. Refer to the JMap Server Settings section for information on how to enter or edit a Google Maps API key. You must make sure you use this option in accordance with Google’s license agreement. |
| Bing Maps | Add a base layer that will display the Bing Map. In order for this layer to display correctly with the other layers, the projection of the JMap project must be identical to the projection used by Bing Maps, i.e WGS84 / Pseudo-Mercator (EPSG:3857). You can choose the types of maps (Road, Aerial, Aerial With Labels, etc.) that you wish to add. Important: In order for this layer to appear, you must enter a Bing Maps API key in your configuration. In the layer configuration interface, the existing key is displayed, but you cannot edit it in the interface. Refer to the JMap Server Settings section for information on how to enter or edit a Bing Maps API key.You must make sure you use this option in accordance with Microsoft’s license agreement. |
| OpenStreetMap | Add a base layer that will display the OpenStreetMap map. In order for this layer to display correctly with the other layers, the projection of the JMap project must be identical to the projection used by OpenStreetMap, i.e. WGS84 / Pseudo-Mercator (EPSG:3857). Important: You must make sure you use this option in accordance with OpenStreetMap’s license agreement. |
| Mapbox | Add a base layer that will display the Mapbox map. In order for this layer to display correctly with the other layers, the projection of the JMap project must be identical to the projection used by Mapbox, i.e. WGS84 / Pseudo-Mercator (EPSG:3857). Important: You must make sure you use this option in accordance with Mapbox’s license agreement. |
| GeoWebCache | Create a static JMap layer by reusing an existing tile cache that is available in GeoWebCache. For more information, refer to the Using a GeoWebCache Server section. |
| WMTS layer | Add a layer from a server that is compatible with WMTS (version 1.0.0). You must give the layer a name, indicate if you want the layer to be visible when the application opens, and also indicate if you want it to be listed in the Layers menu.You can use one of the project’s existing layers or directly connect to an external source to obtain the data. If using the latter option, you must provide the GetCapabilities URL that will return the capabilities of the WMTS server. The URL should be similar to the following: http://www.server.com/wmts?SERVICE=WMTS&VERSION=1.0.0&REQUEST=GetCapabilities For example: https://basemap.nationalmap.gov/arcgis/rest/services/USGSHydroCached/MapServer/WMTS/1.0.0/WMTSCapabilities.xml Afterwards, you must select the layer to add to the JMap Web application. Only layers who have the same projection as the project are selectable. |
The following settings apply when creating a JMap layer (static or dynamic) for JMap Web.
| Properties | |
|---|---|
| Layer name | Name that identifies the layer. This name will be presented to the user in the application’s layer manager. The name must be unique. |
| Image format | Select the format used to produce the layer images. For layers with air or satellite photos, the jpeg format usually offers the best compression rates. However, this format does not allow you to adjust the transparency of the layer, which is opaque. |
| Base layer | Determines whether or not the layer will be a base layer. |
| Visible | Determines if the layer will be initially visible or invisible when the application opens. This option does not apply to base layers. |
| Listed | Determines if the layer will be displayed in the layer list presented to the users. A layer may be displayed on the map without being displayed in the list of layers. |
| Tiled | Determines whether or not the layer images will be tiled. Static layers are automatically tiled. |
| Cached | Select this option if you want GeoWebCache to be used to cache the tiles generated for this layer. This option is available only for static layers. Refer to the Using a GeoWebCache Server section for more information. |
| Layer composition | |
| Available layers | List of project layers available to include in the new layer. |
| Selected layers | List of layers selected to be included in the new layer. You can define the display order of the project layers that make up the new layer. All selected layers will be drawn together in the images produced by JMap Server. |
| Map thumbnail | |
| Choose | When the layer is a Base Map, you can select an image to represent it as a thumbnail in the application. The image to be uploaded must have a size of 100x100 pixels, otherwise it will be modified to reach this size. If you do not select an image, the thumbnail will display a default image. |
Geographic properties
The geographic properties of JMap Web allow you to redefine certain project properties for this application. This type of application can generate a significant workload on JMap Server and a large storage space if you use a GeoWebCache server. By reducing the global extent of the map and maximum scale, you can help reduce the load and improve performance. By default, JMap Web will use the same properties as those defined in the project.
The following parameters apply to JMap Web applications.
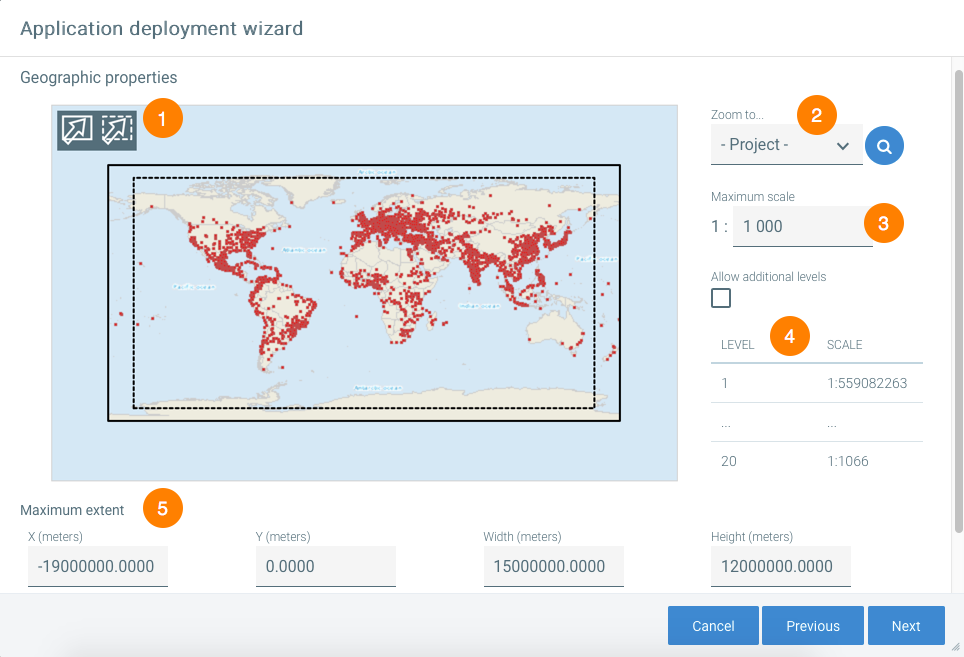
| 1 | Use these tools to redefine the initial and maximum extents, as needed. By default, the project’s extent values are used. Limiting the maximum extent of the map can greatly reduce the size of the cached data for this type of application. The maximum extent is represented by the solid line. The initial extent is represented by the dotted line. |
| 2 | Zoom to… The Zoom to… function allows you to find data on the map. In some cases, the extents known by JMap can be incorrect, and the map displayed by default can seem empty. In order to help you locate the data correctly, this tool allows you to zoom in on the extent of a specific layer or on the extent of the entire project. Once the data has been located, you can reset valid initial and maximum extents. |
| 3 | Maximum scale This setting allows you to redefine the maximum scale of the map to limit the user’s ability to enlarge the map. By default, the maximum scale defined in the project configuration is used but another scale can be specified. Specifying a smaller maximum scale allows you to considerably reduce the size of cached data for this type of application. |
| 4 | Level/Scale Displays the list of zoom levels and scales that will be used by the application. The levels are determined by the maximum scale and maximum extent. Allow additional levels This option allows JMap Web, in certain situations, to display the map at larger scales (closer zoom) than those normally used. The largest scale normally used is approximately 1:1000. If the maximum scale defined previously is larger than 1:1000 (e.g. 1:500), you must select this option to allow JMap to zoom closer. Most base maps (Google Maps, Bing Maps, OpenStreetMap, Mapbox) cannot display well at scales larger than 1:1000. |
| 5 | Maximum extent The maximum extent settings are displayed below the map (X, Y coordinates of lower left point, width, height, in the coordinate system of the project). You can also enter the values directly in the respective fields. |
WFS and WMS Services
WMS Service
Web Map Service (WMS) is a standard set forth by the Open Geospatial Consortium that defines how client applications can obtain map images from a server that is compatible with the standard.
JMap Server can act as a WMS server. If you implement a WMS web service, other applications can query JMap Server via the WMS protocol for the selected project.
| Application options | |
|---|---|
| Project | Select the JMap project that will be accessible via the WMS service. |
| Controlled access | Select this option if the WMS service must be secured through HTTP authentication. The selected project must allow anonymous access if this option is not selected. |
Once the service has been deployed, you can click on Launch to display a web page containing 2 hyperlinks: the first one is the getCapabilities request you must provide to the applications that wish to query JMap’s WMS service. The second one is an example of a getMap request that allows you to obtain a map image.
WFS Service
Web Feature Service (WFS) is a standard presented by the Open Geospatial Consortium that defines how client applications can obtain vector data and its attributes (GML format) from a server that is compatible with WFS.
JMap Server can act as a WFS server. If you implement a WFS web service, other applications can query JMap Server via the WFS protocol for the selected project.
| Application options | |
|---|---|
| Project | Select the JMap project that will be accessible via the WFS service. |
| Controlled access | Select this option if the WFS service must be secured through HTTP authentication. The selected project must allow anonymous access if this option is not selected. |
Once the service has been deployed, you can click on Launch to display a web page containing a hyperlink towards the getCapabilities request you must provide to the applications that wish to query JMap’s WFS service.
Managing Deployed Applications
Once you have deployed applications, you can perform certain management tasks on them from the Deployed Applications interface of the Deployed section.
Editing an existing application
Editing an existing application allows you to go through all configuration sections again and change any options as needed. Double-click on the application’s name and select Edit.
Clone an existing application
Select an application to duplicate it.
Updating applications
Updating a deployed application means deploying it again, overwriting the existing version. This is equivalent to editing an existing application and keeping all the same options. Updating applications is useful when you install a new version of JMap to make sure your deployed application uses all the latest library versions. You do not need to update deployed applications when the data or the project changes.
Loading and unloading applications
If you want to temporarily make a deployed application unavailable, you simply need to unload it by selecting it in the list and pressing Unload. When an application is unloaded, users can no longer start it using its URL. If you want to make it available again, simply press Load to reload it.
Downloading applications
If an application’s type is External, you can download that application’s .war file in order to deploy it on another web server. Select the application and click on Download.
For more information on external applications, see this section.
Deleting applications
Deleting an existing deployed application deletes all files related to this application. There is no way to undelete an application (you need to redeploy it). Note that when deleting an application, none of your data or configurations (projects, layers, data sources, databases, etc.) are deleted nor affected in any way.
Click on this button  to access the following functions:
Permissions
If you select a deployment, you can access the Permissions section of the application.
Download REST services
The service.war file containing the JMap REST services is downloaded to your computer for deployment on another server.
Download report services
The report.war file containing the report service is downloaded to your computer for deployment on another server.
Download securityRealm services
The securityRealm.war file is downloaded to your computer. This file is used in single sign-on (SSO) by authentication servers (OIDC, SAML2) to communicate with JMap.
Using a GeoWebCache Server
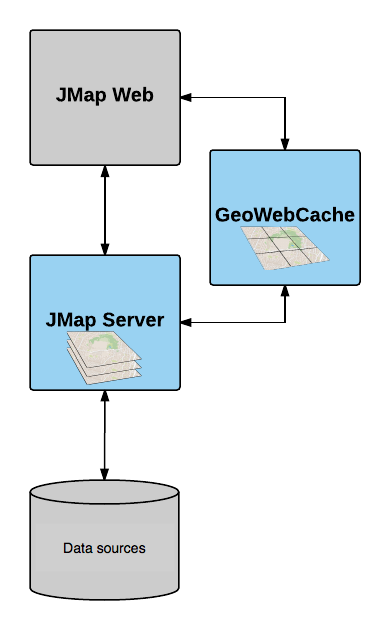
JMap Web applications use an approach based on the production of map images generated by JMap Server. The images can be produced as a series of tiles that are adjacent to one another, for each scale level. Lower scale levels contain a small number of tiles (small scale, few details on a large portion of territory), while higher scale levels typically contain a large amount of tiles (large scale, many details on a large portion of territory).
These images are created on request when users navigate on the map in web applications. Producing these images demands a lot of work from JMap Server and therefore can cause significant delays in these applications. To improve performance, it is recommended to use a tile cache system. This system caches each tile once it is produced and can also ask JMap Server to produce all images of each layer in advance. This operation can require several hours of work during which JMap Server will be very busy. In addition, the sum total of the cached tiles can require considerable storage space. Afterwards, this will greatly accelerate navigation in web applications, since all images will have been produced and made available.
JMap Server is compatible with the open source product GeoWebCache (http://geowebcache.org). However, to improve integration with JMap Admin, K2 Geospatial provides its own slightly adapted version of GeoWebCache. Visit K2 Geospatial’s website (http://k2geospatial.com) to download the GeoWebCache installer for JMap Server.
Configuring JMap to use GeoWebCache
To use GeoWebCache in conjunction with JMap Server, JMap Admin must be configured to provide JMap with the settings to connect to GeoWebCache. These settings are entered in the section JMap Server / Settings.
The URL to GeoWebCache indicates the JMap Server address that communicates with GeoWebCache. Providing more than one URL towards GeoWebCache enables web and mobile applications to launch more image queries simultaneously, which improves performance when loading the map. These URLs must use domain names or IP addresses that point to the same GeoWebCache instance (e.g. cache1.jmaponline.net, cache2.jmaponline.net).
The username and password configured allow JMap Server to connect to GeoWebCache and send it commands. For instance, JMap Server can ask GeoWebCache to create, delete or update tile caches. These settings must match the configuration in GeoWebCache. Read below for more information on configuring GeoWebCache.
See the JMap Server Settings section for more information on configuring these settings.
Configuring GeoWebCache
GeoWebCache is not included with JMap and must be installed separately. For more information on installing and configuring GeoWebCache, read the following article.
Using GeoWebCache for JMap Web applications
If GeoWebCache is correctly installed and configured, you can use it with JMap Web applications. Usage of GeoWebCache for this type of applications is configured when these are deployed. It is when you configure layers that you can select the Cached option. See JMap Web Applications.
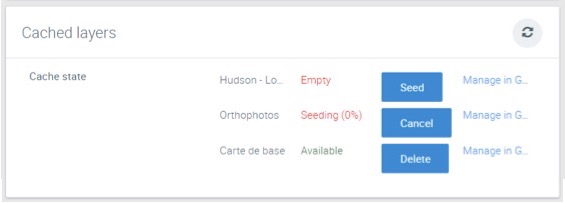
In the information section of a web or mobile application that has already been deployed, there is a subsection titled Cached layers. This subsection displays the list of layers for which the Cached option was activated. This section allows you to manage caching and access the GeoWebCache management console.
Cache state
For each layer, click on Seed to launch the production of the tile cache. This process can be cancelled by clicking on Cancel. To delete the cache for a layer, click on Delete. Cache production can take a very long time. If you wish to manage the cache directly in the Geowebcache interfaces, click on Manage in Geowebcache.
New generation JMap applications
New generation applications such as JMap NG and JMap Survey connect to the JMap Web API to access projects. They are built on technologies that allow them to evolve over time and to be fully customized by the developers of client organizations.
The JMap administrator does not need to configure a deployment, as would be the case with traditional applications; the applications connect to and consume the projects directly. While this simplifies the administrator’s work since there is no deployment to elaborate, it is critical to follow project configuration best practices to ensure the optimal performance and relevance of the new generation applications. Indeed, for applications of this type, projects must be designed with a view to their end use. A single project can be disseminated in several different traditional applications based on specific needs, but it is disseminated directly and in its entirety in new generation applications.
JMap’s new generation applications work with vector data organized into vector tiles, resulting in a heavy workload for the Web browser, contrarily to JMap Web, for example, whose workload is mostly handled by JMap Server.
If the deployed traditional applications can be hosted in a proxy, in the case of new generation applications, JMap’s Web APIs are hosted in a proxy.
The Mapbox vector tiles used in new generation applications ensure smooth image rendering, while also offering smooth and efficient three-dimensional navigation. However, using Mapbox vector tiles creates some application limitations:
-
The administrator cannot define customized base maps for projects. The base maps provided by Mapbox must be used. Maps from Google Maps, Bing or OpenStreetMaps cannot be used.
-
The applications have the Web Mercator projection system, specifically the EPSG:3857 reference system. The project can have another projection system, but when vector tiles are generated by Mapbox, the vector data is reprojected to ESPG:3857. In this case, the project images are not displayed in the applications.
Preparing projects to work with new generation applications
Some practices make projects more appropriate for use with new generation applications:
-
The project must be designed based on its end use; each NG application must open the entire project.
-
A project with few layers makes it easier to display the application by reducing the Web browser’s workload.
-
Generating vector tiles can take a certain amount of time, depending on the size of the data. Vector tiles are generated for specific zoom levels (approximately 20). Each tile contains the data describing the geometries and attributes. They are light and allow the style to be changed on the fly when a user is browsing the map.
You can create tile caches for projects. This article contains the detailed procedure to produce vector tile caches.
JMap NG Applications
JMap NG applications open in a Web browser. They can be used to display data two and three-dimensionally, to navigate the data three-dimensionally, to query, measure and edit editable data, and to create and print customized maps.
The administrator must provide the URL of the NG service to users. The users will then be able to access the JMap server’s projects based on the permissions for each project.
The URL is in the following form: http://SERVERADDRESS:PORT/services/ng where SERVERADDRESS:PORT is the IP address or domain in which JMap Server is installed. Here are two examples:
https://jmap7dev.jmaponline.net/services/nghttp://192.168.0.106:8080/services/ng
The documentation for developers offers other options to initiate JMap NG.
JMap Survey Applications
JMap Survey applications are mobile applications that are used to collect data in the field in offline mode (without Internet access). This application replaces the traditional JMap Mobile application.
Similarly to JMap NG, JMap Survey allows the user to connect to a specific project from a JMap server. The administrator must then provide the URL of the JMap server and the name of the project.