Creating a New Project
Table of contents
Adding, or creating a new project involves setting its specific location on the map, identifying the person in charge of the project, defining the project’s spatial extent (*empreinte spatiale), and entering descriptive information.
Positioning a project
To create a new project:
-
Click on
 Info-RTU in the lateral bar, then click on
  to open the Project section.
 -
Click on
 Add new project to open the project creation interface.
 -
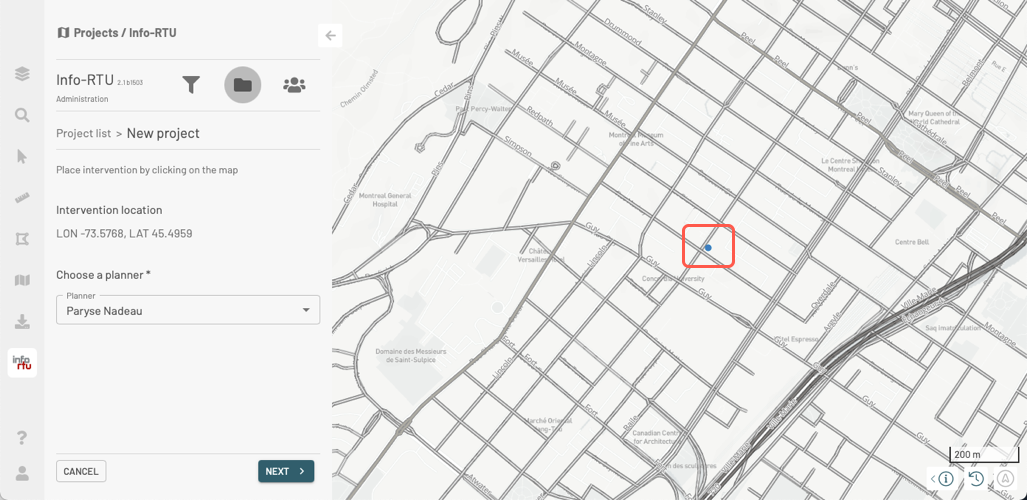
Click on a point on the map to define the position of your project. The logotype of your company will appear at the location where you clicked. The geographic coordinates of this location, expressed in Latitude and Longitude values, are displayed in the panel. A mark is displayed at the chosen position on the map.
-
Select the project’s Planner in the drop-down list.
-
Click on NEXT.
-
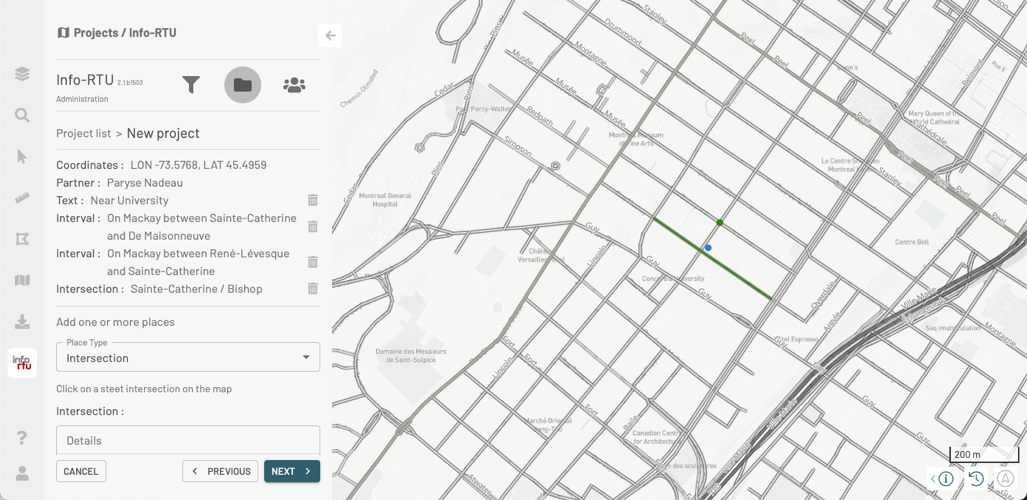
Select the Place Type in the drop-down list. The options that are available in the list vary based on the Planner you selected at the previous step.
The spatial extent (*emprise spatiale) of a project is defined by a set of different place types. The default place type is the Interval.
The Place types section details the various possibilities offered by Info-RTU.
Each place type added is displayed in the project panel and on the map, in green. You can erase each place by clicking on
 .
.
-
Once the place types have been defined for the project, click on NEXT. The panel to enter the project’s descriptive information is displayed. For details on each attribute to define in this panel, see Defining the details of a project.
-
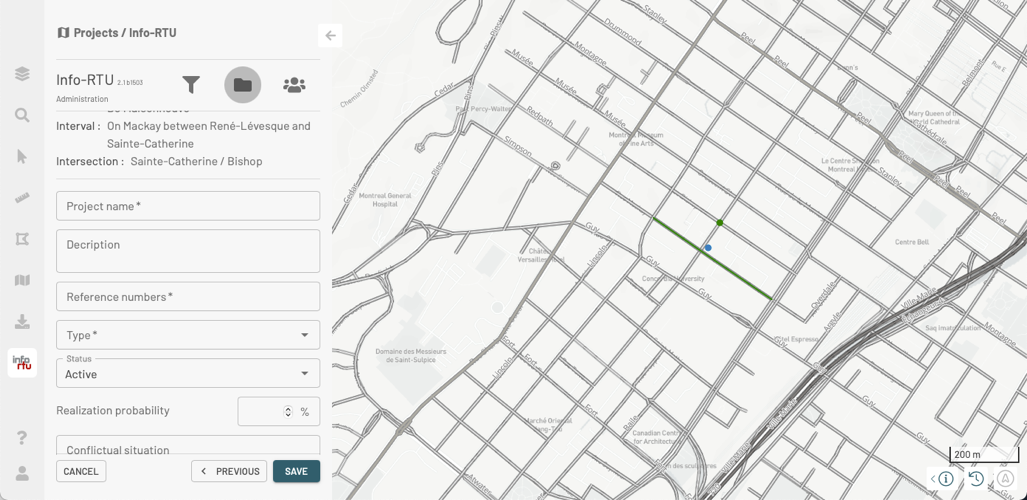
Enter the project’s information.
-
Click on SAVE to create the project. The project will be displayed in the Projects panel and on the map.
Place types
The extent of the project (*emprise du projet) can be defined using a set of place types, such as an interval, an approximate location, an address, an intersection, a polygon, or various road sections.
Interval
An interval is a set of sections from the same street. To add an interval:
-
Select the starting section of the interval by clicking on it. Information on that section will be populated in the On, between, and and fields. The selected section turns yellow.
-
Add other sections to the interval. All the selected sections must be part of the same street, otherwise a warning message will appear. The selected sections turn yellow. The On, between and and information is updated each time a section is added.
-
If needed, add text to provide some details about the interval.
-
Click on DELETE SELECTION if you wish to delete the interval before adding it as a place type for the project.
-
Click on ADD. The interval is displayed in the panel and it turns green on the map.
OR
Click on DELETE SELECTION to erase the selected sections before adding them as a place type.
Approximate location
You can define an approximate location using descriptive text. To do so:
-
Select Approximate Location in the drop-down list if you wish to add this type of location.
-
Enter text describing the approximate location of the place.
-
Click on ADD. This location is displayed as Text in the project panel and as a blue dot on the map.
Address
To add an address as a place type:
-
Select Address in the drop-down list.
-
Enter the address. Civic number and Street name are required fields. Article (avenue, street, etc.) and Direction (north, west, south, etc.) are optional fields.
-
Click on SEARCH to search for existing addresses in the database.
-
Select the relevant address in the Address drop-down list.
-
If needed, add text to provide additional details about this location.
-
Click on ADD. The address appears in the project panel, and the street section on which the address is found is colored in green on the map.
Intersection
To add an intersection:
-
Select Intersection in the drop-down list.
-
Click on a two-street intersection in the map. The intersection displays with an x in the map and with the street names in the panel.
-
If needed, add text to provide additional details.
-
Click on ADD. The intersection appears in the project panel and on the map as a green dot.
Polygon
A polygon is a group of adjacent street segments that form a closed shape. In other words, the last section is adjacent to the first section. To define a polygon:
-
Select Polygon in the drop-down list.
-
Select the first street section of the polygon. The selected street section turns yellow.
-
Select the following section. It must touch the street segment you already selected.
-
Select the next segments. Each segment must touch the previous one.
-
Select the final segment. It must touch the previous segment and also the very first segment selected in order to close the polygon.
-
If needed, add text to provide additional details.
-
Click on ADD. The street names of the segments that form the polygon are displayed in the project panel. The polygon is colored in green on the map.
OR
Click on DELETE SELECTION to delete the selection of segments before adding them as a place type.
Sections
This place type is a collection of street sections belonging to different streets. To define this type of place:
-
Select Sections in the drop-down list.
-
Select the sections that form the desired location.
-
Add text to provide additional details (this text is required).
-
Click on ADD to add the sections as a place type. In the map, the sections turn green.
OR
Click on DELETE SELECTION to delete your selection of sections before adding them as a place type.
Defining the details of a project
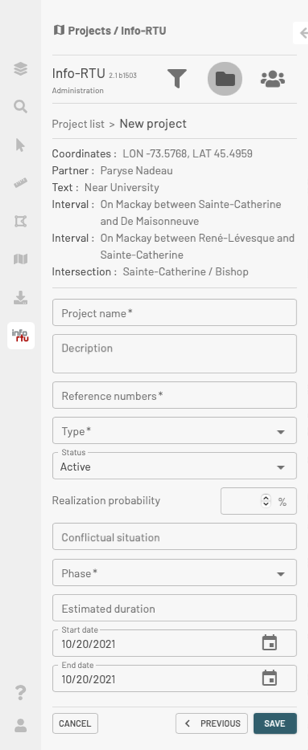
The panel to enter descriptive information about the project contains required attributes, indicated by an asterisk (*) as well as optional attributes.
Project name
Enter the street where the project is located and its limits (… street from … to …) or enter the intersection.
Description
Indicate the nature of the work.
Reference numbers
This number must be unique to each project. Use a sequence for the whole of your projects.
Type
In the drop-down menu, select the most appropriate type, to the best of your knowledge.
Status
Select the status of the project in the drop-down menu.
Realization probability
Indicate, as a percentage value, the probability the project will be completed.
Conflictual situation
If the project is in conflict with another project, indicate the conflict, then notify the partners to coordinate these projects. If this doesn’t apply, leave the field blank.
Phase
In the drop-down menu, select the current phase of the project.
Estimated duration
Enter the planned duration of the project.
Start date and End date
Select the dates in the calendar.