Editing Projects
Table of contents
You can modify different aspects of the projects to which you have the appropriate access permissions.
-
You can copy a project, change its location and its attributes (status, person in charge, etc.).
-
You can batch edit a set of projects you have selected.
Copying a project
Copying a project consists of creating a new project with the same details as an existing project. This allows you to:
-
Quickly repeat a project at the same location;
-
Create a new project planned at a different location from another similar project.
The process is similar to creating a new project:
-
Select the project you wish to copy in the Projects panel or in the table of projects.
-
Click on
 to open the menu with the features that are available to you.
-
Click on Copy. Two options are available to you: With places or Without places.
Copying a project with the same places as the original project
-
Click on With places if you wish to copy the project with the current places. The panel to create a new project opens. It displays the geographic coordinates of the company’s logotype and of the project planner.
-
Click on a point in the map to change the location of the logotype of the new project and therefore avoid superimposing it on the logotype of the original project.
-
Change the Planner if needed.
-
Click on NEXT to display the original project’s places.
-
Add or change the places, as needed.
-
Click on NEXT to display the panel with the project’s details. The attributes of the original project are displayed.
-
Change the Project name if the limits of the project have changed.
-
Give the project a unique Reference number.
-
Identify any Conflictual situations with any of the partners’ projects, and edit the Description of the project if there have been any changes.
-
Change the Status of the project.
-
Click on SAVE. The new project is displayed in the projects panel and on the map.
Copying a project without the original project’s places
-
Click on Without places if you wish to copy the project without the current places. The panel to create a new project opens. It displays the geographic coordinates of the company’s logotype and of the project planner.
-
Click on a point in the map to change the location of the logotype of the new project and therefore avoid superimposing it on the logotype of the original project.
-
Change the Planner if needed.
-
Click on NEXT to display the panel containing the data on the places. No place is defined for the project.
-
Add places to the project. For details on the types of available places, see Creating a New Project.
-
Click on NEXT to display the panel with the project’s details. The attributes of the original project are displayed.
-
Change the Project name if the limits of the project have changed.
-
Give the project a unique Reference number.
-
Identify any Conflictual situations with any of the partners’ projects, and edit the Description of the project if there have been any changes.
-
Change the Status of the project, if needed. The Project status section offers a description of each available status.
-
Click on SAVE. The new project is displayed in the projects panel and on the map.
Editing a project
You can modify different aspects of a project. In general, editing a project is similar to creating a new project, and it involves the same panels.
To edit a project:
-
Select the project you wish to edit in the Projects panel or in the projects table.
-
Click on
to open the menu of available features.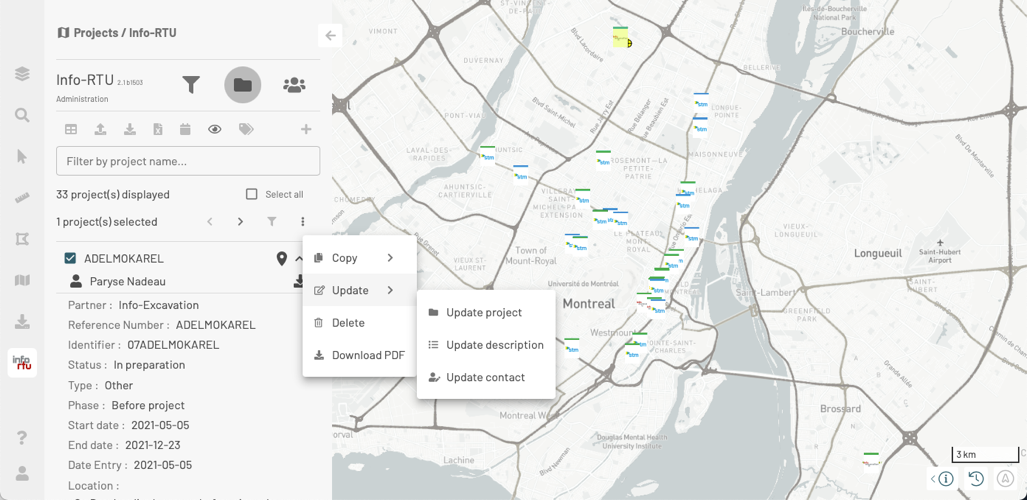
-
Click on Update. Three options are available: Update project, Update description and Update contact.
Update project
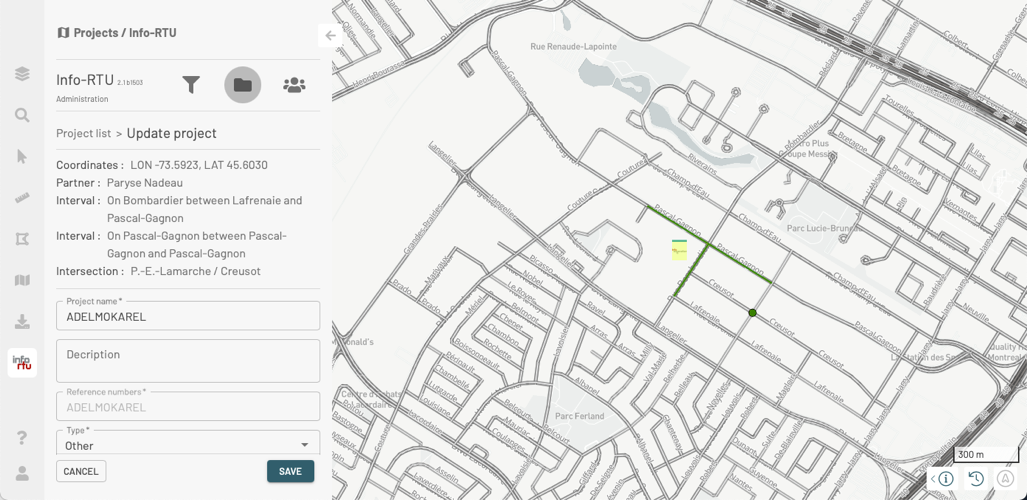
This feature allows you to change the project’s location, the places it includes, and the project’s details.
-
Click on Update project to display the Update project panel.

-
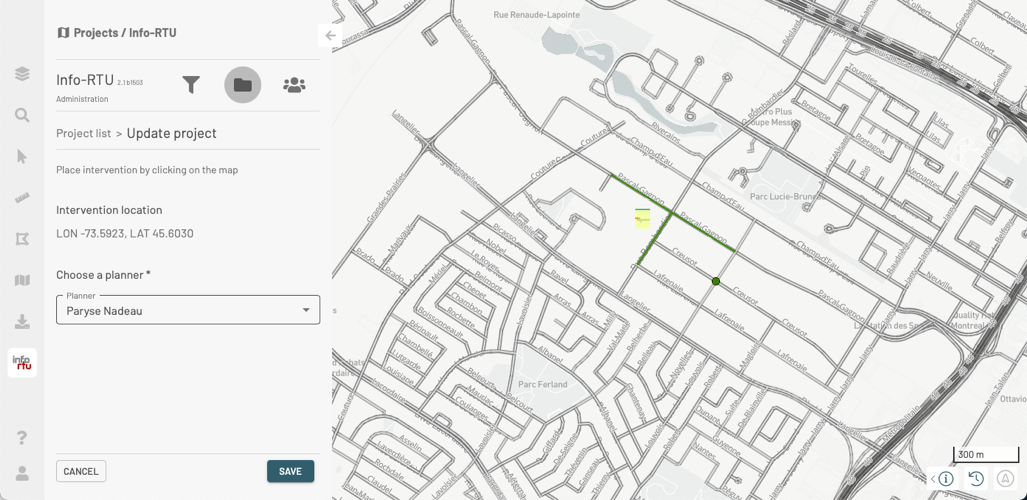
Click on the map if you wish to change the project’s location. A mark appears at the selected location, and the new coordinates, expressed in Latitude and Longitude values, are displayed in the panel.
-
Change the project Planner if required.
-
Click on NEXT to define the project places.
-
Define the project’s places. For details on the available types of places, see Creating a New Project.
-
Click on NEXT to edit the project’s details, as needed.
-
Edit the details of the project. You must not change the project’s Reference number.
-
Change the status of the project, if needed. The Project status section offers a description of each available status.
-
Click on SAVE to save the changes made to the project.
Update description
-
Click on Update project to display the Update project panel in the project details section.
-
Edit the details of the project. You must not change the project’s Reference number.
-
Change the status of the project, if needed. The Project status section offers a description of each available status.
-
Click on SAVE to save the changes made to the project’s details.
Update contact
-
Click on Update contact to display the Update project panel.
-
Select a new project planner.
-
Click on SAVE to save the changes made to the project.
Project status
There are 4 types of statuses for a project. Project statuses are defined using a color code in the bar located above the organization’s logotype.
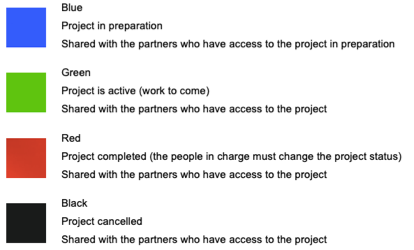
Select the status of your project:
-
To make the project visible to the other partners, select the Active status.
-
To cancel the project, select the Cancelled status.
-
When your project has been completed, change its status to Completed.
Batch updating the descriptive data of projects
You can batch update the descriptive data of projects to which you have the required access permissions. To do so:
-
In the Projects panel, select the projects whose information you wish to edit.
-
Click on the
menu. If you select projects you have permission to edit, the menu offers the Bulk update option. If your selection includes a project you do not have permission to edit, this option will not be displayed.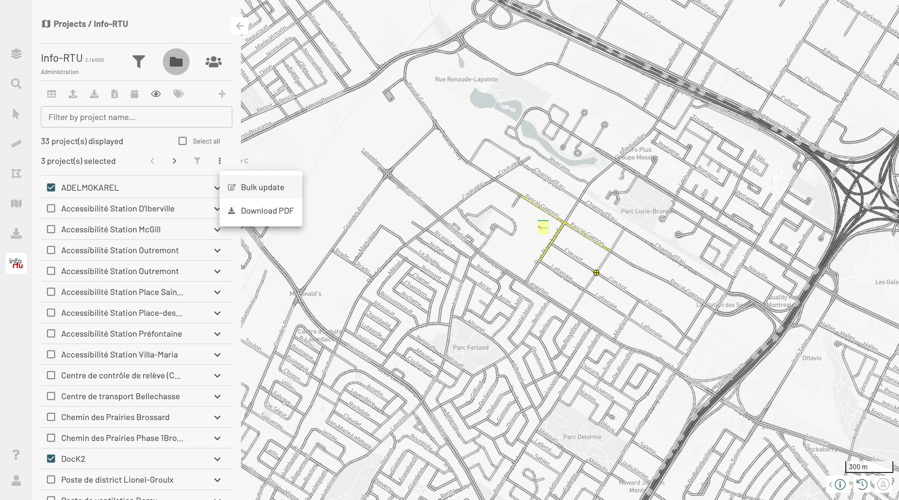
-
Click on Bulk update to open the editing form.
-
Select the attributes you wish to edit and enter the new values.

-
Click on SAVE to save the changes. A message asks you to confirm your intention to update the data.
-
Click on OK to proceed with the update.