Collaboration Tools
Table of contents
Several tools are available for collaborative work.
Map Contexts
Map contexts are comprised of all the settings required to recreate a geographical map. They allow you to save a map and also share it with other users. Existing contexts can be easily retrieved to recreate a map environment. All layer settings, annotations, thematics, selections, etc. are part of the context and are recreated when it is opened.
Note: A context is associated with the project in which it was created. It cannot be accessed from other projects.
Create a New Context
To create a new context go to Project -> Contexts… and click on the  button from the context window.
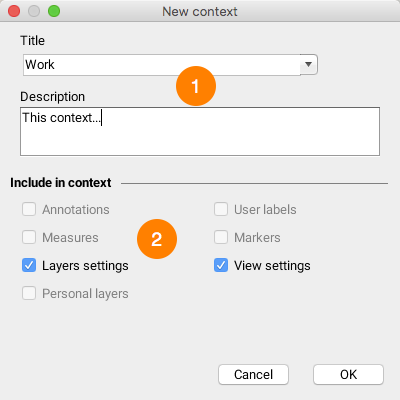
| 1 | Enter a name for the context. If the name already exists, you will be prompted for a confirmation before overwriting the context with the same name. When creating a new context, the settings of the displayed map are saved according to the selected options. |
| 2 | The following options are available: Annotations: Include the list of selected objects, the user’s drawings, the labels added to the map, and the distance and surface measurements. Measures: Include measurements made on the map. Layers settings: Include layer settings (visibility, order, styles, filters, etc.). User labels: Include labels displayed on the map. Markers: Include markers for the points the user has searched for and located by entering coordinates. View settings: Include settings of the displayed map (scale, area displayed, units, etc.). If an option is not selected, the settings associated with it are ignored and are not part of the context. When the context is opened, these settings will not be affected. Certain options may not be available if they do not apply. |
The new context appears in a list of the user’s private contexts.
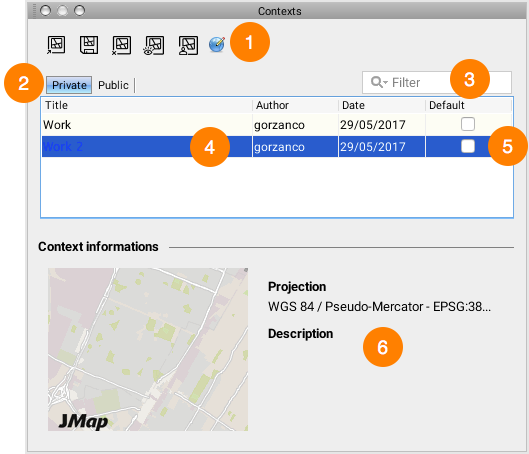
| 1 | The following options are available: Open: Select the context to open and click on the button to display it. Save context…: Click on this button to create a new context from the displayed map. Delete: Select the context to delete and click on the button to delete it. Make public: Select the context you wish to make public and click on the button to make it accessible to all users. Send a copy: Select the context you wish to send and choose the recipient in the list. The recipient will then see a pop-up in JMap notifying him or her that a context has been added to his or her list of private contexts. Change projection: This advanced function allows you to change the projection associated with a context. This can be useful after an administrator has changed the projection of a JMap project. |
| 2 | Click on the tab associated with the list of contexts to be viewed (public or private). |
| 3 | When entering a query in this search field, only the contexts whose names include the contents of the query will be displayed. |
| 4 | List of contexts showing the author and creation date of each context. |
| 5 | Allows you to select a context that will be displayed by default when a JMap session is opened. Only one context can be defined with this option. |
| 6 | Information on the context that is entered when it is created, along with a preview of the context. |
 Opening a Context
Open the context management window in Project -> Contexts….
The context management window displays the list of existing contexts for the current project. The list is divided into 2 sections: the private section displays your list of private contexts (which only you can access) and the public section shows the list of public contexts (shared by users and accessible to all users who have access to the project).
Contexts can be sorted by clicking on the column headers in the list.
To open a context, select the context in the list and press the button or double-click on the context in the list. After a context is opened, the active view displays the map. The context window stays on the screen to allow you to open another context.
 Sending a Context to Other Users
Open the context management window in Project -> Contexts….
JMap allows you to send a copy of a map context to one or more users. The context will appear in each recipient’s private section. Recipients are the owners of their copies and can modify or delete them.
In order to send a context, select it in the list and press the Send a copy button . A window displays, allowing you to select recipients.
Select one or more users or groups who will receive a copy of the context. When groups are selected, all members receive a copy. Press Ok.
 Making a Context Public
Open the context management window in Project -> Contexts….
A public context appears in the public section. A public context is in fact a private context that a user has decided to share with the other persons who have access to the project; all of these users can open the public context. Once it is shared, the context remains in the user’s private section, and a copy of it appears in the public section. Only the user who shared the context can modify or delete it.
To make a context public, select it in the list and press the Make public button .
 Deleting a Context
Open the context management window in Project -> Contexts….
To delete a context, select it in the list and press the Delete button . Only the owner of a public context can delete it.
Note: A context that has been deleted cannot be restored.
Load a Context by Default
Open the context management window in Project -> Contexts….
A context (private or public) can be loaded automatically when opening a project.
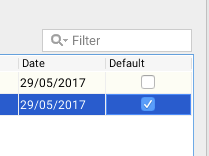
Select the context to be loaded automatically when the project is opened. Only one project can be selected. To cancel this function, simply re-click in the check box of the selected context.
Sharing Maps
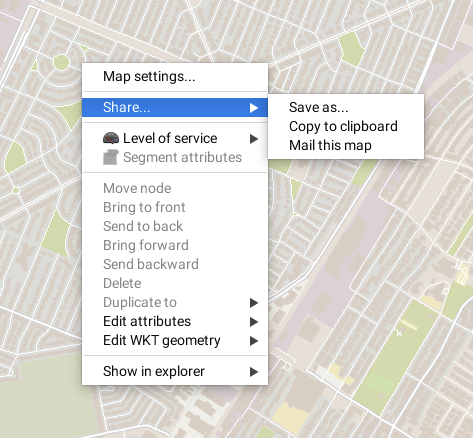
JMap allows you to create and share map images. You can copy a map to the clipboard and paste it into another application, send a map by email or save an image of the map in a file. These functions are accessed via the map’s pop-up menu (right-click on the map).
Copying a Map to the Clipboard
You can copy a map to the clipboard and paste it to another application (word processor, presentation software, email, etc.). Access the pop-up menu by right-clicking on the map and selecting Share… -> Copy to clipboard. Afterwards, you can use the Paste function in the application that will receive the image.
Saving a Map Image
You can save a map image in a file. Use the pop-up menu by right-clicking on the map and selecting Share… -> Save as…. You must then select a target directory and enter a name for the file.
Sending a Map by Email
JMap allows you to send an image of a map by email. Use the pop-up menu by right-clicking on the map and choosing Share… -> Mail this map. You can select JMap users to whom you wish to send the map or enter the recipients directly in the designated field (use a semicolon (;) to separate addresses). Groups can be used as lists of recipients. The map will be added to the email as an attachment.
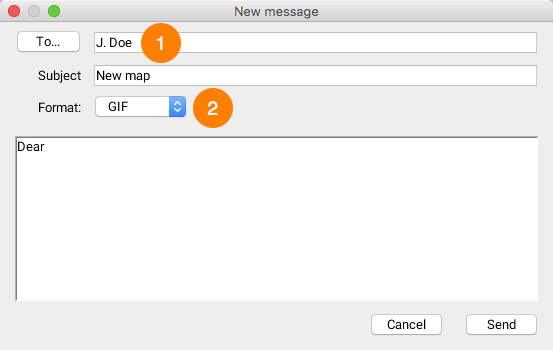
| 1 | Choose the email recipient among all JMap users by clicking on the To… button or enter the address of the recipient. Enter a subject for your email. |
| 2 | Choose the image format to apply to the email attachment. You can also enter text that will accompany the map image. |
Printing Maps
 JMap’s printing tool allows you to print maps with advanced page setup options. The print layouts are predefined page setups you can use for printing purposes. You can create your own layouts, and the JMap administrator can provide layouts that can be used by all users. You can also ask the JMap administrator to make your personal layouts public. The settings made in the print interface are saved automatically when you close your session.
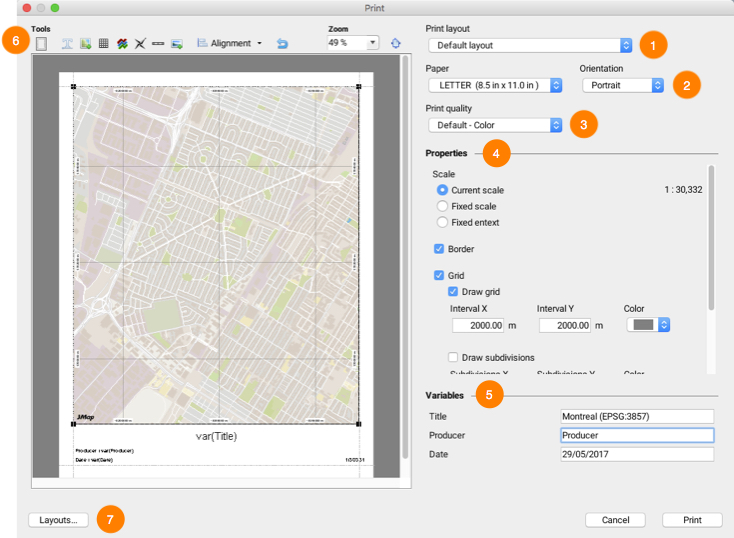
| 1 | Select the layout you wish to use. There is always at least one default layout. Refer to Print Layouts for more information on layouts. |
| 2 | Select the paper format and the printing orientation. JMap can print maps on many different paper formats, from very small to very large. |
| 3 | Select the print quality and type (color or grayscale). A high-quality print requires more time. |
| 4 | This section allows you to configure aspects such as the scale, borders, and grid of the map. For more information, refer to the Map Printing Properties section. |
| 5 | Variables are text that is replaced by user-defined values when the map is printed. The table shows all variables that are available in the selected layout. To modify a value, double-click on it and enter the new value. |
| 6 | You can modify the page setup of the map using a preview of it. For more information, refer to the Map Page Setup section. |
| 7 | Click on Layouts… to open the layout management window. Refer to the Print Layouts section for more information on layouts. |
Print Layouts
 Print layouts are used to define the page setup for printing. You can create your own layouts and use them according to your needs. Layouts also allow you to define a wide variety of display options. When defining the page setup of a layout, each element of the layout can be moved and resized using the mouse. Each element has its own settings window that can be accessed by double-clicking on the element.
To open the templates window, click on the Print layouts option in the Printing tools from the toolbar, or click on the Layouts… button in the Print window.
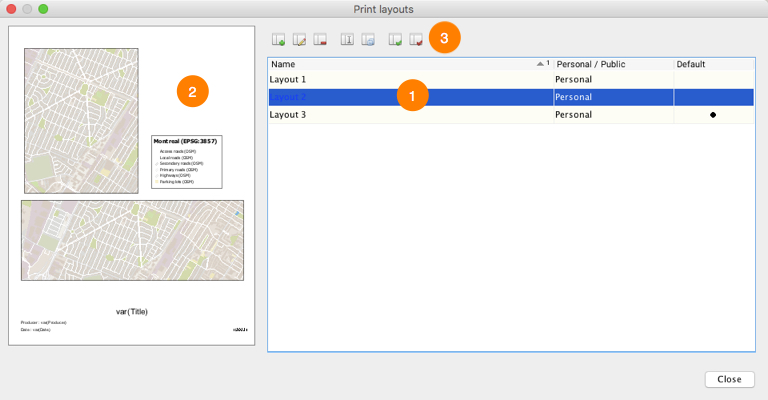
| 1 | The list of existing layouts. The default layout is indicated in the right column. |
| 2 | A preview of the selected layout. |
| 3 | Click on these buttons to: Create a new layout. Create a new layout. Edit selected layout. Edit selected layout. Delete selected layout. Delete selected layout. Rename selected layout. Rename selected layout. Duplicate selected layout. Duplicate selected layout. Assign selected layout as default layout. Assign selected layout as default layout. Remove default layout status from selected layout. Remove default layout status from selected layout. |
Map Printing Properties
The map’s printing properties can be configured directly in the printing interface, or they can be defined when configuring a print layout. In the latter case, double-click on one of the layout’s maps and open its Properties window. Both methods offer the same options to control the map’s appearance for printing purposes.
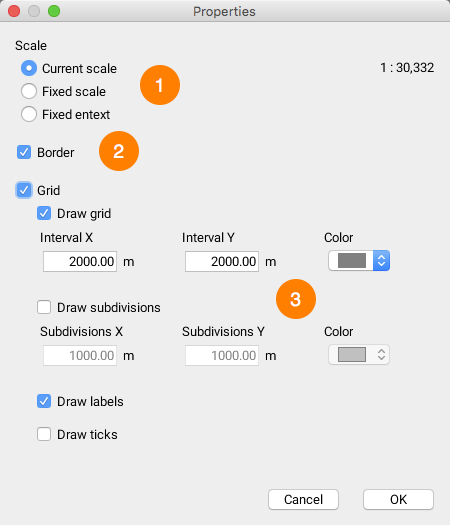
| 1 | Scale: Printing can be done according to the scale displayed on the screen or according to the displayed region. If you choose the Current scale option, JMap will print the map according to the same scale as displayed on the screen, but the area printed can change, depending on the size of the map and paper. If you choose Fixed scale, you can enter a different scale. The Fixed extent option allows you to adapt the map to the paper format used to ensure the printed area is at least as big as the area displayed on the screen. |
| 2 | Border: This option allows you to add a border around the map. |
| 3 | Grid: You can add a grid on the map. This grid will show divisions and subdivisions of the coordinates system. |
Map Page Setup
The map’s page setup can be configured directly from the printing interface or when creating or modifying a layout. In both cases, the interfaces offer the same tools. The following figure shows the layout configuration window.
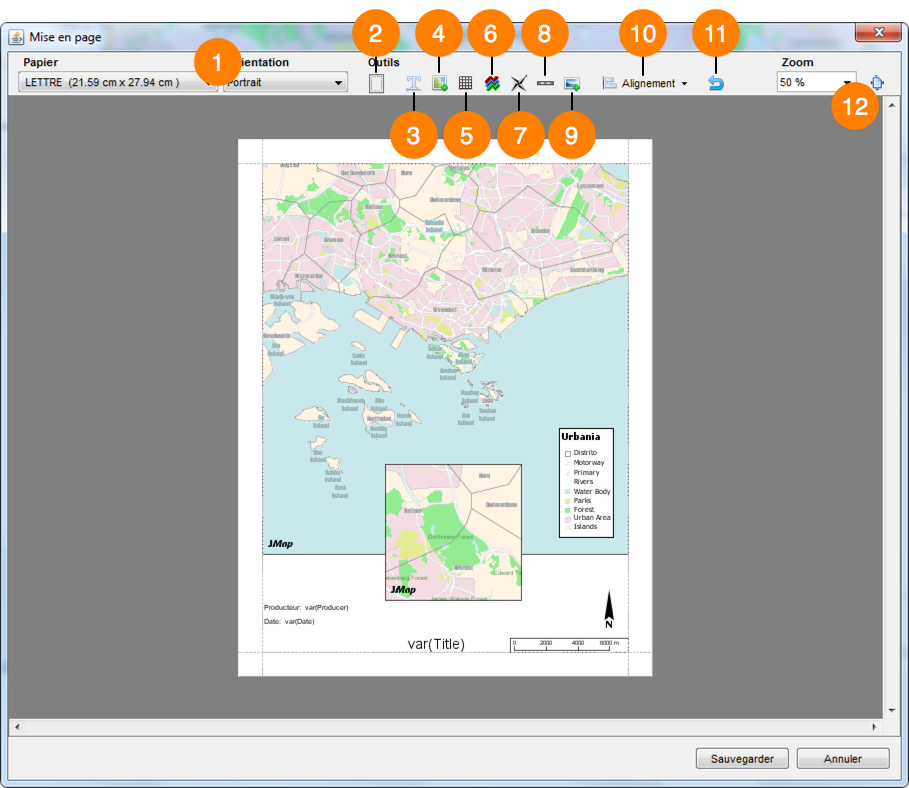
| 1 | Select the paper format and orientation of the layout. |
| 2 | Define the margins used in the layout. |
| 3 | Click on this button to add a text element on the page. The new element appears in the upper left corner of the page. Double-click on the text to modify its parameters (text, alignment, font, etc.). To insert a variable in the text, use the following syntax: var(name) , where name is the name of the variable. This function will be replaced by the value of the variable. |
| 4 | Click on this button to add an additional map on the page. By default, the map that is active when the print function is executed will be displayed in full size. However, all maps that are open in JMap Pro will also be available for the creation of the layout. When you add a map on the page, double-click on it to access its parameters window and select the map to display. For more information, refer to Map Printing Properties. |
| 5 | Click on this button to add a table on the page. Each cell of the table can contain text. Double-click on the table to access its parameters window. |
| 6 | Click on this button to add a legend on the page. The legend can be customized to display only the desired layers. Double-click on the legend to access its parameters window. |
| 7 | Click on this button to add a north arrow on the page. The arrow can be customized. Double-click on the arrow to access its parameters window. |
| 8 | Click on this button to add a graphic or textual scale on the page. Double-click on the scale to access its parameters window. |
| 9 | Click on this button to add an image on the page. You must choose an image by navigating through the file system of your computer. Double-click on the image to access its parameters window. |
| 10 | If you select one or more elements, this button allows you to align them to the page’s margins and place them in the page.If you select several elements, you can also align them in relation to each other. |
| 11 | Click on this button to reset the page setup. |
| 12 | You can adjust the zoom in the layout window to define the size of the page or click on  to adjust the page to the size of the window. to adjust the page to the size of the window. |
Double-clicking on the map displayed opens the Map Printing Properties window.