Editable Layers
Table of contents
Some layers allow for data editing, which includes adding, moving, modifying and deleting geometries as well as entering or modifying their attribute values and other data, using forms. This is the case if the JMap administrator has given you permission to modify the contents of one or more layers in a JMap project. Another case is when you use personal layers, which have been created by you or other users who have granted you editing privileges. In both cases, editing tools must be activated in the application.
Editing Data
Two tools allow you to create, modify or delete elements on an editable layer:
-
JMap’s Edition extension allows you to create new elements directly in a map-based interface and modify or delete them.
-
The elements explorer allows you modify attributes of existing elements or delete existing elements.
Editing data with the Edition extension
The JMap administrator included this extension in the JMap Pro application. The user manual of Edition extension, which can be accessed via your application’s help menu, provides more details about this extension’s functions.
If the edition tools are not visible, you can display them by selecting Edition in the View menu. The graphical user interface of the Edition extension is as follows:
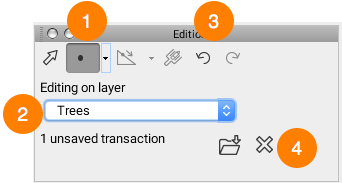
| 1 | Select the type of geometry you wish to create. Your selection must not be incompatible with the type of layer (e.g. you cannot create polygons on a layer of points). |
| 2 | Select the layer on which you wish to create elements. If several editable layers have been added to the project (including personal layers), they will all appear in this list. Note: The layer named Annotations is not a personal layer. It is a generic layer on which you can draw freely but it does not allow you to define attributes. |
| 3 | When you bring changes (add, modify, delete) to a personal layer, JMap stores the transactions that should be saved. Press  to save the layer transactions on the JMap server. to save the layer transactions on the JMap server.Press  to reject the transactions and cancel all changes on the layer. to reject the transactions and cancel all changes on the layer. |
| 4 | All editing operations can be canceled individually if they have not been saved. You can also restore canceled actions by clicking on the Redo arrow. |
Creating cartographic elements
To create new elements you must select the editable layer in the extension Edition window and then the type of geometry of the layer, as indicated in the previous table.
You can create the geometry of each element using the editing tools directly by clicking on the map at the desired position. This section of the user manual of Edition provides details on the subject.
When the geometry is created, the attribute entry form is displayed. You can enter the values of the attributes here. Some attributes are required. The form can only be closed when all the required attributes have been completed. The following section provides details on the forms.
Once you have created the items you should save them by pressing  in the Edition extension window.
Editing elements
You can change the location, geometry, or attributes of cartographic elements.
To change the location of an element, you need to select it with the edition selection tool  and move it to the new position.
To modify the geometry of an element, you must select it with the edition selection tool and use the tools to perform node operations of lines and polygons. This section of the user manual of Edition provides details on these operations.
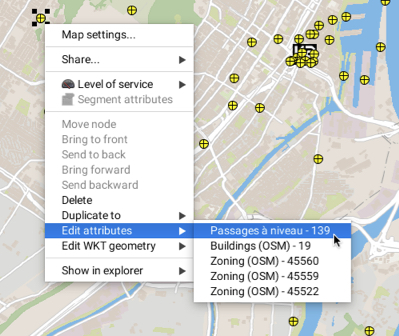
To modify the attributes of an element you must click on the element in the map with the right button in order to display the pop-up menu. Select the Edit attributes function and select the element you want to edit. Notice that all the elements of the editable layers that are in the place where you clicked are displayed.
The element attributes form displays and you can edit the editable fields.
If the form contains a relevant field, you can add photos (standard and 360 degrees) from your computer’s file system. You can also add a title and comments to photos that were entered using a JMap Survey application, or to photos that were uploaded as files in the forms of JMap Pro and JMap Web applications. To do this:
-
Open the form of the element you want to edit using the Edit attributes function in the pop-up menu. When the pointer moves over a photo, its name is displayed.
-
Double-click on a photo to open the metadata interface of the photo.
-
Click on
 to download the photo.
 -
Add or edit the Title of the photo.
-
Add or edit a Comment. Your comment can contain up to 255 characters.
-
Metadata of the photo can be included and you can modify its presentation format.
-
Press OK to close the data interface of the photo.
-
Press OK to close the form.
-
Save the changes in the interface of the Edition extension. You can see the new title in the element form.

-
You can view the changes in the element’s form and also in the mouseover bubble, if it has been configured to display the photo. To do so, double-click on the photo of your choice in the mouseover bubble to open the photo viewer. Note that the amount of photos to display in the mouseover bubble and their size can cause a delay in the display of the mouseover bubble. As 360 degree photos are large the delay in the display can be pronounced.

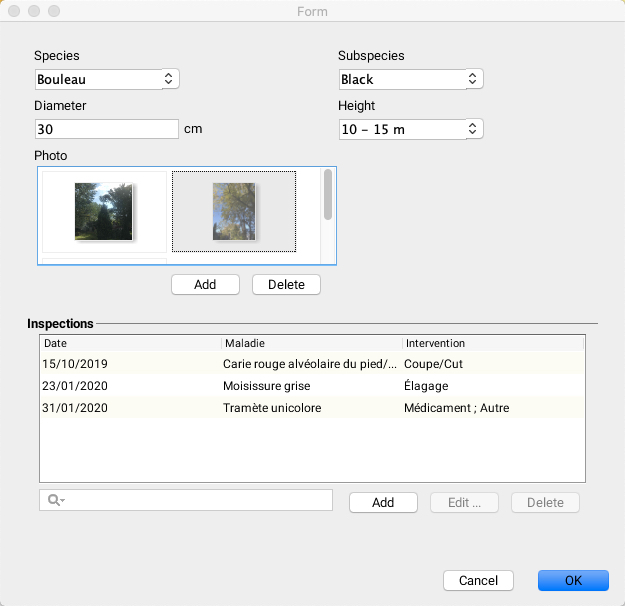
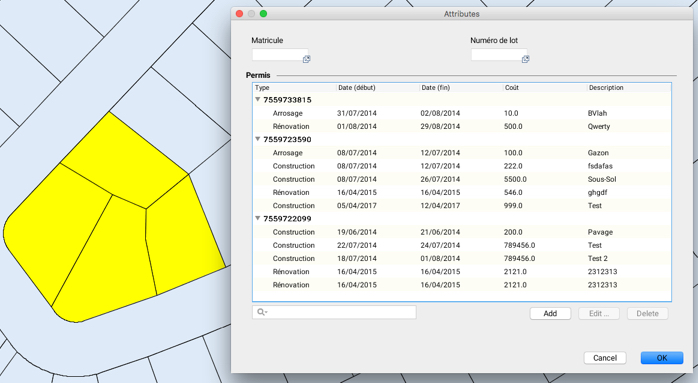
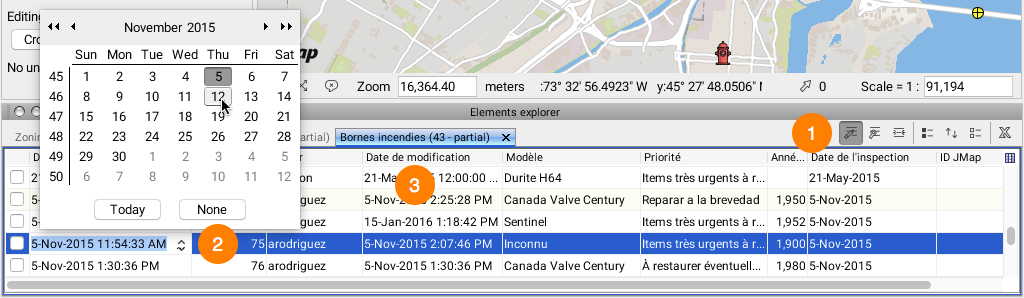
Forms can contain nested subforms. These may be used, for example, to enter information on the inspections performed for an element over time, as shown in the following image.
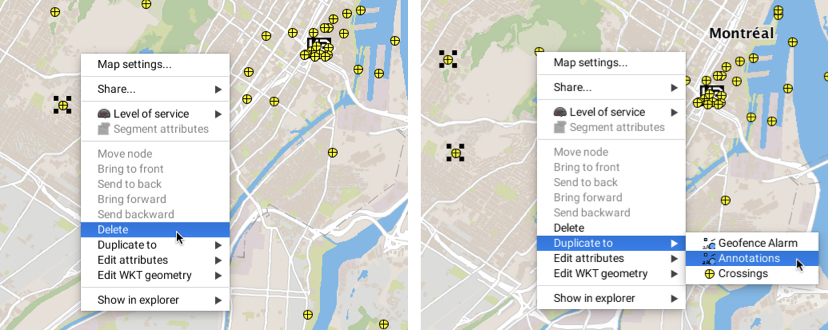
Duplicating and deleting elements
The pop-up menu offers editing tools for individual elements or for a selection of elements that you have made using the selection tools: you can delete the elements or you can duplicate them to another editable layer.
You must always save or cancel the transactions made in the extension Edition window for the changes to be saved.
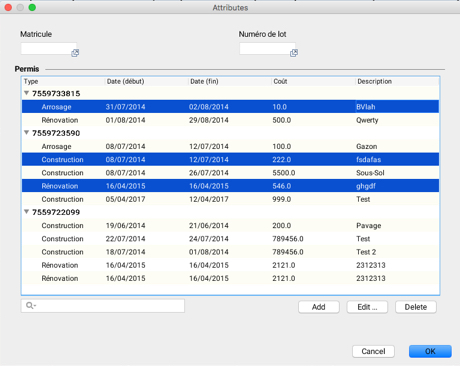
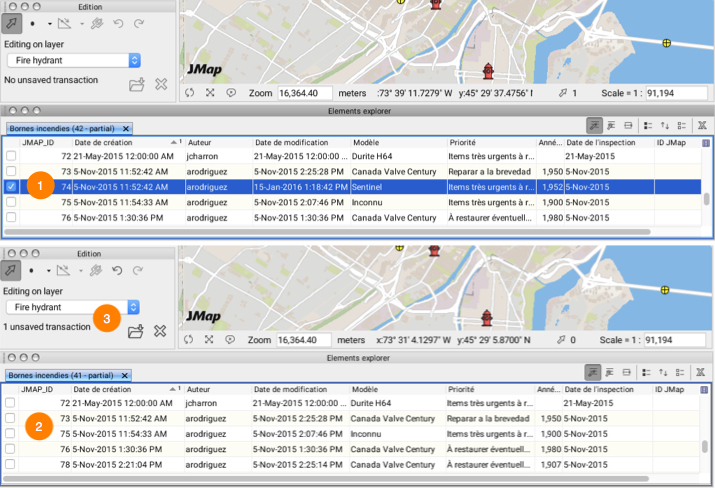
Batch editing the attributes of a set of elements
You can also batch edit the attributes of a selection of elements from certain layers. Indeed, when a layer contains forms with subforms, you can edit the attributes of the form or of a subform in batches, for a set of elements you have selected. In the case of subforms, editing includes adding new records as well as modifying or deleting existing records.
The following figure illustrates this process.
-
In the extension Edition window, select the layer you want to edit.
-
Select elements from the layer using the interactive selection tools.
-
Open the attributes form of the selected elements using the pop-up menu.
-
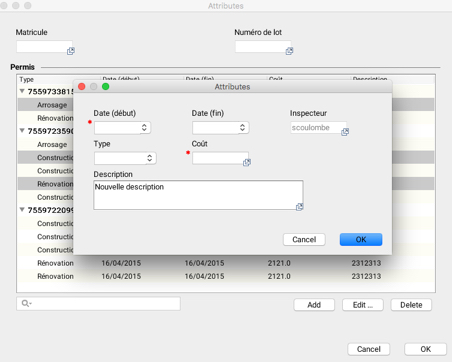
Select the subform records you wish to modify and press Edit…. The subform interface displays.
-
Modify the attribute values for the set of selected elements.
-
Press OK to close the subform.
-
Press Add to add a new record to the subform. The procedure is similar to that of editing existing records.
-
To delete recordings, select them and press Delete.
-
Save the transactions made in the extension Edition window. The number of transactions is equal to the number of modifications made (edition, addition or deletion) times the number of elements of the layer selected.
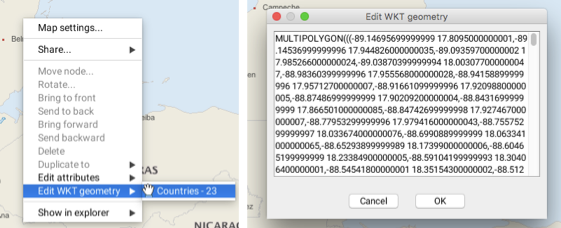
Editing elements in WKT format
The Edition extension also allows you to edit WKT elements. You can add WKT elements from Tools -> Add WKT geometry in the menu bar. A window opens, allowing you to enter the coordinates of the elements you want to add.
The elements are added in the Annotations layer. They can be saved in a context, where they can be selected and duplicated in other editable layers using the pop-up menu. This menu also allows you to delete elements and modify their vertical position.
The pop-up menu also allows you to edit WKT elements. The Edit WKT geometry function displays the elements of the layers found at the map point where the context menu is open. Select one of the elements to open the window containing the element’s coordinates and data. If you have the appropriate permissions, you can edit this data.
Editing Elements in the Elements Explorer
Element attribute values can be entered or modified directly in the elements explorer of an editable layer. Edit mode must be enabled by pressing  .
.
| 1 | Press to enable edit mode. In this mode, all modifiable attribute values can be entered or changed. Afterward, click on a field to change its value. Date fields display a calendar to facilitate data entry. Values that are entered are validated in order to ensure their compatibility with the attribute type.For more information on how to use the elements explorer, refer to Elements Explorer. |
| 2 | Click on a field to enter or modify the attribute value. |
| 3 | Some of the attributes that are displayed cannot be edited (Author, Creation Time, Modification Time, ID JMap). These are system attributes and their values are automatically set by JMap. |
Layer elements can also be deleted if Edit mode is enabled.
| 1 | Select the element you want to delete. Press Delete on your computer keyboard. |
| 2 | The element disappears from the elements explorer. |
| 3 | The transaction must be saved in the Edition extension’s window. |
Personal Layers
Personal layers are editable map data layers created by users. When you create a personal layer, you assign it a name, a type (point, line, polygon), a style, and a list of attributes. You can then begin to add map elements to it by drawing them using JMap’s editing tools. You can also enter values for the layer’s element attributes. Personal layers can be shared between users; various access levels can be defined for these purposes.
The personal layer management interface shows you a list of the personal layers you can access. These layers may have been created by you or by other users who shared them with you. This window can be accessed through the Project -> Personal layers… menu or by pressing CTRL+L.
Note: Special privileges are required to create personal layers. Contact your JMap administrator for more information.
The personal layer management interface is as follows:
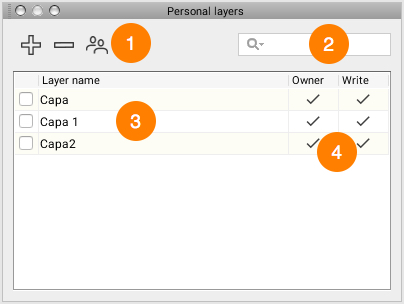
| 1 | Click on  to create a new personal layer. to create a new personal layer.Click on  to erase the selected personal layer. to erase the selected personal layer.Click on  to share the selected personal layer. to share the selected personal layer. |
| 2 | The filter field allows you to filter the list of personal layers; to do so, type a few letters of the names of the layers you wish to retrieve. |
| 3 | Layers that are checked are added to the project’s layers. Personal layers can be added to a project or removed from it at any time. |
| 4 | This section displays your access privileges in relation to the project’s various personal layers. Keep in mind that the Read permission, which allows you to display data, is implied for all of the personal layers you have access to. Owner: This permission indicates that you are the owner of the layer, which allows you to modify or delete it. In addition, being the owner of a layer allows you to share it with other users. Note that the Owner permission automatically gives you Write permission. Write: This permission allows you to add, modify, and delete elements on the layer. You can also modify the values of element attributes. |
Creating and Modifying a Personal Layer
This is the interface for creating and modifying personal layers:
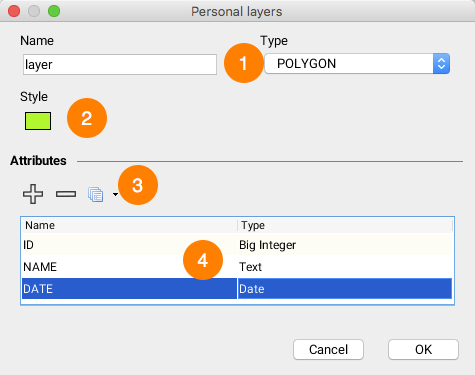
| 1 | Name: Enter the name of the layer. Names do not have to be unique, but we recommend using names that have meaning; spaces can be used in the names. Type: Indicate which type of elements (point, line or polygon) the layer will contain. |
| 2 | Press this button to configure the style of layer elements. |
| 3 | You can define a list of attributes for the layer. The values of these attributes can be entered using a form or the elements explorer. Press to add an attribute to the personal layer.Press to remove an attribute from the personal layer.If needed, press  and select a layer to copy the attributes list of an existing layer. and select a layer to copy the attributes list of an existing layer. |
| 4 | This table presents the list of attributes defined for the personal layer. When adding a new attribute, you can enter its name and the type of data it will contain. Note: It is impossible to change the name and type of an existing attribute. |
Sharing Personal Layers
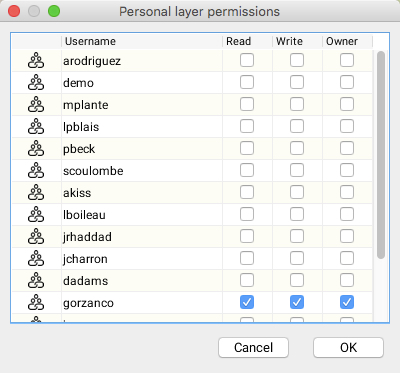
Personal layers can be shared with other users according to various access levels. The following permissions are available.
| Permissions | |
|---|---|
| Read | Allows the user to add the layer to his or her project and display its data on the map. |
| Write | A user who has this access privilege automatically inherits the read permission. In addition, the user can create, modify, and delete the personal layer’s geometric and descriptive data (attributes). |
| Owner | A user who has this permission automatically inherits read and write permissions. In addition, the user can modify the personal layer’s settings, delete it or share it with other users. |
In order to share a personal layer, click on the Share icon in the personal layer management window. The following window appears and shows the list of users, allowing you to define permissions for each one.