Drawing Annotations on the Map
Table of contents
- Drawing freehand
- Inserting text
- Drawing points
- Drawing lines
- Drawing rectangles
- Drawing polygons
- Drawing circles
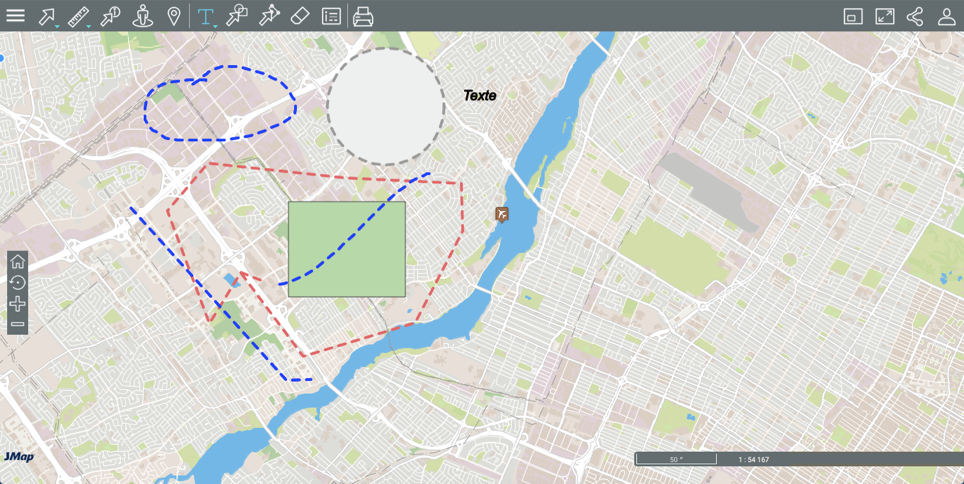
This tool allows you to draw annotations on the map. Your annotations can be saved in PDF format with the map.
To enable the annotation tools:
-
Click on
 Annotations to display the drop-down menu.
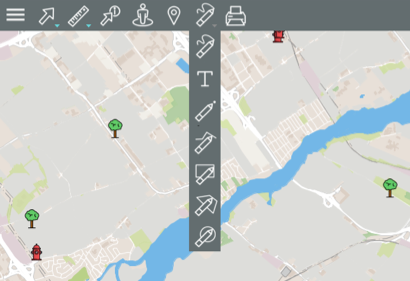

Allows you to add freehand drawings on the map. 
Allows you to add text on the map. 
Allows you to add points on the map. 
Allows you to add lines on the map. 
Allows you to add rectangles on the map. 
Allows you to add polygons on the map. 
Allows you to add circles on the map. -
To add annotations on the map, select the type of drawing you wish to add by clicking on the appropriate icon. The icon turns blue, indicating that the function is enabled. Drawing tools are displayed on the menu bar.
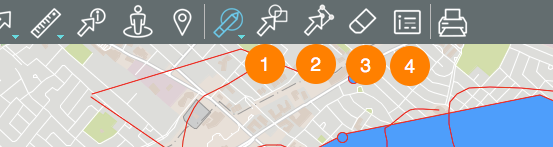
| 1 | Tool to select annotations (lines, polygons, etc.). 1. Click on the icon to activate the tool. 2. Click on an annotation to select it. By holding down the SHIFT key you can add other annotations to the selection. The blue line indicates the selected annotations. 3. Move the pointer to one of the selected annotations. The pointer adopts the shape of a hand  . . 4. Click and hold down the button (or your finger) to move your selection. 5. Drop it at the desired place. 6. Click the map interface to deselect annotations. 7. Click on the icon  to disable the function. to disable the function. |
| 2 | Tool to move the points of an annotation (except points). 1. Click on the icon to activate the tool. Two buttons appear, allowing you to rotate left or right. 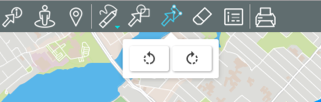 2. Click on a drawing to select it. A blue dot appears where you place the pointer. 3. While holding down the button, move the blue dot. 4. Release the button to drop the blue dot to the desired location. 5. Click  to rotate the annotation to the left or to rotate the annotation to the left or  to rotate to the right. to rotate to the right.6. Click the map interface to deselect the annotation. 7. Click on the icon  to disable the function. to disable the function. |
| 3 | Tool to erase annotations. If you made a selection, only the annotations composing the selection are erased. If no annotation is selected, all annotations are erased. A message allows you to validate your intention. |
| 4 | Tool to select the style of drawings and texts. 1. Click the icon to open the drawing style and text style interface.  2. Click the Fill box and the Line box to set the color of lines and rectangles, polygons, and circles. 3. Determine the thickness of the lines. 4. Select the style of the lines (the choices are Normal and Line dash). 5. Select the size of the text font. 6. Click the Text box to select the text color. 7. Check Bold and/or Italic if you want to give these characteristics to the texts. 8. Click the icon to close the style interface. |
Drawing freehand
-
In the drawing menu, click on
to draw freehand lines. -
Click on a point and drag the cursor or the finger to draw the lines.
-
Click on
to disable the function or click on another icon to change the type of annotation.
Inserting text
-
In the drawing menu, click on
to insert text. -
Click where you want to insert the text. An interface appears to register the content.
-
Press Enter to close the interface and display the text.
-
Click on
to disable the function or click on another icon to change the type of annotation.
Drawing points
-
In the drawing menu, click on
 to draw points.
 -
Each click on the map area adds one point.
-
Click on
to disable the function or click on another icon to change the type of annotation.
Drawing lines
-
In the drawing menu, click on
 to draw lines.
 -
Click once to start the line.
-
Click to insert nodes in the line.
-
Double-click to finish the line.
-
Click on
to disable the function or click on another icon to change the type of annotation.
Drawing rectangles
-
In the drawing menu, click on
 to draw rectangles.
 -
Click once to draw the first point.
-
Click a second time to draw the opposite point of the rectangle.
-
Click on
to disable the function or click on another icon to change the type of annotation.
Drawing polygons
-
In the drawing menu, click on
 to draw polygons.
 -
Click once to start the polygon.
-
Click to insert vertices in the polygon.
-
Double-click to finish the polygon.
-
Click on
to disable the function or click on another icon to change the type of annotation.
Drawing circles
-
In the drawing menu, click on
to draw circles. -
Click once to establish the center of the circle.
-
Drag the cursor to draw the circle.
-
Click on
to disable the function or click on another icon to change the type of annotation.
Annotations will remain on the map until the end of the session or until you erase them.