Exporting a Map
You can export the map in different formats to print it or insert it in various documents. The tools to configure the map for this purpose are found in the Export the map panel.
The Export the map panel
The Export the map panel contains the tools to configure the map.
-
Click on
 to open the Export the map panel. The icon changes color
  .
.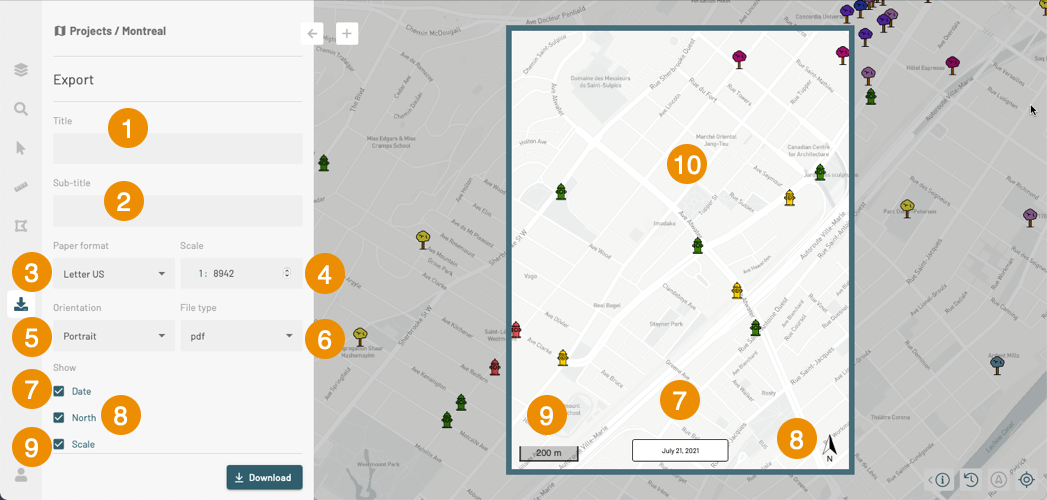
1 Title
Enter the title of the map. The title will appear in the map as you type it.2 Subtitle
Enter a subtitle for the map. It will appear in the map as you type it.3 Paper format
In the drop-down list, select the paper format of the map. The different formats are shown in the data frame in real time.4 Scale
Enter a scale. The map displays the chosen scale in real time.
You can change the scale of the map directly in the map interface. The Scale field displays the scale values.5 Orientation
In the drop-down list, select the paper orientation: Portrait or Landscape. The map displays the selected option in real time.6 File type
In the drop-down list, select the type of file to which you want to export the map: png, jpeg, or pdf.7 Date
Select this option to display the date in the map.8 North
Select this option to display the north arrow in the map.9 Scale
Select this option to display the bar scale in the map.10 The data frame displayed in the center of the map interface represents the layout that will be exported. It is fixed, and its shape and dimensions vary based on the selected paper format and orientation. -
Slide the map in order to have the area you wish to export displayed in the data frame.
-
Click Download to export the map into a file of the selected format.