Selecting Elements in the Map
Table of contents
You can interactively select map elements that belong to one or more layers using the selection tools. After doing this, you can view the attributes of the selected elements and export the data in various formats.
The selection tools are found in the Selection panel.
To select elements in layers, you must first make these selectable. For detailed steps on how to do this, refer to Making layer elements selectable.
The Selection panel
The Selection panel contains the selection tools that are available in the application.
-
Click on
 to open the Selection panel. The icon changes color
  .
.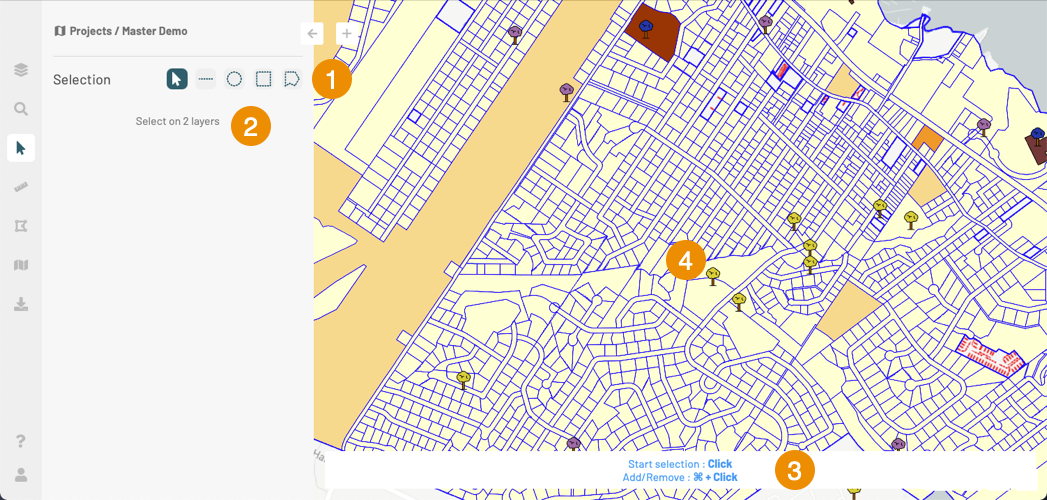
1 Selection tools. 2 The legend indicates the number of layers with elements that are selectable. 3 Directions to help you make an interactive selection. 4 The map displays the layers whose elements are selectable. -
Select the tool of your choice by clicking on it. The tool’s icon changes color. The Interactive selection tools section explains the features of these tools and how to use them.
-
Select elements in the map. You can select elements from all selectable layers at once.
-
To add elements to your selection, using the same tool or a different one, press and hold the ⌘ key on a Mac or the Ctrl key on a PC. The instructions at the bottom of the screen indicate how to add or remove elements in your selection.
The Selection results section provides details on how to use the application’s tools to work with the selected elements.
Interactive selection tools
Several tools are available to select elements:
| Icon | |
|---|---|
 | Point selection Allows you to select one element at a time by clicking on each one. 1. Click on an element to select it. 2. To add another element to your selection, press and hold the ⌘ key on a Mac or the Ctrl key on a PC. 3. When holding down the ⌘ or Ctrl key, you can click on a new element to add it to the selection, or click on one of the selected elements to remove it from the selection. As you select elements, their information is displayed in the Selection panel. |
 | Line selection Allows you to select one or many elements by drawing a line. All elements that are on the line’s path will be selected. Note: this option does not work with layers of points. 1. Click on the map once to indicate where the line starts. 2. Slide the mouse pointer to draw the line. 3. Double-click or press the space bar to complete the line. If you draw another line, the elements selected with the first line will be unselected. The data of the selected elements is displayed in the Selection panel. |
 | Circular selection Allows you to select one or more elements by drawing a circle. All elements that are entirely or partially included in the circle are selected. 1. Click once on the map to define the center of the circle. 2. Slide the mouse pointer to define the radius of the circle. 3. Click again or press the space bar to complete the circle. If you draw another circle, the elements selected with the first circle will be unselected. The data of the selected elements is displayed in the Selection panel. |
 | Rectangular selection Allows you to select one or more elements by drawing a rectangle. All elements that are entirely or partially included in the rectangle are selected. 1. Click once to define one of the vertices of the rectangle. 2. Slide the mouse pointer to define the rectangle. 3. Click again to define the opposite vertex of the rectangle. If you draw a new rectangle, the elements selected with the first rectangle will be unselected. The data of the selected elements is displayed in the Selection panel. |
 | Polygonal selection Allows you to select one or more elements by drawing a polygon. All elements that are entirely or partially included in the polygon are selected. 1. Click to define the first vertex of the polygon. 2. Click to define the following points that form the polygon. 3. Double-click or press the space bar to complete the polygon. If you draw a new polygon, the elements selected with the first polygon will be unselected. The data of the selected elements is displayed in the Selection panel. |
Selection results
The results are displayed in the Selection panel and in the map.
The selected elements will remain selected until they are unselected or until their layer is no longer selectable.

| 1 | The selected map objects or elements are indicated in yellow on the map. If you click on an element with the point selection tool enabled, the element remains selected and the other elements are unselected. |
| 2 | Selection tools. |
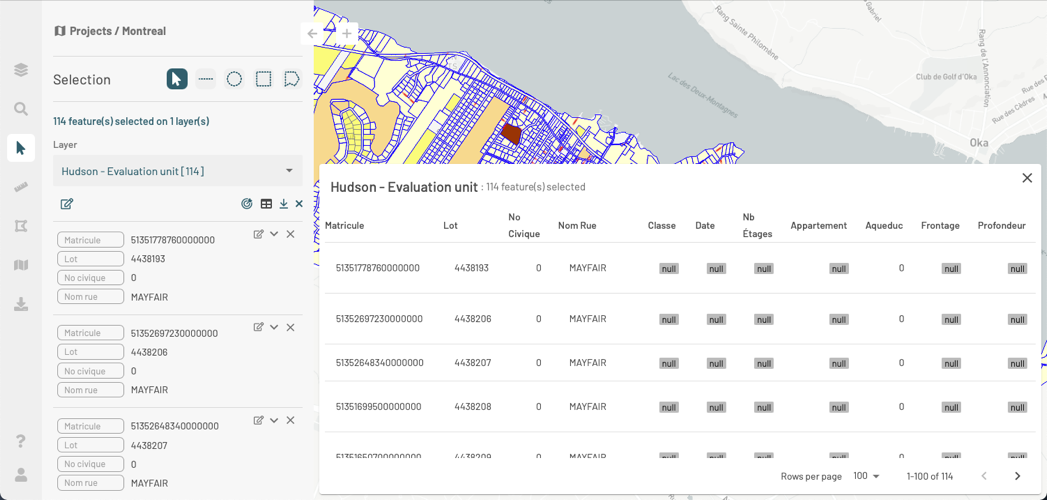
| 3 | This legend indicates the number of selected elements and the number of layers to which they belong. |
| 4 | Layer Select the layer for which you want to display the cards of selected elements, view the data table, export the data to an Excel file or unselect elements. These operations will only apply to the layer you choose. The name of each layer is accompanied by the number of selected elements. |
| 5 | Several tools allow you to work with the elements selected from the layer you indicated in the Layer field: 1. Click on  to modify the selected elements. Refers to the section Editing Data for details about this topic. to modify the selected elements. Refers to the section Editing Data for details about this topic.2. Click on  to place all of the layer’s selected elements in the center of the map. If the scale changes, it is possible that the layer will no longer be visible. to place all of the layer’s selected elements in the center of the map. If the scale changes, it is possible that the layer will no longer be visible. 2. Click on  to open a table displaying the attribute data of the selected elements. The icon will darken. The Data table section presents the details of this table. to open a table displaying the attribute data of the selected elements. The icon will darken. The Data table section presents the details of this table.3. Click on to close the data table.4. Click on  to download an Excel file containing the attributes of all selected elements. to download an Excel file containing the attributes of all selected elements.5. Click on  to unselect the layer elements. The elements selected from other layers will remain selected. to unselect the layer elements. The elements selected from other layers will remain selected. |
| 6 | For each selected element, a card displays the attribute values: 1. You can browse through the list of cards. There is one card for each selected element. 2. Click on an element’s card to place that element in the center of the map. Click on  to return to the previous view of the map. to return to the previous view of the map.3. Click on 4. Click on 5. Click on  to edit the element. Refers to the section Editing Data for details about this topic. to edit the element. Refers to the section Editing Data for details about this topic. 6. Click on  to unselect the element. The other elements remain selected. to unselect the element. The other elements remain selected. |
| 7 | Instructions to help you select elements on the map. If you use the method described here, the elements selected using the search will be unselected. |
Data table
The data table displays the attribute values of the selected elements in tabular form. The elements are listed in the tables lines, and their attributes are shown in the columns.
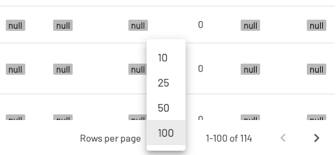
You can select the number of elements (or lines) to display on each page:
-
Click on Rows per page to display the options.
-
Select the desired option. The table will adjust to your choice.
-
Use the arrows to browse through the pages in the table.
You can sort the elements based on the values of a given attribute:
-
Hover the mouse pointer over the header of the column corresponding to the attribute you want to use to sort the data. An arrow
 displays next to the name of the attribute.
 -
Click on the arrow
to enable sorting. The arrow darkens  and the elements are sorted in ascending order, based on their value for that attribute.
 -
Click again to change the order. The arrow changes to
 and the elements are sorted in descending order.
You can also use the table to navigate between the selected elements:
-
Click on the line of an element in the table. That element is placed in the center of the map.
-
Click on
to return to the previous view.
Lastly, click on  to close the table. The elements remain selected.